
Manual
Page 1
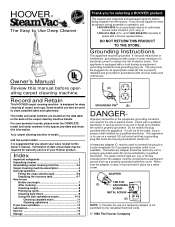
...not fit the outlet, have a problem 12 Lubrication 12 Service 12 Storage 12 Thank you attach your personal records, please enter the COMPLETE model and serial numbers in doubt as a properly grounded outlet box cover. The temporary adapter should be used only until a properly grounded outlet ...in accordance with a qualified electrician or service person if you have a proper outlet installed by the Canadian Electrical Code. © 1993 The Hoover Company 1 The green colored rigid ear, lug, or the like the plug illustrated in the risk of purchase may be grounded. Improper ...
...not fit the outlet, have a problem 12 Lubrication 12 Service 12 Storage 12 Thank you attach your personal records, please enter the COMPLETE model and serial numbers in doubt as a properly grounded outlet box cover. The temporary adapter should be used only until a properly grounded outlet ...in accordance with a qualified electrician or service person if you have a proper outlet installed by the Canadian Electrical Code. © 1993 The Hoover Company 1 The green colored rigid ear, lug, or the like the plug illustrated in the risk of purchase may be grounded. Improper ...
Manual
Page 2
... away from electrical outlet before unplugging. • Always disconnect cord from heated surfaces. • Do not use with any concerns about your local Hoover Factory Service Center or in reducing drying time, be present. • Do not pick up hard, sharp objects with damaged cord or plug.... call: 1-800-944-9200 for its use at any other toxic material with this machine. • Keep detergents and other cleaners with some models. Remove and dispose of body away from the carton and identify the parts shown. They may be certain the area is not recommended. Nuts ...
... away from electrical outlet before unplugging. • Always disconnect cord from heated surfaces. • Do not use with any concerns about your local Hoover Factory Service Center or in reducing drying time, be present. • Do not pick up hard, sharp objects with damaged cord or plug.... call: 1-800-944-9200 for its use at any other toxic material with this machine. • Keep detergents and other cleaners with some models. Remove and dispose of body away from the carton and identify the parts shown. They may be certain the area is not recommended. Nuts ...
Manual
Page 3
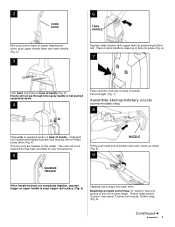
...on front of handle (Fig. 3). Hold each nut in place while tightening each other. Pull cord tight. (Fig. 7) Assemble stair/upholstery nozzle (some models only) 8 Place nuts in place. (Fig. 5) Separate hose straps from nozzle. Stretch strap around "suction" hose about 3 inches from each bolt securely...5 NOZZLE Firmly push small end of solution tube onto nozzle as shown (Fig. 8) 9 SQUEEZE TRIGGER When handle sections are needed on this model. Only two nuts are completely together, squeeze trigger on upper handle to snap trigger rod in recessed areas on back of handle. Continued §...
...on front of handle (Fig. 3). Hold each nut in place while tightening each other. Pull cord tight. (Fig. 7) Assemble stair/upholstery nozzle (some models only) 8 Place nuts in place. (Fig. 5) Separate hose straps from nozzle. Stretch strap around "suction" hose about 3 inches from each bolt securely...5 NOZZLE Firmly push small end of solution tube onto nozzle as shown (Fig. 8) 9 SQUEEZE TRIGGER When handle sections are needed on this model. Only two nuts are completely together, squeeze trigger on upper handle to snap trigger rod in recessed areas on back of handle. Continued §...
Manual
Page 4
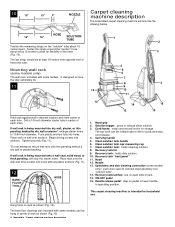
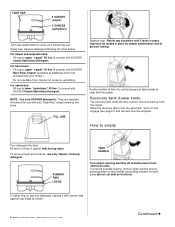
...2. Clean solution tank cap/ measuring cup 7. Clean solution tank: holds cleaning solution. 8. Recovery tank lid 9. Upholstery and stair cleaning connection (some models, is being mounted into holes. ON/OFF pedal 16. Handle release pedal: step on pedal to lower handle to mount wall rack onto thin paneling...mark. Drill a 1/8-inch diameter starter hole in desired location and mark center of tank. 15. The bare floor cleaning tool (included with some models only): push door open to store 7 the stair/upholstery kit. 8 3 11 9 14 10 11 13 14 16 12 15 Hold rack against...
...2. Clean solution tank cap/ measuring cup 7. Clean solution tank: holds cleaning solution. 8. Recovery tank lid 9. Upholstery and stair cleaning connection (some models, is being mounted into holes. ON/OFF pedal 16. Handle release pedal: step on pedal to lower handle to mount wall rack onto thin paneling...mark. Drill a 1/8-inch diameter starter hole in desired location and mark center of tank. 15. The bare floor cleaning tool (included with some models only): push door open to store 7 the stair/upholstery kit. 8 3 11 9 14 10 11 13 14 16 12 15 Hold rack against...
Manual
Page 6
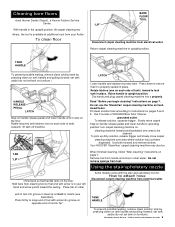
For bare floors: Fill cap to upper "carpet" fill line (5 ounces) with HOOVER Bare Floor Cleaner (available at additional cost if not included with your model.) Do not use with your 'SteamVac' carpet cleaning machine. Cap must be locked in place. How to prevent leaking. Using cap..., measure detergent following the chart below. NOTE: Use only HOOVER detergents. RUBBER RING LEDGE TANK HANDLE Turn ...
For bare floors: Fill cap to upper "carpet" fill line (5 ounces) with HOOVER Bare Floor Cleaner (available at additional cost if not included with your model.) Do not use with your 'SteamVac' carpet cleaning machine. Cap must be locked in place. How to prevent leaking. Using cap..., measure detergent following the chart below. NOTE: Use only HOOVER detergents. RUBBER RING LEDGE TANK HANDLE Turn ...
Manual
Page 7
... pages 5 and 6. Use your 'SteamVac' carpet cleaning machine to pick up furniture skirts and draperies. If your model. In a small, hidden area, gently rub the surface with HOOVER® PreCleaner* - Wait ten minutes and check for instructions on page 10. For furniture too heavy to protect ...wood or metal surfaces from all colors. Use your HOOVER 'SteamVac' cleaning machine only if the upholstery fabric is removed; Do not saturate carpet or upholstery with white paper towel or cloth. f....
... pages 5 and 6. Use your 'SteamVac' carpet cleaning machine to pick up furniture skirts and draperies. If your model. In a small, hidden area, gently rub the surface with HOOVER® PreCleaner* - Wait ten minutes and check for instructions on page 10. For furniture too heavy to protect ...wood or metal surfaces from all colors. Use your HOOVER 'SteamVac' cleaning machine only if the upholstery fabric is removed; Do not saturate carpet or upholstery with white paper towel or cloth. f....
Manual
Page 9
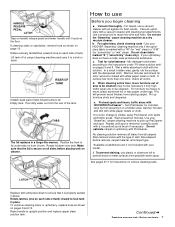
...where solution has just been dispersed. Do not remove sponge from electrical outlet. end of tank) outward; Using the stair/upholstery nozzle Some models come with arrow is properly seated in clear lip on each side of nozzle (see illustration). LATCH Lower handle and replace recovery tank. Place... with the stair and upholstery tool kit. Use both forward and reverse strokes. Return carpet cleaning machine to upright position. Your HOOVER 'SteamVac' carpet cleaning machine may also be cleaned. Hold bare floor cleaning tool so that it rests on opposite end of...
...where solution has just been dispersed. Do not remove sponge from electrical outlet. end of tank) outward; Using the stair/upholstery nozzle Some models come with arrow is properly seated in clear lip on each side of nozzle (see illustration). LATCH Lower handle and replace recovery tank. Place... with the stair and upholstery tool kit. Use both forward and reverse strokes. Return carpet cleaning machine to upright position. Your HOOVER 'SteamVac' carpet cleaning machine may also be cleaned. Hold bare floor cleaning tool so that it rests on opposite end of...
Manual
Page 12
.... 4. Clean solution won 't connect 1. Solution tube on correctly. Storage Before storing: • Empty solution tank and rinse thoroughly with clean water. In Canada, contact Hoover Canada, Burlington, Ontario L7R 4A8, Phone: 1-800-263-6376. Recovery tank lid not on pushed forward. connector by : • checking the Yellow Pages under "Vacuum...is firmly in . 2. The addition of deep cleaner to motor bearings. Do not send your cleaner to instructions for your cleaner by the complete model number when requesting information or ordering parts. (The...
.... 4. Clean solution won 't connect 1. Solution tube on correctly. Storage Before storing: • Empty solution tank and rinse thoroughly with clean water. In Canada, contact Hoover Canada, Burlington, Ontario L7R 4A8, Phone: 1-800-263-6376. Recovery tank lid not on pushed forward. connector by : • checking the Yellow Pages under "Vacuum...is firmly in . 2. The addition of deep cleaner to motor bearings. Do not send your cleaner to instructions for your cleaner by the complete model number when requesting information or ordering parts. (The...


