
Manual
Page 6
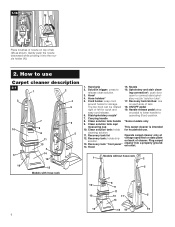
... of tab (M) as shown. Stair/upholstery nozzle* operating (floor) position. 7. Recovery tank lid Operate carpet cleaner only at 12. Recovery tank "front panel" 14. Hand grip 15. ing connection*: push door 3. Hose holders* stery nozzle "solution tube". 5. Handle release pedal: step easy cord release. Recovery tank: holds dirty voltage specified on back of cleaner. release clean solution...
... of tab (M) as shown. Stair/upholstery nozzle* operating (floor) position. 7. Recovery tank lid Operate carpet cleaner only at 12. Recovery tank "front panel" 14. Hand grip 15. ing connection*: push door 3. Hose holders* stery nozzle "solution tube". 5. Handle release pedal: step easy cord release. Recovery tank: holds dirty voltage specified on back of cleaner. release clean solution...
Manual
Page 12
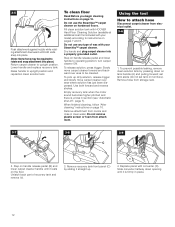
... pick up . 4. Do not use any type of recovery tank and remove lid. 3. Slowly move carpet cleaner over area to operating position; Remove attachment from electrical outlet. 3-6 A 1. Remove recovery tank front panel (C) by pressing down opening until it is a loss...B 2. Remove hose from attachment. Lower handle and replace recovery tank. Fill clean solution tank with HOOVER Hard Floor Cleaning Solution (available at additional cost if not included with your SteamVac™ carpet cleaner. Empty recovery tank when the motor sound becomes higher pitched and there is ...
... pick up . 4. Do not use any type of recovery tank and remove lid. 3. Slowly move carpet cleaner over area to operating position; Remove attachment from electrical outlet. 3-6 A 1. Remove recovery tank front panel (C) by pressing down opening until it is a loss...B 2. Remove hose from attachment. Lower handle and replace recovery tank. Fill clean solution tank with HOOVER Hard Floor Cleaning Solution (available at additional cost if not included with your SteamVac™ carpet cleaner. Empty recovery tank when the motor sound becomes higher pitched and there is ...
Manual
Page 13
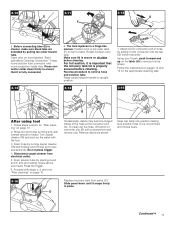
... water with a screwdriver and remove clip. For full suction, it snaps firmly in place. H 1. Attach tool to ensure that the recovery tank lid is not pinched and moves freely. 3-16 Replace recovery tank front panel (D). Drain hose by turning carpet cleaner ON and holding end of hose by pulling tan collar toward tube. Occasionally, debris...
... water with a screwdriver and remove clip. For full suction, it snaps firmly in place. H 1. Attach tool to ensure that the recovery tank lid is not pinched and moves freely. 3-16 Replace recovery tank front panel (D). Drain hose by turning carpet cleaner ON and holding end of hose by pulling tan collar toward tube. Occasionally, debris...
Manual
Page 15
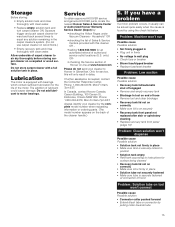
... cleaner with clean water. • Replace empty solution tank and turn carpet cleaner ON. Service To obtain approved HOOVER service and genuine HOOVER parts, locate the nearest Hoover Sales & Service Center or Authorized Hoover Warranty Service Dealer (Depot) by using the check list... hose • Remove tool and clear blockage • Recovery tank lid not on correctly • Make sure lid is on securely • Recovery tank front panel not replaced after stair or upholstery cleaning • Replace recovery tank front panel (page 13) Problem: Clean solution won 't connect Possible...
... cleaner with clean water. • Replace empty solution tank and turn carpet cleaner ON. Service To obtain approved HOOVER service and genuine HOOVER parts, locate the nearest Hoover Sales & Service Center or Authorized Hoover Warranty Service Dealer (Depot) by using the check list... hose • Remove tool and clear blockage • Recovery tank lid not on correctly • Make sure lid is on securely • Recovery tank front panel not replaced after stair or upholstery cleaning • Replace recovery tank front panel (page 13) Problem: Clean solution won 't connect Possible...


