Manual
Page 3
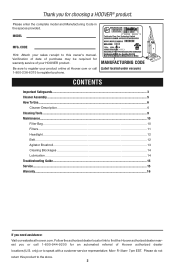
... located under vacuum) Contents Important Safeguards...3 Cleaner Assembly...5 How To Use...6 Cleaner Description 6 Cleaning Tools...9 Maintenance...10 Filter Bag...10 Filters...11 Headlight...12 Belt...12 Agitator Brushroll 13 Clearing Blockages 14 Lubrication...14 Troubleshooting Guide...15 Service...15 Warranty...16 If you need assistance: Visit our website at Hoover.com or call...
... located under vacuum) Contents Important Safeguards...3 Cleaner Assembly...5 How To Use...6 Cleaner Description 6 Cleaning Tools...9 Maintenance...10 Filter Bag...10 Filters...11 Headlight...12 Belt...12 Agitator Brushroll 13 Clearing Blockages 14 Lubrication...14 Troubleshooting Guide...15 Service...15 Warranty...16 If you need assistance: Visit our website at Hoover.com or call...

Manual
Page 6
...near children. Do not place product on cord. Brushroll continues to rotate when in the upright position. • Turn off all parts of body away from openings and moving parts. Do...THE RISK OF FIRE, ELECTRIC SHOCK OR INJURY: • Fully assemble before operating. • Operate vacuum only at bottom of cleaner. • Do not leave appliance when plugged in. Not intended for ... loose clothing, fingers, and all controls before cleaning or servicing. • Do not use without Dust bag and Filters in place. • WARNING: This product contains chemicals known to the State of dust, ...
...near children. Do not place product on cord. Brushroll continues to rotate when in the upright position. • Turn off all parts of body away from openings and moving parts. Do...THE RISK OF FIRE, ELECTRIC SHOCK OR INJURY: • Fully assemble before operating. • Operate vacuum only at bottom of cleaner. • Do not leave appliance when plugged in. Not intended for ... loose clothing, fingers, and all controls before cleaning or servicing. • Do not use without Dust bag and Filters in place. • WARNING: This product contains chemicals known to the State of dust, ...
Manual
Page 10
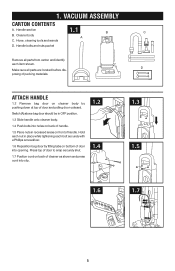
... 1.3 1.5 1.6 1.7 5 Hose, cleaning tools and wands D. Switch (A) above bag door should be in place while tightening each item shown. Handle bolts and nuts packet Remove all parts are located before dis- Vacuum ASSEMBLY Carton contents A. Cleaner body 1.1 B A C C. Make sure all parts... from carton and identify each bolt securely with a Phillips screwdriver. 1.6 Reposition bag door by pushing down at top of packing ...
... 1.3 1.5 1.6 1.7 5 Hose, cleaning tools and wands D. Switch (A) above bag door should be in place while tightening each item shown. Handle bolts and nuts packet Remove all parts are located before dis- Vacuum ASSEMBLY Carton contents A. Cleaner body 1.1 B A C C. Make sure all parts... from carton and identify each bolt securely with a Phillips screwdriver. 1.6 Reposition bag door by pushing down at top of packing ...
Manual
Page 11
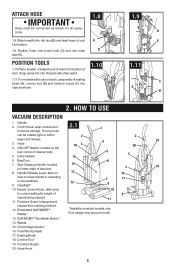
...located 14 on lower edge of rack. Handle Release Lever: step on select models only. DirtFINDER™ Sensitivity Switch* 14. HOW TO USE Vacuum Description 1. Headlight* 7 17 9 10. Furniture Guard: helps prevent cleaner from marking furniture 12. Crevice Tool* 19. Hose Hook 6 ... lever to lower handle to operating or low positions 12 9. Position tools 1.10 Place smaller unridged end of wand into bottom of bag door 8. Bag Door 7. Final Filter Exhaust 17. ON/OFF Switch: located on back, snap ends of dusting brush (A), crevice tool (B) and...
...located 14 on lower edge of rack. Handle Release Lever: step on select models only. DirtFINDER™ Sensitivity Switch* 14. HOW TO USE Vacuum Description 1. Headlight* 7 17 9 10. Furniture Guard: helps prevent cleaner from marking furniture 12. Crevice Tool* 19. Hose Hook 6 ... lever to lower handle to operating or low positions 12 9. Position tools 1.10 Place smaller unridged end of wand into bottom of bag door 8. Bag Door 7. Final Filter Exhaust 17. ON/OFF Switch: located on back, snap ends of dusting brush (A), crevice tool (B) and...

Manual
Page 14
... ON, push switch (A) toward back of cleaner. 2.2 A Handle positions The handle of your cleaner has three positions; upright for reaching under low furniture. To increase the feature's sensitivity to dirt, set the switch to the "Reg" (Regular...front of carpet that may need more AB cleaning attention. To let you should take additional cleaning strokes in upright position, tilt cleaner back on rear wheels and push forward. 2.5 Embedded DirtFINDER™ (Available on ...., you know that a larger amount of the way while vacuuming, position cord down into electrical outlet.
... ON, push switch (A) toward back of cleaner. 2.2 A Handle positions The handle of your cleaner has three positions; upright for reaching under low furniture. To increase the feature's sensitivity to dirt, set the switch to the "Reg" (Regular...front of carpet that may need more AB cleaning attention. To let you should take additional cleaning strokes in upright position, tilt cleaner back on rear wheels and push forward. 2.5 Embedded DirtFINDER™ (Available on ...., you know that a larger amount of the way while vacuuming, position cord down into electrical outlet.
Manual
Page 15
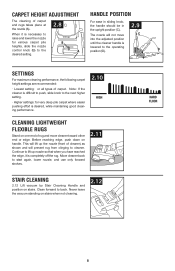
...nozzle will prevent rug from clinging to start again, lower nozzle, and use only forward strokes. 2.11 Stair Cleaning 2.12 Lift vacuum by Stair Cleaning Handle and position on one end of rug and move C raise and lower the nozzle into the adjusted position for...handle is difficult to push, slide knob to back. Carpet height adjustment Handle position The cleaning of carpet. Never leave the vacuum standing on handle. the upright position (C). Move cleaner back to cleaner. Settings For maximum cleaning performance, the following carpet height settings are recommended: • ...
...nozzle will prevent rug from clinging to start again, lower nozzle, and use only forward strokes. 2.11 Stair Cleaning 2.12 Lift vacuum by Stair Cleaning Handle and position on one end of rug and move C raise and lower the nozzle into the adjusted position for...handle is difficult to push, slide knob to back. Carpet height adjustment Handle position The cleaning of carpet. Never leave the vacuum standing on handle. the upright position (C). Move cleaner back to cleaner. Settings For maximum cleaning performance, the following carpet height settings are recommended: • ...

Manual
Page 18
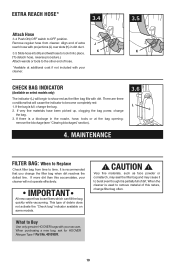
... detergent. Extension wands are used for tool use hose, lift hose end as dresser drawers, upholstered furniture, stairs and baseboards. The vacuum is ready for upholstered furniture, draperies, mattresses, clothing, automobile interiors, and carpeted stairs. Also, turn while product is turned on ... to turn cleaner OFF before using cleaning tools, cleaner handle should be used in tight spaces, corners and along edges in upright position. C. D. IMPORTANT Brushroll continues to clean areas. To avoid damage to hose tube (A). Rinse and air dry before disconnecting...
... detergent. Extension wands are used for tool use hose, lift hose end as dresser drawers, upholstered furniture, stairs and baseboards. The vacuum is ready for upholstered furniture, draperies, mattresses, clothing, automobile interiors, and carpeted stairs. Also, turn while product is turned on ... to turn cleaner OFF before using cleaning tools, cleaner handle should be used in tight spaces, corners and along edges in upright position. C. D. IMPORTANT Brushroll continues to clean areas. To avoid damage to hose tube (A). Rinse and air dry before disconnecting...
Manual
Page 19
...Attach wands or tools to time. There are three conditions that you change the bag. 2. change filter bag often. 10 IMPORTANT All new carpet has loose fibers which can fill the bag quickly while vacuuming. Check bag indicator (Available on some models. If there is a blockage in dirt duct....the nozzle, hose, tools or at additional cost if not included with your vacuum. If more dirt than this nature, change the bag. 3. If the bag is used to Buy Use only genuine HOOVER® bags with your cleaner will not operate effectively. Very fine materials, such as ...
...Attach wands or tools to time. There are three conditions that you change the bag. 2. change filter bag often. 10 IMPORTANT All new carpet has loose fibers which can fill the bag quickly while vacuuming. Check bag indicator (Available on some models. If there is a blockage in dirt duct....the nozzle, hose, tools or at additional cost if not included with your vacuum. If more dirt than this nature, change the bag. 3. If the bag is used to Buy Use only genuine HOOVER® bags with your cleaner will not operate effectively. Very fine materials, such as ...

Manual
Page 22
.... 4.6 Lift out filter (B) and hand wash it on bottom of injury from moving parts, unplug vacuum before servicing. filter bag: How to Clean ! Remove door. Hold new filter bag as shown. When purchasing a new Final Filter, ask for Hoover® Part No. 38765-019. 4.4 A 4.5 Final Filter The final filter assists in cold water with...
.... 4.6 Lift out filter (B) and hand wash it on bottom of injury from moving parts, unplug vacuum before servicing. filter bag: How to Clean ! Remove door. Hold new filter bag as shown. When purchasing a new Final Filter, ask for Hoover® Part No. 38765-019. 4.4 A 4.5 Final Filter The final filter assists in cold water with...
Manual
Page 23
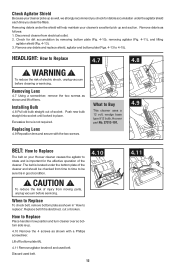
.... 2. Installing Bulb 4.8 Pull old bulb straight out of electric shock, unplug vacuum before servicing. What to Buy This cleaner uses a 12 volt, wedge base type 912 bulb, Hoover® part No. 27313-101. 4.9 Belt: How to Replace The belt on your Hoover® cleaner causes the agitator to be sure it is in...
.... 2. Installing Bulb 4.8 Pull old bulb straight out of electric shock, unplug vacuum before servicing. What to Buy This cleaner uses a 12 volt, wedge base type 912 bulb, Hoover® part No. 27313-101. 4.9 Belt: How to Replace The belt on your Hoover® cleaner causes the agitator to be sure it is in...
Manual
Page 26
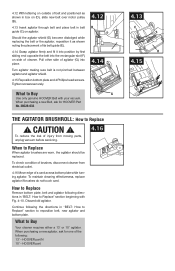
...agitator if brushes do not touch card. What to Buy G Use only genuine HOOVER® Belt with Fig. 4-10. When purchasing a new agitator, ask for HOOVER® Part No. 38528-033. HOOVER part N 15" - HOOVER part 4.13 C D 4.15 4.12 With lettering on outside of belt and ...of agitator (G) into the rectangular slot (F) on side of brushes, disconnect cleaner from moving parts, unplug vacuum before servicing. 4.16 When to Replace" section beginning with your vacuum. To check condition of cleaner. Discard old agitator. Continue following the directions in "BELT: How to Replace...
...agitator if brushes do not touch card. What to Buy G Use only genuine HOOVER® Belt with Fig. 4-10. When purchasing a new agitator, ask for HOOVER® Part No. 38528-033. HOOVER part N 15" - HOOVER part 4.13 C D 4.15 4.12 With lettering on outside of belt and ...of agitator (G) into the rectangular slot (F) on side of brushes, disconnect cleaner from moving parts, unplug vacuum before servicing. 4.16 When to Replace" section beginning with your vacuum. To check condition of cleaner. Discard old agitator. Continue following the directions in "BELT: How to Replace...
Manual
Page 27
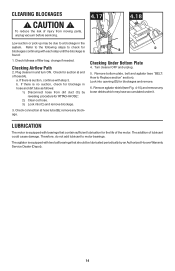
CAUTION ! change if needed. Checking Airflow Path 2. b. The addition of filter bag; a. Remove bottom plate, belt and agitator (see Fig. 4-10) and remove any blockage. To reduce the risk of injury from dirt duct (C) by an Authorized Hoover Warranty Service Dealer (Depot). 14 If there is found: 1. Check connection at...with two ball bearings that contain sufficient lubrication for blockage in hose and dirt tube as follows: 1) Disconnect hose from moving parts, unplug vacuum before servicing. 4.17 4.18 Low suction or pick up may have accumulated under it.
CAUTION ! change if needed. Checking Airflow Path 2. b. The addition of filter bag; a. Remove bottom plate, belt and agitator (see Fig. 4-10) and remove any blockage. To reduce the risk of injury from dirt duct (C) by an Authorized Hoover Warranty Service Dealer (Depot). 14 If there is found: 1. Check connection at...with two ball bearings that contain sufficient lubrication for blockage in hose and dirt tube as follows: 1) Disconnect hose from moving parts, unplug vacuum before servicing. 4.17 4.18 Low suction or pick up may have accumulated under it.

Manual
Page 30
... 't run POSSIBLE REASON 1. Filter bag full 4. Belt broken or stretched 2. Customers) or hoover.ca (Canadian customers). Follow the service center link to Hoover,® Inc., Company in Glenwillow for 30 minutes (this product to the store. Do not send your vacuum by an authorized service representative. ... should be solved quite easily when the cause is found by : • Checking the Yellow Pages under "Vacuum Cleaners" or "Household". • Visit our website at hoover.com (U.S. Broken or worn belt 2. Blockage in delay. Allow cleaner to push 1. Move carpet height control to...
... 't run POSSIBLE REASON 1. Filter bag full 4. Belt broken or stretched 2. Customers) or hoover.ca (Canadian customers). Follow the service center link to Hoover,® Inc., Company in Glenwillow for 30 minutes (this product to the store. Do not send your vacuum by an authorized service representative. ... should be solved quite easily when the cause is found by : • Checking the Yellow Pages under "Vacuum Cleaners" or "Household". • Visit our website at hoover.com (U.S. Broken or worn belt 2. Blockage in delay. Allow cleaner to push 1. Move carpet height control to...


