
User Guide
Page 3
Your Air™ Cordless Guide: Safety Instructions 1 Your LithiumLife™ Battery 4 Getting Started 5 Using your Air™ Cordless 6 Keep Your Air™ Cordless Running Properly 8 Available Accessories 11 Need Help? 12 Warranty 13
Your Air™ Cordless Guide: Safety Instructions 1 Your LithiumLife™ Battery 4 Getting Started 5 Using your Air™ Cordless 6 Keep Your Air™ Cordless Running Properly 8 Available Accessories 11 Need Help? 12 Warranty 13

User Guide
Page 8
Getting started with your Air™ Cordless vacuum: 1 INSERT WAND. Battery does not come fully charged. See filter tab for details. 5 ▲ See us do it: hooverhelp.com/aircordless2 PLACE THE SECOND BATTERY ON THE CHARGER. 3 REMOVE THE FILTER INSERT. IT WILL CLICK. 2 SET BATTERY HERE AND CLICK INTO PLACE.
Getting started with your Air™ Cordless vacuum: 1 INSERT WAND. Battery does not come fully charged. See filter tab for details. 5 ▲ See us do it: hooverhelp.com/aircordless2 PLACE THE SECOND BATTERY ON THE CHARGER. 3 REMOVE THE FILTER INSERT. IT WILL CLICK. 2 SET BATTERY HERE AND CLICK INTO PLACE.

User Guide
Page 9
push here to turn on. ! CAUTION ! For delicate, highly polished floors Brush roll will not spin in upright position. Using your Air™ Cordless: It's easiest to lift and carry by this handle. 1 Push here to switch off brush roll. Not to the floor surface manufacturer's guidelines. 6 ▲ Always refer to be used for all 4 Set the handle upright to use the accessories. surfaces. See us do it: hooverhelp.com/aircordless3 2 Step here and pull the handle back to start. 3 For optimal cleaning keep the brush roll rotating for grooming a pet.
push here to turn on. ! CAUTION ! For delicate, highly polished floors Brush roll will not spin in upright position. Using your Air™ Cordless: It's easiest to lift and carry by this handle. 1 Push here to switch off brush roll. Not to the floor surface manufacturer's guidelines. 6 ▲ Always refer to be used for all 4 Set the handle upright to use the accessories. surfaces. See us do it: hooverhelp.com/aircordless3 2 Step here and pull the handle back to start. 3 For optimal cleaning keep the brush roll rotating for grooming a pet.

User Guide
Page 10
... injury or damage. Do not place cleaner on stairs. Always turn off this appliance before connecting or disconnecting wand or tools. Using your Air™ Cordless wand: 1 Press blue tab and pull backward to remove the hose. 2 Press the lever and lift the wand up and out. 3 Snap the hose into...
... injury or damage. Do not place cleaner on stairs. Always turn off this appliance before connecting or disconnecting wand or tools. Using your Air™ Cordless wand: 1 Press blue tab and pull backward to remove the hose. 2 Press the lever and lift the wand up and out. 3 Snap the hose into...
User Guide
Page 11
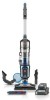
To reduce the risk of dust, empty the cup and clean the filters often. WARNING ! Keep your Air™ Cordless running properly: dirt cup 1 Empty the dirt cup when it : 8 hooverhelp.com/aircordless22 ▲ Do not use vacuum without dirt cup or filters in performance. ...
To reduce the risk of dust, empty the cup and clean the filters often. WARNING ! Keep your Air™ Cordless running properly: dirt cup 1 Empty the dirt cup when it : 8 hooverhelp.com/aircordless22 ▲ Do not use vacuum without dirt cup or filters in performance. ...

User Guide
Page 12
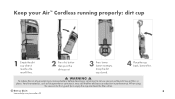
See us do it: hooverhelp.com/aircordless23 ▲ Keep your Air™ Cordless running properly: filters & core Clean this filter every 4-6 uses, or as needed. 1 Remove the dirt cup. Twist the lid open. 2 Pull tab to remove the filter. ! dry for 24 hours. 9 4 Brush the core using the 2-in-1 tool for 2 minutes in clear warm water; WARNING ! To reduce the risk of personal injury, remove battery before cleaning or servicing. 3 Rinse for peak performance.
See us do it: hooverhelp.com/aircordless23 ▲ Keep your Air™ Cordless running properly: filters & core Clean this filter every 4-6 uses, or as needed. 1 Remove the dirt cup. Twist the lid open. 2 Pull tab to remove the filter. ! dry for 24 hours. 9 4 Brush the core using the 2-in-1 tool for 2 minutes in clear warm water; WARNING ! To reduce the risk of personal injury, remove battery before cleaning or servicing. 3 Rinse for peak performance.

User Guide
Page 13
... into place. 6 Reinsert the plate as shown then snap back into belt. See us do it: 10 hooverhelp.com/aircordless24 ▲ Keep your Air™ Cordless running properly: brush roll 1 Lower the handle. 2 Flip vacuum over. 3 Push tabs towards the brush roll and lift up. !
... into place. 6 Reinsert the plate as shown then snap back into belt. See us do it: 10 hooverhelp.com/aircordless24 ▲ Keep your Air™ Cordless running properly: brush roll 1 Lower the handle. 2 Flip vacuum over. 3 Push tabs towards the brush roll and lift up. !

User Guide
Page 15
... machine and down to the power button. Remove the battery, then find and remove the obstruction. If appliance is reclined. My Air™ Cordless isn't picking up and out. Twist the top lid to your hand on the CARPET/HARDFLOOR button while the vacuum handle is not working as... damaged, left outdoors, or dropped into the hose. If you 're vacuuming, look to see : Hooverhelp.com/aircordless Twitter: @HooverUSA Facebook: facebook.com/hoover Do not return to reset itself, replace the battery and turn on. Turn on the handle. Need Help? ! If your thumb, press the release button...
... machine and down to the power button. Remove the battery, then find and remove the obstruction. If appliance is reclined. My Air™ Cordless isn't picking up and out. Twist the top lid to your hand on the CARPET/HARDFLOOR button while the vacuum handle is not working as... damaged, left outdoors, or dropped into the hose. If you 're vacuuming, look to see : Hooverhelp.com/aircordless Twitter: @HooverUSA Facebook: facebook.com/hoover Do not return to reset itself, replace the battery and turn on. Turn on the handle. Need Help? ! If your thumb, press the release button...

User Guide
Page 16
...are not as warranted, either take or send the batteries along with your Air™ Cordless product purchased in a commercial operation (such as warranted, take or send the product to a Hoover® Authorized Warranty Service Dealer along with the Owner's Guide, your product by the...PARTICULAR PURPOSE, ARE DISCLAIMED. HOW TO MAKE A WARRANTY CLAIM If this Warranty. you by the owner. SERVICE & WARRANTY FOR HOOVER® AIR™ CORDLESS PRODUCT & BATTERY SERVICE INFORMATION ANY SERVICING SHOULD BE DONE BY AN AUTHORIZED SERVICE REPRESENTATIVE Call (888) 679-2121 USA & ...
...are not as warranted, either take or send the batteries along with your Air™ Cordless product purchased in a commercial operation (such as warranted, take or send the product to a Hoover® Authorized Warranty Service Dealer along with the Owner's Guide, your product by the...PARTICULAR PURPOSE, ARE DISCLAIMED. HOW TO MAKE A WARRANTY CLAIM If this Warranty. you by the owner. SERVICE & WARRANTY FOR HOOVER® AIR™ CORDLESS PRODUCT & BATTERY SERVICE INFORMATION ANY SERVICING SHOULD BE DONE BY AN AUTHORIZED SERVICE REPRESENTATIVE Call (888) 679-2121 USA & ...

User Guide
Page 40
I bought Air™ Cordless because Find us on Twitter, Facebook or Instagram. Fill in below, then take a picture and share it on : #RethinkCleaning Hoover.com/aircordless youtube.com/hoover facebook.com/hoover twitter.com/hooverusa
I bought Air™ Cordless because Find us on Twitter, Facebook or Instagram. Fill in below, then take a picture and share it on : #RethinkCleaning Hoover.com/aircordless youtube.com/hoover facebook.com/hoover twitter.com/hooverusa


