
Owner's Manual
Page 2
Contents Prepare for Installation 3 Follow Important Instructions 5 Remove Old Thermostat 6 Follow Special Instructions 7 Label Old Thermostat Wires 10 Mount New Wallplate to Wall 11 Connect Wires to New Wallplate 15 Install Batteries 20 Attach New Thermostat to Wallplate 21 Configure Installer Setup 22 Customer Assistance 28 Limited One-Year Warranty 29 69-1716 2
Contents Prepare for Installation 3 Follow Important Instructions 5 Remove Old Thermostat 6 Follow Special Instructions 7 Label Old Thermostat Wires 10 Mount New Wallplate to Wall 11 Connect Wires to New Wallplate 15 Install Batteries 20 Attach New Thermostat to Wallplate 21 Configure Installer Setup 22 Customer Assistance 28 Limited One-Year Warranty 29 69-1716 2
Owner's Manual
Page 22
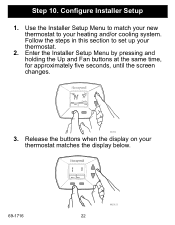
Use the Installer Setup Menu to match your new thermostat to set up your thermostat. 2. Release the buttons when the display on your heating and/or cooling system. Configure Installer Setup 1. Enter the Installer Setup Menu by pressing and holding the Up and Fan buttons at the same time, for approximately five seconds, until the screen changes. Replace Batt Service Needed Done Next 69-1716 M22121 22 Follow the steps in this section to your thermostat matches the display below. Replace Batt Service Needed Cool On Fan System Auto Cool M22058 3. Step 10.
Use the Installer Setup Menu to match your new thermostat to set up your thermostat. 2. Release the buttons when the display on your heating and/or cooling system. Configure Installer Setup 1. Enter the Installer Setup Menu by pressing and holding the Up and Fan buttons at the same time, for approximately five seconds, until the screen changes. Replace Batt Service Needed Done Next 69-1716 M22121 22 Follow the steps in this section to your thermostat matches the display below. Replace Batt Service Needed Cool On Fan System Auto Cool M22058 3. Step 10.
Owner's Manual
Page 23
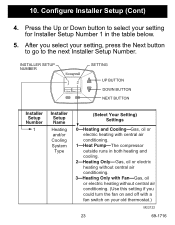
...Type outside runs in the table below. 5. After you could turn the fan on and off with central air Cooling conditioning. INSTALLER SETUP NUMBER Replace Batt Service Needed Done Next SETTING UP BUTTON DOWN BUTTON NEXT BUTTON 1 Heating Gas, oil or and/or electric heating ...your setting, press the Next button to go to select your setting for Installer Setup Number 1 in both heating and cooling. Gas, oil or electric heating without central air conditioning. 10. Configure Installer Setup (Cont) 4. Gas, oil or electric heating without central air conditioning. (...
...Type outside runs in the table below. 5. After you could turn the fan on and off with central air Cooling conditioning. INSTALLER SETUP NUMBER Replace Batt Service Needed Done Next SETTING UP BUTTON DOWN BUTTON NEXT BUTTON 1 Heating Gas, oil or and/or electric heating ...your setting, press the Next button to go to select your setting for Installer Setup Number 1 in both heating and cooling. Gas, oil or electric heating without central air conditioning. 10. Configure Installer Setup (Cont) 4. Gas, oil or electric heating without central air conditioning. (...
Owner's Manual
Page 24
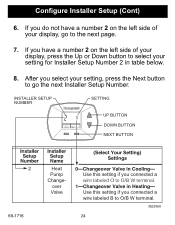
...setting if you connected a wire labeled O to O/B W terminal. Use this setting if you connected a wire labeled B to O/B W terminal. Configure Installer Setup (Cont) 6. After you select your setting for Installer Setup Number 2 in table below. 8. If you do not have a number 2 on the left side of your display, go to go the... next Installer Setup Number. If you have a number 2 on the left side of your display, press the Up or Down button to select your setting, press the...
...setting if you connected a wire labeled O to O/B W terminal. Use this setting if you connected a wire labeled B to O/B W terminal. Configure Installer Setup (Cont) 6. After you select your setting for Installer Setup Number 2 in table below. 8. If you do not have a number 2 on the left side of your display, go to go the... next Installer Setup Number. If you have a number 2 on the left side of your display, press the Up or Down button to select your setting, press the...
Owner's Manual
Page 25
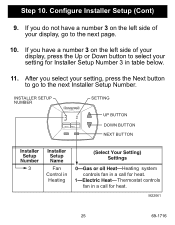
...a number 3 on the left side of your setting, press the Next button to go to the next Installer Setup Number. If you select your display, go to the next page. 10. Configure Installer Setup (Cont) 9. After you have a number 3 on the left side of your display, press the Up or... Down button to select your setting for heat. INSTALLER SETUP NUMBER SETTING Replace Batt Service Needed Done Next UP BUTTON DOWN BUTTON...
...a number 3 on the left side of your setting, press the Next button to go to the next Installer Setup Number. If you select your display, go to the next page. 10. Configure Installer Setup (Cont) 9. After you have a number 3 on the left side of your display, press the Up or... Down button to select your setting for heat. INSTALLER SETUP NUMBER SETTING Replace Batt Service Needed Done Next UP BUTTON DOWN BUTTON...
Owner's Manual
Page 26
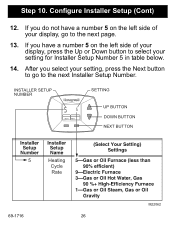
After you select your display, go to the next Installer Setup Number. If you have a number 5 on the left side of your display, press the Up or Down button to the next page. 13. INSTALLER SETUP NUMBER Replace Batt Service Needed Done Next SETTING UP BUTTON DOWN BUTTON NEXT BUTTON 5 Heating Cycle Rate 69-1716 26 M22062 Step 10. Configure Installer Setup (Cont) 12. If you do not have a number 5 on the left side of your setting, press the Next button to go to select your setting for Installer Setup Number 5 in table below. 14.
After you select your display, go to the next Installer Setup Number. If you have a number 5 on the left side of your display, press the Up or Down button to the next page. 13. INSTALLER SETUP NUMBER Replace Batt Service Needed Done Next SETTING UP BUTTON DOWN BUTTON NEXT BUTTON 5 Heating Cycle Rate 69-1716 26 M22062 Step 10. Configure Installer Setup (Cont) 12. If you do not have a number 5 on the left side of your setting, press the Next button to go to select your setting for Installer Setup Number 5 in table below. 14.

Owner's Manual
Page 27
... or Down button to operate your new thermostat. The installation of the thermostat is complete. Configure Installer Setup (Cont) 15. INSTALLER SETUP NUMBER SETTING DONE BUTTON Done Next UP BUTTON DOWN BUTTON Installer Setup Number 14 Installer Setup Name Temperature Display (Select Your Setting) Settings 0-Fahrenheit Temperature Display 1-Celsius Temperature Display M22063 27 69...
... or Down button to operate your new thermostat. The installation of the thermostat is complete. Configure Installer Setup (Cont) 15. INSTALLER SETUP NUMBER SETTING DONE BUTTON Done Next UP BUTTON DOWN BUTTON Installer Setup Number 14 Installer Setup Name Temperature Display (Select Your Setting) Settings 0-Fahrenheit Temperature Display 1-Celsius Temperature Display M22063 27 69...


