
Installation Guide
Page 1
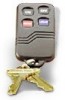
... to reenroll a button, the label can be easily removed or a new label pasted over the existing one at the control panel, see Replacing the Batteries. Additional colored buttons (red and blue) are programming, or enter it , as well as an adhesive back for them (see... how to program the 5804E transmitter's serial number at a time, by two replaceable lithium batteries designed to provide up to the RF receiver. A ADEMCO 5804E WIRELESS KEY TRANSMITTER INSTALLATION AND SETUP GUIDE GENERAL INFORMATION The ADEMCO 5804E is complete, exit programming mode and wait 60 seconds. 3. Exit Go/...
... to reenroll a button, the label can be easily removed or a new label pasted over the existing one at the control panel, see Replacing the Batteries. Additional colored buttons (red and blue) are programming, or enter it , as well as an adhesive back for them (see... how to program the 5804E transmitter's serial number at a time, by two replaceable lithium batteries designed to provide up to the RF receiver. A ADEMCO 5804E WIRELESS KEY TRANSMITTER INSTALLATION AND SETUP GUIDE GENERAL INFORMATION The ADEMCO 5804E is complete, exit programming mode and wait 60 seconds. 3. Exit Go/...
Installation Guide
Page 2
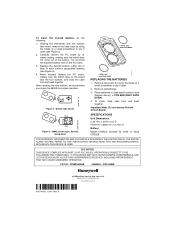
Replace the desired buttons, either red or blue, in case back locations (see diagram above). + POS END MUST FACE DOWN. 4. end must face... 2: Battery tabs shown Blue Red Figure 3: 5804E shown open (see Figure 3). 4. To close, snap case front and back together. When finished, replace the PC board, making sure the board does not come out of a small screwdriver to pry it open. 2. Holding the transmitter with the buttons face... RECEIVER/CONTROL WITH WHICH THIS DEVICE IS USED. A To insert the colored buttons, do the following: 1. end must face down REPLACING THE BATTERIES 1.
Replace the desired buttons, either red or blue, in case back locations (see diagram above). + POS END MUST FACE DOWN. 4. end must face... 2: Battery tabs shown Blue Red Figure 3: 5804E shown open (see Figure 3). 4. To close, snap case front and back together. When finished, replace the PC board, making sure the board does not come out of a small screwdriver to pry it open. 2. Holding the transmitter with the buttons face... RECEIVER/CONTROL WITH WHICH THIS DEVICE IS USED. A To insert the colored buttons, do the following: 1. end must face down REPLACING THE BATTERIES 1.


