Downloadable Instruction Book
Page 3
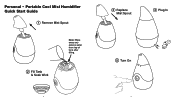
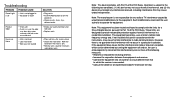
Personal • Portable Cool Mist Humidifier Quick Start Guide 1 Remove Mist Spout Note: Wipe away any excess water from top of tank after filling. 2 Fill Tank & Soak Wick 4 3 Replace Mist Spout 4 Plug In 5 Turn On 5
Personal • Portable Cool Mist Humidifier Quick Start Guide 1 Remove Mist Spout Note: Wipe away any excess water from top of tank after filling. 2 Fill Tank & Soak Wick 4 3 Replace Mist Spout 4 Plug In 5 Turn On 5
Downloadable Instruction Book
Page 4
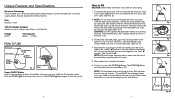
Push the POWER Button once to turn off . Remove the wick from the top of the tank before replacing the mist spout. 5. Fill the water tank with clean, ...unit in the "unlock" position. The humidifier WILL NOT function without first soaking the wick. Place the mist spout back on . Wick Includes 1 wick 120V AC Adaptor Included Perfect for more than 6 hours. The POWER Button will be... spout, turn on if you live in use. Lift up to the MAX FILL line. Unlock the spring loaded wick by turning the mist spout to a 120 volt AC electrical outlet. To turn it aside. (See Fig. 3)...
Push the POWER Button once to turn off . Remove the wick from the top of the tank before replacing the mist spout. 5. Fill the water tank with clean, ...unit in the "unlock" position. The humidifier WILL NOT function without first soaking the wick. Place the mist spout back on . Wick Includes 1 wick 120V AC Adaptor Included Perfect for more than 6 hours. The POWER Button will be... spout, turn on if you live in use. Lift up to the MAX FILL line. Unlock the spring loaded wick by turning the mist spout to a 120 volt AC electrical outlet. To turn it aside. (See Fig. 3)...
Downloadable Instruction Book
Page 5
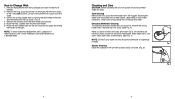
... turning the holder to the right until the icons align in water for 2 minutes. 2. NOTE: To order additional replacement wicks, please visit www.homedics.com or call HoMedics Consumer Relations at 1.800.466.3342 Cleaning and Care CAUTION: Before cleaning the unit, turn power off and disconnect single pin plug. Ultrasonic Membrane Cleaning ...
... turning the holder to the right until the icons align in water for 2 minutes. 2. NOTE: To order additional replacement wicks, please visit www.homedics.com or call HoMedics Consumer Relations at 1.800.466.3342 Cleaning and Care CAUTION: Before cleaning the unit, turn power off and disconnect single pin plug. Ultrasonic Membrane Cleaning ...
Downloadable Instruction Book
Page 6
...interference, and (2) this equipment does cause harmful interference to radio or television reception, which the receiver is low. • Remove wick, soak for 2 minutes and replace wick Note: This device complies with the limits for a Class B digital device, pursuant to Part 15 of the FCC Rules. Note... is connected. • Consult the dealer or an experienced radio/TV technician for any water and clean and refill tank • Replace wick • Place unit on a circuit different from that interference will not occur in accordance with the instructions, may be determined by ...
...interference, and (2) this equipment does cause harmful interference to radio or television reception, which the receiver is low. • Remove wick, soak for 2 minutes and replace wick Note: This device complies with the limits for a Class B digital device, pursuant to Part 15 of the FCC Rules. Note... is connected. • Consult the dealer or an experienced radio/TV technician for any water and clean and refill tank • Replace wick • Place unit on a circuit different from that interference will not occur in accordance with the instructions, may be determined by ...


