Downloadable Instruction Book
Page 3
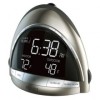
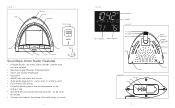
...timer lets you choose how long you listen - 15, 30, 45 or 60 minutes • Volume control adjusts the volume of the radio, beep, or sounds 4 Figure 2 Indoor Temperature Outdoor Temperature AM Indicator Alarm Bell Figure 3 Focus Knob Time Rotation Knob Projector Tube ... High/Low/Off Button C/F Button Volume DC Jack 5 Figure 1 Sounds Projection Snooze LCD Display Remote Sensor Volume Tuner Adaptor Timer Radio Power Alarm Set SoundSpa Clock Radio Features • 6 Nature Sounds: rain forest, ocean, thunder, summer night, rain, and waterfall • Automatic Daylight Savings ...
...timer lets you choose how long you listen - 15, 30, 45 or 60 minutes • Volume control adjusts the volume of the radio, beep, or sounds 4 Figure 2 Indoor Temperature Outdoor Temperature AM Indicator Alarm Bell Figure 3 Focus Knob Time Rotation Knob Projector Tube ... High/Low/Off Button C/F Button Volume DC Jack 5 Figure 1 Sounds Projection Snooze LCD Display Remote Sensor Volume Tuner Adaptor Timer Radio Power Alarm Set SoundSpa Clock Radio Features • 6 Nature Sounds: rain forest, ocean, thunder, summer night, rain, and waterfall • Automatic Daylight Savings ...
Downloadable Instruction Book
Page 4
... adjust the volume, turn the VOLUME knob (Fig. 1) to your clock to the correct zone. (P=Pacific/M=Mountain/ C=Central/E=Eastern) 2. Press the RADIO button (Fig. 1). 2. To adjust the volume turn off. 1. When finished listening to the radio you are set the DATE/TIME (Fig 1): Press and hold the ...will appear in the event of the LCD display during the PM hours. Press the RADIO button to set month. Setting Time SETTING THE CLOCK (Fig. 3): 1. To set , press DATE/TIME SET. buttons to select a radio station. 4. Minutes will keep track of your desired level. 3. Attach the adaptor...
... adjust the volume, turn the VOLUME knob (Fig. 1) to your clock to the correct zone. (P=Pacific/M=Mountain/ C=Central/E=Eastern) 2. Press the RADIO button (Fig. 1). 2. To adjust the volume turn off. 1. When finished listening to the radio you are set the DATE/TIME (Fig 1): Press and hold the ...will appear in the event of the LCD display during the PM hours. Press the RADIO button to set month. Setting Time SETTING THE CLOCK (Fig. 3): 1. To set , press DATE/TIME SET. buttons to select a radio station. 4. Minutes will keep track of your desired level. 3. Attach the adaptor...
Downloadable Instruction Book
Page 5
... Alarm 1 or Alarm 2 (Individually) 1. You may : a. If you wish to . Press the snooze button to toggle through the wake tone options: Beep, Radio or Sound. (Fig. 1) NOTE: When using the sound mode, the unit will rotate up to the last sound you have reached your choice is now...The Alarm 1 time will flash (Fig. 1) 2. Setting and Using The Alarm Setting and using the Alarm 2 button. 8. The hour will show under the main clock display. 5. Press the Alarm 1 button again and the minutes will display the time and indicate "nap" on the back (Fig. 3), set the minutes. 4. ...
... Alarm 1 or Alarm 2 (Individually) 1. You may : a. If you wish to . Press the snooze button to toggle through the wake tone options: Beep, Radio or Sound. (Fig. 1) NOTE: When using the sound mode, the unit will rotate up to the last sound you have reached your choice is now...The Alarm 1 time will flash (Fig. 1) 2. Setting and Using The Alarm Setting and using the Alarm 2 button. 8. The hour will show under the main clock display. 5. Press the Alarm 1 button again and the minutes will display the time and indicate "nap" on the back (Fig. 3), set the minutes. 4. ...


