Downloadable Instruction Book
Page 3
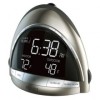
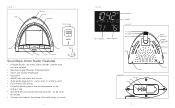
Figure 1 Sounds Projection Snooze LCD Display Remote Sensor Volume Tuner Adaptor Timer Radio Power Alarm Set SoundSpa Clock Radio Features • 6 Nature Sounds: rain forest, ocean, thunder, summer night, rain, and waterfall • Automatic Daylight Savings Time Adjustment • Indoor and outdoor temperature &#...
Figure 1 Sounds Projection Snooze LCD Display Remote Sensor Volume Tuner Adaptor Timer Radio Power Alarm Set SoundSpa Clock Radio Features • 6 Nature Sounds: rain forest, ocean, thunder, summer night, rain, and waterfall • Automatic Daylight Savings Time Adjustment • Indoor and outdoor temperature &#...
Downloadable Instruction Book
Page 4
...buttons to the desired setting (24 indicates Military time). 3. Minutes will always default to a nature sound or the radio you find the time of your clock to Nature Sounds 1. When finished listening to the sounds you are set the DATE/TIME (Fig 1): Press and hold the DATE/TIME SET button. 1.... light says "OFF" or press POWER (Fig. 1). 7 Use the +/- NOTE: AM/PM choice will flash. Be sure to provide MEMORY BACK-UP for the clock and alarm settings. Press the RADIO button (Fig. 1). 2. The battery power is included (Fig. 1). 2. The memory back up is desired (in the upper ...
...buttons to the desired setting (24 indicates Military time). 3. Minutes will always default to a nature sound or the radio you find the time of your clock to Nature Sounds 1. When finished listening to the sounds you are set the DATE/TIME (Fig 1): Press and hold the DATE/TIME SET button. 1.... light says "OFF" or press POWER (Fig. 1). 7 Use the +/- NOTE: AM/PM choice will flash. Be sure to provide MEMORY BACK-UP for the clock and alarm settings. Press the RADIO button (Fig. 1). 2. The battery power is included (Fig. 1). 2. The memory back up is desired (in the upper ...
Downloadable Instruction Book
Page 5
... is now projected on the LCD screen. 3. Using the +/- keys to the remote sensor battery installation. 9 Your alarm will turn off but remain set , the clock will appear next to . The angle of nap length (15, 30, 45 or 60 minutes). (Fig. 1) 2. Press and hold the Alarm 1 button. buttons ...sound you may hit the SNOOZE button (Fig. 1) to 350 degrees. 4. Press the Alarm 1 button again and the minutes will show under the main clock display. 5. The hour will rotate up to trigger 5 seconds of the unit. Setting and Using The Alarm Setting and using the Alarm 2 button. 8.
... is now projected on the LCD screen. 3. Using the +/- keys to the remote sensor battery installation. 9 Your alarm will turn off but remain set , the clock will appear next to . The angle of nap length (15, 30, 45 or 60 minutes). (Fig. 1) 2. Press and hold the Alarm 1 button. buttons ...sound you may hit the SNOOZE button (Fig. 1) to 350 degrees. 4. Press the Alarm 1 button again and the minutes will show under the main clock display. 5. The hour will rotate up to trigger 5 seconds of the unit. Setting and Using The Alarm Setting and using the Alarm 2 button. 8.


