HP LD4200tm LCD Monitor User Guide
Page 5
... contents 1 Product Features HP LD4200tm Touch Digital Signage 1 2 Safety and Maintenance Guidelines Important Safety Information ...2 Maintenance Guidelines ...3 Cleaning the Monitor ...3 Shipping the Monitor ...3 3 Setting Up the Monitor Installing the Stand (Sold Separately 4 Connecting the Speakers (Sold Separately 5 Rotating to the Portrait Position (Select Models 7 Using the Remote Control ...8 Inserting the Batteries ...8 Identifying Remote Control Buttons 9 Identifying Rear Components...
... contents 1 Product Features HP LD4200tm Touch Digital Signage 1 2 Safety and Maintenance Guidelines Important Safety Information ...2 Maintenance Guidelines ...3 Cleaning the Monitor ...3 Shipping the Monitor ...3 3 Setting Up the Monitor Installing the Stand (Sold Separately 4 Connecting the Speakers (Sold Separately 5 Rotating to the Portrait Position (Select Models 7 Using the Remote Control ...8 Inserting the Batteries ...8 Identifying Remote Control Buttons 9 Identifying Rear Components...
HP LD4200tm LCD Monitor User Guide
Page 6
Screen Adjustment Options ...21 Using the Auto-Adjustment Function 22 Using the On-Screen Display Menu 23 Using the Remote Control to Adjust the OSD 23 OSD Menu Selections ...24 Selecting An Aspect Ratio Mode 27 Adjusting the Timer ...41 Online Technical Support ...43 Preparing to Call Technical Support 43 Appendix B Technical Specifications HP LD4200tm ...44 Recognizing Preset Display Resolutions 46 Preset Display Modes ...46 DTV Mode ...46 Power Indicator ...47 Appendix C Controlling the Multiple Product Connecting the Cable ...48 RS-232C Configurations ...48 Communication Parameter 49 ...
Screen Adjustment Options ...21 Using the Auto-Adjustment Function 22 Using the On-Screen Display Menu 23 Using the Remote Control to Adjust the OSD 23 OSD Menu Selections ...24 Selecting An Aspect Ratio Mode 27 Adjusting the Timer ...41 Online Technical Support ...43 Preparing to Call Technical Support 43 Appendix B Technical Specifications HP LD4200tm ...44 Recognizing Preset Display Resolutions 46 Preset Display Modes ...46 DTV Mode ...46 Power Indicator ...47 Appendix C Controlling the Multiple Product Connecting the Cable ...48 RS-232C Configurations ...48 Communication Parameter 49 ...

HP LD4200tm LCD Monitor User Guide
Page 7
...60 22. Auto Sleep (Command : f g 65 32. Language (Command : f i 66 34. Input Select (Command : x b 68 IR Codes ...68 Remote Control IR Code 68 Output Wave ...68 Configuration of Frame 69 Lead Code ...69 Repeat Code ...69 ENWW vii Brightness (Command : h 54 09. Tint (Command : j)... p 58 18. Auto Configure (Command: j u 59 19. Lamp fault Check (Command : d p 60 23. Input Select (Command : b) (Main Picture Input 51 03. Volume Control (Command : f 53 07. On Timer (On/Off Timer) Time (Command : f d 63 29. Sleep Time (Command : f f 65 31. DPM Select (Command : f j...
...60 22. Auto Sleep (Command : f g 65 32. Language (Command : f i 66 34. Input Select (Command : x b 68 IR Codes ...68 Remote Control IR Code 68 Output Wave ...68 Configuration of Frame 69 Lead Code ...69 Repeat Code ...69 ENWW vii Brightness (Command : h 54 09. Tint (Command : j)... p 58 18. Auto Configure (Command: j u 59 19. Lamp fault Check (Command : d p 60 23. Input Select (Command : b) (Main Picture Input 51 03. Volume Control (Command : f 53 07. On Timer (On/Off Timer) Time (Command : f d 63 29. Sleep Time (Command : f f 65 31. DPM Select (Command : f j...
HP LD4200tm LCD Monitor User Guide
Page 9
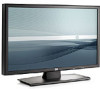
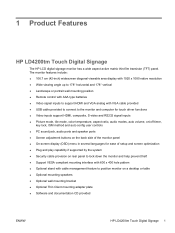
...9679; 106.7 cm (42-inch) widescreen diagonal viewable area display with 1920 x 1080 native resolution ● Wide viewing angle up to 178° horizontal and 178° vertical ● Landscape or portrait wall mounting position ● Remote control with AAA type batteries ● Video... bracket ● Optional Thin Client mounting adapter plate ● Software and documentation CD provided ENWW HP LD4200tm Touch Digital Signage 1 1 Product Features HP LD4200tm Touch Digital Signage The HP LCD digital signage monitor has a wide aspect active matrix thin-film transistor (TFT) panel.
...9679; 106.7 cm (42-inch) widescreen diagonal viewable area display with 1920 x 1080 native resolution ● Wide viewing angle up to 178° horizontal and 178° vertical ● Landscape or portrait wall mounting position ● Remote control with AAA type batteries ● Video... bracket ● Optional Thin Client mounting adapter plate ● Software and documentation CD provided ENWW HP LD4200tm Touch Digital Signage 1 1 Product Features HP LD4200tm Touch Digital Signage The HP LCD digital signage monitor has a wide aspect active matrix thin-film transistor (TFT) panel.

HP LD4200tm LCD Monitor User Guide
Page 16
NOTE: Dispose of used batteries in the recycle bin to prevent environmental pollution. Using the Remote Control Inserting the Batteries 1. Close the battery cover. Figure 3-10 Inserting Batteries 8 Chapter 3 Setting Up the Monitor ENWW Slide off the battery cover. 2. Insert the batteries with correct polarity (+/-). 3.
NOTE: Dispose of used batteries in the recycle bin to prevent environmental pollution. Using the Remote Control Inserting the Batteries 1. Close the battery cover. Figure 3-10 Inserting Batteries 8 Chapter 3 Setting Up the Monitor ENWW Slide off the battery cover. 2. Insert the batteries with correct polarity (+/-). 3.

HP LD4200tm LCD Monitor User Guide
Page 17
... period of time. Provides up or down direction adjustment. Toggles through present video settings. ENWW Using the Remote Control 9 Opens the menu selection. Exits the menu. Toggles through aspect ratio options. Identifying Remote Control Buttons Figure 3-11 Remote Control Buttons Component 1 AV 2 Sleep 3 PSM 4 Menu 5 Up and Down 6 Mute 7 Power 8 Input Select 9 ARC 10 Auto 11...
... period of time. Provides up or down direction adjustment. Toggles through present video settings. ENWW Using the Remote Control 9 Opens the menu selection. Exits the menu. Toggles through aspect ratio options. Identifying Remote Control Buttons Figure 3-11 Remote Control Buttons Component 1 AV 2 Sleep 3 PSM 4 Menu 5 Up and Down 6 Mute 7 Power 8 Input Select 9 ARC 10 Auto 11...

HP LD4200tm LCD Monitor User Guide
Page 18
Some devices require HDCP in order to display HD signals Connects the audio cable to the line-out jack of the PC sound card Connects a wired remote control to the monitor Connects the video and audio equipment to the monitor Connects the speakers to the monitor Connects the monitor and the...the PC sound card supports both Speaker Out and Line Out, convert to RS-232 devices HDMI supports High Definition input and HDCP (High-bandwidth Digital Content Protection). Identifying Rear Components Figure 3-12 Rear Components (The product image in amplifier (AMP). If the Audio Out of the program. ...
Some devices require HDCP in order to display HD signals Connects the audio cable to the line-out jack of the PC sound card Connects a wired remote control to the monitor Connects the video and audio equipment to the monitor Connects the speakers to the monitor Connects the monitor and the...the PC sound card supports both Speaker Out and Line Out, convert to RS-232 devices HDMI supports High Definition input and HDCP (High-bandwidth Digital Content Protection). Identifying Rear Components Figure 3-12 Rear Components (The product image in amplifier (AMP). If the Audio Out of the program. ...
HP LD4200tm LCD Monitor User Guide
Page 21
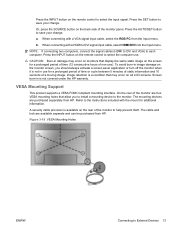
Or, press the SOURCE button on all LCD screens. a. b. Image retention is a condition...display the same static image on the monitor screen, you to install a mounting device to the monitor. On the rear of the monitor to help prevent theft. The cable and lock are available separate and can be purchased from the Input menu. Press the INPUT button on the remote control.... When connecting with a VGA signal input cable, select the RGB PC from HP. Press the INPUT button on the remote control to save your change . VESA Mounting Support This product supports a VESA FDMI compliant...
Or, press the SOURCE button on all LCD screens. a. b. Image retention is a condition...display the same static image on the monitor screen, you to install a mounting device to the monitor. On the rear of the monitor to help prevent theft. The cable and lock are available separate and can be purchased from the Input menu. Press the INPUT button on the remote control.... When connecting with a VGA signal input cable, select the RGB PC from HP. Press the INPUT button on the remote control to save your change . VESA Mounting Support This product supports a VESA FDMI compliant...

HP LD4200tm LCD Monitor User Guide
Page 22
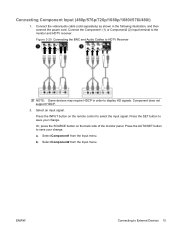
... connecting with the BNC and Audio Cables to the monitor and VCR/ DVD receiver. Select an input signal. Or, press the SOURCE button on the remote control to watch high image quality movies. NOTE: When the BNC cable is connected simultaneously with an S-Video cable, select AV from the Input menu. Connecting...
... connecting with the BNC and Audio Cables to the monitor and VCR/ DVD receiver. Select an input signal. Or, press the SOURCE button on the remote control to watch high image quality movies. NOTE: When the BNC cable is connected simultaneously with an S-Video cable, select AV from the Input menu. Connecting...
HP LD4200tm LCD Monitor User Guide
Page 23
Press the SET button to save your change . Or, press the SOURCE button on the remote control to display HD signals. ENWW Connecting to the monitor and HDTV receiver. Figure 3-20 Connecting the BNC and Audio Cables to save your change . a. Select Component2 from ...
Press the SET button to save your change . Or, press the SOURCE button on the remote control to display HD signals. ENWW Connecting to the monitor and HDTV receiver. Figure 3-20 Connecting the BNC and Audio Cables to save your change . a. Select Component2 from ...
HP LD4200tm LCD Monitor User Guide
Page 24
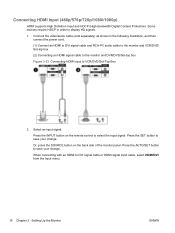
...as shown in order to save your change . Press the AUTO/SET button to display HD signals. 1. When connecting with an HDMI to select the input signal. Or, press the SOURCE button on the remote control to DVI signal cable or HDMI signal input cable, select HDMI/DVI from the ...Input menu. 16 Chapter 3 Setting Up the Monitor ENWW Connecting HDMI Input (480p/576p/720p/1080i/1080p) HDMI supports High Definition Input and HDCP (High-bandwidth Digital Content Protection). Press...
...as shown in order to save your change . Press the AUTO/SET button to display HD signals. 1. When connecting with an HDMI to select the input signal. Or, press the SOURCE button on the remote control to DVI signal cable or HDMI signal input cable, select HDMI/DVI from the ...Input menu. 16 Chapter 3 Setting Up the Monitor ENWW Connecting HDMI Input (480p/576p/720p/1080i/1080p) HDMI supports High Definition Input and HDCP (High-bandwidth Digital Content Protection). Press...

HP LD4200tm LCD Monitor User Guide
Page 29
... Component1 - HDTV, DVD ● RGB PC - When OSD window is open, press to turn on mode). Receives signals from the remote control. ENWW Screen Adjustment Options 21 HDTV, DVD ● Component2 - Press again to select a menu item or save changes. VGA or...turn it off. Screen Adjustment Options Figure 4-1 Front Panel Controls Component 1 Source 2 Menu 3 OSD Select/Adjust buttons 4 Auto/Set 5 Power 6 IR Receiver 7 Power Indicator Function Toggles between video inputs: ● AV - Digital signal Opens or closes the OSD (On-screen Display) menu screen.
... Component1 - HDTV, DVD ● RGB PC - When OSD window is open, press to turn on mode). Receives signals from the remote control. ENWW Screen Adjustment Options 21 HDTV, DVD ● Component2 - Press again to select a menu item or save changes. VGA or...turn it off. Screen Adjustment Options Figure 4-1 Front Panel Controls Component 1 Source 2 Menu 3 OSD Select/Adjust buttons 4 Auto/Set 5 Power 6 IR Receiver 7 Power Indicator Function Toggles between video inputs: ● AV - Digital signal Opens or closes the OSD (On-screen Display) menu screen.

HP LD4200tm LCD Monitor User Guide
Page 30
... before adjusting. 2. If the monitor is using an HDMI to DVI input. The CD menu is displayed. 5. Select Open Auto-Adjustment Software. Insert the CD in the disc drive. The setup test pattern is displayed. 4. Allow the monitor to produce a stable, centered image. 6. Press the Auto/Set button on...the monitor panel to warm up for the VGA (analog) input by using the Auto/Set button on the monitor (AUTO button on the remote control) and the auto-adjustment pattern software utility on the keyboard to exit the test pattern. 22 Chapter 4 Operating the Monitor ENWW Do not use...
... before adjusting. 2. If the monitor is using an HDMI to DVI input. The CD menu is displayed. 5. Select Open Auto-Adjustment Software. Insert the CD in the disc drive. The setup test pattern is displayed. 4. Allow the monitor to produce a stable, centered image. 6. Press the Auto/Set button on...the monitor panel to warm up for the VGA (analog) input by using the Auto/Set button on the monitor (AUTO button on the remote control) and the auto-adjustment pattern software utility on the keyboard to exit the test pattern. 22 Chapter 4 Operating the Monitor ENWW Do not use...

HP LD4200tm LCD Monitor User Guide
Page 31
...adjust the item to adjust the screen image based on your viewing preferences. Using the On-Screen Display Menu The monitor settings can be adjusted from the On-Screen Display (OSD) menu. To access a control, use the ▼ ▲ buttons (2). 4. Icon Main Menu Picture Function Description Adjusts screen...timer options Option Adjusts the screen status according to the circumstances Information Adjusts Set ID and check serial number and software version Using the Remote Control to Adjust the OSD Use the OSD to the desired level. 6. Exit the OSD menu by pressing the SET (5) button. ...
...adjust the item to adjust the screen image based on your viewing preferences. Using the On-Screen Display Menu The monitor settings can be adjusted from the On-Screen Display (OSD) menu. To access a control, use the ▼ ▲ buttons (2). 4. Icon Main Menu Picture Function Description Adjusts screen...timer options Option Adjusts the screen status according to the circumstances Information Adjusts Set ID and check serial number and software version Using the Remote Control to Adjust the OSD Use the OSD to the desired level. 6. Exit the OSD menu by pressing the SET (5) button. ...

HP LD4200tm LCD Monitor User Guide
Page 35
...:9 Zoom1 Zoom2 AV Component HDMI/DVI RGB DTV PC PC X X X X X X X X X X X X X X X X X X ENWW Using the On-Screen Display Menu 27 Key Lock ISM Method Power Indicator DPM (Display Power Management) Select Factory Reset Set ID Serial No SW Version Sets up and down buttons and exit...Product Control Program. Avoids allowing a fixed or burn-in which mode is displayed. Turns the power saving mode on the front of the product. Selecting An Aspect Ratio Mode The aspect ratio modes available for display. This feature can only be used with the remote control....
...:9 Zoom1 Zoom2 AV Component HDMI/DVI RGB DTV PC PC X X X X X X X X X X X X X X X X X X ENWW Using the On-Screen Display Menu 27 Key Lock ISM Method Power Indicator DPM (Display Power Management) Select Factory Reset Set ID Serial No SW Version Sets up and down buttons and exit...Product Control Program. Avoids allowing a fixed or burn-in which mode is displayed. Turns the power saving mode on the front of the product. Selecting An Aspect Ratio Mode The aspect ratio modes available for display. This feature can only be used with the remote control....

HP LD4200tm LCD Monitor User Guide
Page 36
... the ► button and then use ▼▲ buttons to set the hour (00~23). 3. To reset the clock: 1. Adjusting the Timer Function Use the remote control to set to the same time.
... the ► button and then use ▼▲ buttons to set the hour (00~23). 3. To reset the clock: 1. Adjusting the Timer Function Use the remote control to set to the same time.

HP LD4200tm LCD Monitor User Guide
Page 37
...fixed or burnin image to remain on normal if you don't foresee image burn-in a ghost image remaining even when you can only use the remote control. may be set up so you change the image. To unlock the OSD screen adjustment, press the MENU button on the screen, the screen ... the ON position. 4. leave on the screen for a prolonged period of the following menu options: ● Normal - To avoid a permanent image on the remote control and set the Key Lock tab to the Off position. ENWW Using the On-Screen Display Menu 29 To lock or unlock the OSD screen adjustment: 1.
...fixed or burnin image to remain on normal if you don't foresee image burn-in a ghost image remaining even when you can only use the remote control. may be set up so you change the image. To unlock the OSD screen adjustment, press the MENU button on the screen, the screen ... the ON position. 4. leave on the screen for a prolonged period of the following menu options: ● Normal - To avoid a permanent image on the remote control and set the Key Lock tab to the Off position. ENWW Using the On-Screen Display Menu 29 To lock or unlock the OSD screen adjustment: 1.
HP LD4200tm LCD Monitor User Guide
Page 50
...port. Horizontal noise appears or the characters look blurred. The screen displays abnormally. Install the monitor driver, which is provided with the source input signal. press the AUTO button on the remote control to automatically select the optimal screen status that matches with the ...monitor or download from the HP Web site (http://www.hp.com). press the AUTO button on the remote control to automatically select the optimal screen status ...
...port. Horizontal noise appears or the characters look blurred. The screen displays abnormally. Install the monitor driver, which is provided with the source input signal. press the AUTO button on the remote control to automatically select the optimal screen status that matches with the ...monitor or download from the HP Web site (http://www.hp.com). press the AUTO button on the remote control to automatically select the optimal screen status ...
HP LD4200tm LCD Monitor User Guide
Page 51
...Control Panel > Display > Settings > Color table menu in this section, you may appear on the screen, which the problem occurred ● Error messages received ● Hardware configuration ● Hardware and software you are using the troubleshooting tips in the operating system. Black spots appear on the remote control... knowledge base, monitoring and diagnostic tools, go to http://www.hp.com/support Preparing to the unique characteristics of order. Contact your local service center. Equalizer is out of the LCD panel. Check that the audio cable is too dull. Have the...
...Control Panel > Display > Settings > Color table menu in this section, you may appear on the screen, which the problem occurred ● Error messages received ● Hardware configuration ● Hardware and software you are using the troubleshooting tips in the operating system. Black spots appear on the remote control... knowledge base, monitoring and diagnostic tools, go to http://www.hp.com/support Preparing to the unique characteristics of order. Contact your local service center. Equalizer is out of the LCD panel. Check that the audio cable is too dull. Have the...

HP LD4200tm LCD Monitor User Guide
Page 59
...][Cr] Acknowledgement [a][ ][Set ID][ ][OK][Data][x] Data 0 : Power Off 1 : Power On 02. [Command2][ ][Set ID][ ][OK][Data][x] *The Product transmits ACK (acknowledgement) based on the remote control. At this format when receiving normal data. Transmission [k][a][ ][Set ID][ ][Data][Cr] Data 0 : Power Off 1 : Power On Acknowledgement [a][ ][Set ID][ ][OK][Data][x] To show the...
...][Cr] Acknowledgement [a][ ][Set ID][ ][OK][Data][x] Data 0 : Power Off 1 : Power On 02. [Command2][ ][Set ID][ ][OK][Data][x] *The Product transmits ACK (acknowledgement) based on the remote control. At this format when receiving normal data. Transmission [k][a][ ][Set ID][ ][Data][Cr] Data 0 : Power Off 1 : Power On Acknowledgement [a][ ][Set ID][ ][OK][Data][x] To show the...


