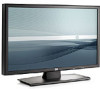
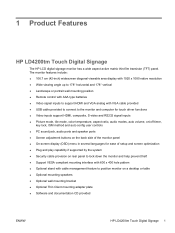
HP LD4200tm LCD Monitor User Guide
Page 2
.... This document contains proprietary information that is protected by copyright. No part of this document may be construed as constituting an additional warranty. HP shall not be liable for HP products and services are either trademarks or registered trademarks of Hewlett-Packard Company. Microsoft, Windows, and Windows Vista are set forth in...
HP LD4200tm LCD Monitor User Guide
Page 3
ENWW iii CAUTION: Text set off in this manner indicates that failure to follow directions could result in this manner indicates that failure to equipment or loss of life. NOTE: Text set off in damage to follow directions could result in bodily harm or loss of information. About This Guide This guide provides information on setting up the monitor, installing drivers, using the on-screen display menu, troubleshooting and technical specifications. Text set off in this manner provides important supplemental information. WARNING!
HP LD4200tm LCD Monitor User Guide
Page 5
Table of contents 1 Product Features HP LD4200tm Touch Digital Signage 1 2 Safety and Maintenance Guidelines Important Safety Information ...2 Maintenance Guidelines ...3 Cleaning the Monitor ...3 Shipping the Monitor ...3 3 Setting Up the Monitor Installing the Stand (Sold Separately 4 Connecting ...
HP LD4200tm LCD Monitor User Guide
Page 6
Screen Adjustment Options ...21 Using the Auto-Adjustment Function 22 Using the On-Screen Display Menu 23 Using the Remote Control to Adjust the OSD 23 OSD Menu Selections ...24 Selecting An Aspect Ratio Mode ... Appendix A Troubleshooting Solving Common Problems ...41 Online Technical Support ...43 Preparing to Call Technical Support 43 Appendix B Technical Specifications HP LD4200tm ...44 Recognizing Preset Display Resolutions 46 Preset Display Modes ...46 DTV Mode ...46 Power Indicator ...47 Appendix C Controlling the Multiple Product Connecting the Cable ...48 RS-232C Configurations ......
HP LD4200tm LCD Monitor User Guide
Page 7
Transmission / Receiving Protocol ...50 01. Volume Mute (Command : e 53 06. Sharpness (Command : k) (Video only 56 12. OSD Select (Command : l 56 13. Temperature value (Command : d n 60 22. Off Timer (On/Off Timer) Time (Command : f e 64 30. Power On Delay (Command : f h 66 33. DPM Select (Command : f j 67 35. Aspect Ratio (Command : c) (Main picture format 52 04. Color (Command : i) (Video only 55 10. Abnormal state (Command : z 58 17. Lamp fault Check (Command : d p 60 23. Time (Command : f a 61 26. Off Timer (On/Off Timer) On, Off (Command : f c 63 28. Auto ...
HP LD4200tm LCD Monitor User Guide
Page 8
... 75 Product Environmental Notices ...75 Materials Disposal ...75 Disposal of Waste Equipment by Users in Private Household in the European Union ...75 Chemical Substances ...75 HP Recycling Program ...75 Restriction of Hazardous Substances (RoHS 75 Turkey EEE Regulation ...76 viii ENWW
HP LD4200tm LCD Monitor User Guide
Page 9
1 Product Features HP LD4200tm Touch Digital Signage The HP LCD digital signage monitor has a wide aspect active matrix thin-film transistor (TFT) panel. The monitor features include: ● 106.7 cm (42-inch) widescreen diagonal viewable area display with 1920 x 1080 native resolution ● Wide viewing angle up to 178° horizontal and 178° vertical ● Landscape or...; Optional mounting speakers ● Optional wall mounting bracket ● Optional Thin Client mounting adapter plate ● Software and documentation CD provided ENWW HP LD4200tm Touch Digital Signage 1
HP LD4200tm LCD Monitor User Guide
Page 10
... times. • Disconnect power from the electrical outlet. Not all cords and cables connected to the LCD monitor so that no one is easily accessible at http://www.hp.com/ergo and/or on the correct power cord set to use only a power source and connection appropriate...Replacement Policy so you can not be pulled, grabbed, or tripped over. 2 Chapter 2 Safety and Maintenance Guidelines ENWW WARNING! WARNING! For your HP LCD monitor. the power strips must be taken to route all power strips provide surge protection; When unplugging from the electrical outlet, grasp the cord ...
HP LD4200tm LCD Monitor User Guide
Page 11
... broken. These chemicals may need it from the outlet. If the monitor is not operating properly or has been dropped or damaged, contact an authorized HP dealer, reseller, or service provider. ● Use only a power source and connection appropriate for this product yourself. You can easily reach. NOTE: ... firmly and pulling it on the power cord. CAUTION: Spray the cleaner onto a cloth and use cleaners that are not covered under the HP warranty. ● Slots and openings in use. It may run behind the bezel and damage the electronics. Adjust only those controls that contain...
HP LD4200tm LCD Monitor User Guide
Page 12
NOTE: The LD4200tm stand uses six M4 x 12mm screws. Figure 3-1 Stand Accessory Contents 2. Installing the Stand (Sold Separately) 1. Figure 3-2 Sliding the Stand Onto the Monitor 4 Chapter 3 Setting Up ...
HP LD4200tm LCD Monitor User Guide
Page 13
Use the screws to secure the stand to the Monitor Connecting the Speakers (Sold Separately) 1. Figure 3-4 Mounting the Speakers 2. Figure 3-3 Securing the Stand to the rear side of the product. Figure 3-5 Securing the Speakers to the monitor. Use the four Taptite D3 x 12mm screws to secure the speakers to the Monitor ENWW Connecting the Speakers (Sold Separately) 5 Mount the speakers onto the product. 3.
HP LD4200tm LCD Monitor User Guide
Page 14
Figure 3-6 Using the Cable Holders (Feature Available on Select Models) Figure 3-7 Using the Cable Ties (Feature Available on select models) to organize the speaker cables. 3. After installing the speakers, use the cable holders and cable ties (available on Select Models) 6 Chapter 3 Setting Up the Monitor ENWW
HP LD4200tm LCD Monitor User Guide
Page 15
Figure 3-8 Connecting to the Input Terminal Rotating to the Portrait Position (Select Models) When installing the monitor in the portrait position, rotate it is on the bottom right corner in only one direction. Figure 3-9 Installing Portrait NOTE: The power indicator LED orientation is installed on the stand. 4. ENWW Rotating to portrait position. The monitor can be rotated if it clockwise based on the bottom left corner when rotated to the Portrait Position (Select Models) 7 After installing the speakers, connect the input terminal with a proper color match. NOTE: The ...
HP LD4200tm LCD Monitor User Guide
Page 16
Using the Remote Control Inserting the Batteries 1. NOTE: Dispose of used batteries in the recycle bin to prevent environmental pollution. Insert the batteries with correct polarity (+/-). 3. Close the battery cover. Slide off the battery cover. 2. Figure 3-10 Inserting Batteries 8 Chapter 3 Setting Up the Monitor ENWW
HP LD4200tm LCD Monitor User Guide
Page 17
When watching AV, RGB PC, HDMI/DVI, Component1, Component2, the product will open. Press the button repetitively to select an appropriate time duration. Toggles through video: AV > Component1 > Component2 > RGB PC > HDMI/DVI. Turns off . If you want using the up and down button. Automatic adjustment function (operational for the analog signal only). ENWW Using the Remote Control 9 Identifying Remote Control Buttons Figure 3-11 Remote Control Buttons Component 1 AV 2 Sleep 3 PSM 4 Menu 5 Up and Down 6 Mute 7 Power 8 Input Select 9 ARC 10 Auto 11 Exit Function ...
HP LD4200tm LCD Monitor User Guide
Page 18
Some devices require HDCP in order to display HD signals Connects the audio cable to the line-out jack of the PC sound card Connects a wired remote control to the monitor Connects the ... the PC sound card supports both Speaker Out and Line Out, convert to RS-232 devices HDMI supports High Definition input and HDCP (High-bandwidth Digital Content Protection). Refer to the speaker, including a built-in the user guide could be different from the actual image) Component 1 Power connector 2 RS-232C serial...
HP LD4200tm LCD Monitor User Guide
Page 19
...) signal cable to the RGB IN (1) connector on the rear of the monitor and the other end to the DVI connector (2) on the computer. For digital operation, connect the HDMI to DVI signal cable (not included) to the HDMI/DVI (1) connector on the rear of the monitor and the other end...
HP LD4200tm LCD Monitor User Guide
Page 20
... grounding plug is an important safety feature. • Plug the power cord in a grounded (earthed) outlet that no one is easily accessible at http://www.hp.com/ergo and/or on the documentation CD, if one may accidentally step on power to the power connector (1) on power cords or cables. Turn...