
Service Guide
Page 60
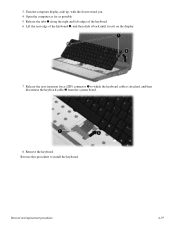
3. Remove the keyboard. Open the computer as far as possible. 5. Release the tabs 1 along the right and left edges of the keyboard 2, and then slide it back until it rests on the display. 7. Removal and replacement procedures 4-19 Release the zero insertion force (ZIF) connector 1 to install the keyboard. Turn the computer display-side up, with the front toward you. 4. Reverse this procedure to which the keyboard cable is attached, and then disconnect the keyboard cable 2 from the system board. 8. Lift the rear edge of the keyboard. 6.
3. Remove the keyboard. Open the computer as far as possible. 5. Release the tabs 1 along the right and left edges of the keyboard 2, and then slide it back until it rests on the display. 7. Removal and replacement procedures 4-19 Release the zero insertion force (ZIF) connector 1 to install the keyboard. Turn the computer display-side up, with the front toward you. 4. Reverse this procedure to which the keyboard cable is attached, and then disconnect the keyboard cable 2 from the system board. 8. Lift the rear edge of the keyboard. 6.
Service Guide
Page 62
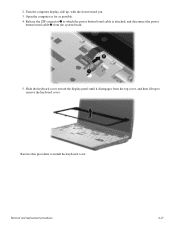
Reverse this procedure to remove the keyboard cover. Release the ZIF connector 1 to which the power button board cable is attached, and disconnect the power button board cable 2 from the top cover, and then lift up , with the front toward you. 3. Removal and replacement procedures 4-21 Turn the computer display-side up to install the keyboard cover. Open the computer as far as possible. 4. Slide the keyboard cover toward the display panel until it disengages from the system board. 5. 2.
Reverse this procedure to remove the keyboard cover. Release the ZIF connector 1 to which the power button board cable is attached, and disconnect the power button board cable 2 from the top cover, and then lift up , with the front toward you. 3. Removal and replacement procedures 4-21 Turn the computer display-side up to install the keyboard cover. Open the computer as far as possible. 4. Slide the keyboard cover toward the display panel until it disengages from the system board. 5. 2.

Service Guide
Page 72
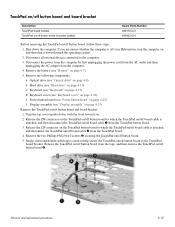
Release the ZIF connector to install the top cover. Remove the top cover 2. Turn the computer right-side up, with the front facing you. 5. Lift the rear edge of the top cover 1 until the top cover disengages from the system board. 6. 4. One Phillips PM2.0x4.0 screw 2 7. Removal and replacement procedures 4-31 Four Phillips PM2.0x6.0 screws 1 b. Remove the following screws: a. Reverse this procedure to which the TouchPad cable is attached, and disconnect the TouchPad cable from the base enclosure. 8.
Release the ZIF connector to install the top cover. Remove the top cover 2. Turn the computer right-side up, with the front facing you. 5. Lift the rear edge of the top cover 1 until the top cover disengages from the system board. 6. 4. One Phillips PM2.0x4.0 screw 2 7. Removal and replacement procedures 4-31 Four Phillips PM2.0x6.0 screws 1 b. Remove the following screws: a. Reverse this procedure to which the TouchPad cable is attached, and disconnect the TouchPad cable from the base enclosure. 8.
Service Guide
Page 73
... cable 1 from the TouchPad button board. 3. Remove the battery (see "Optical drive" on page 4-7). 5. Release the ZIF connector on the TouchPad on/off button board to help secure the TouchPad on /off button board 4. Release the ZIF connector on the TouchPad button board to the computer. 3. Disconnect all external devices connected to which the...
... cable 1 from the TouchPad button board. 3. Remove the battery (see "Optical drive" on page 4-7). 5. Release the ZIF connector on the TouchPad on/off button board to help secure the TouchPad on /off button board 4. Release the ZIF connector on the TouchPad button board to the computer. 3. Disconnect all external devices connected to which the...

Service Guide
Page 75
... (see "Keyboard cover" on , and then shut it down the computer. Reverse this procedure to the computer. 3. Keyboard cover (see "Keyboard" on page 4-7). 5. Release the ZIF connector 1 to the base enclosure. 3. Remove the two Phillips PM2.0×4.0 screws 3 that secure the audio board to which the audio board cable is off or...
... (see "Keyboard cover" on , and then shut it down the computer. Reverse this procedure to the computer. 3. Keyboard cover (see "Keyboard" on page 4-7). 5. Release the ZIF connector 1 to the base enclosure. 3. Remove the two Phillips PM2.0×4.0 screws 3 that secure the audio board to which the audio board cable is off or...


