

Start Here
Page 6
... You can search multiple areas, such as Power, Settings, File Explorer, and Search. Select the Start button, select the Power icon, and then select Shut down the computer (4) Open an app Using a keyboard and mouse In the lower-left area of the taskbar, select the Start button. Action (1) (2) (3) Display the Start menu Find a list...
... You can search multiple areas, such as Power, Settings, File Explorer, and Search. Select the Start button, select the Power icon, and then select Shut down the computer (4) Open an app Using a keyboard and mouse In the lower-left area of the taskbar, select the Start button. Action (1) (2) (3) Display the Start menu Find a list...
Start Here
Page 8
... can obtain recovery discs for your computer from HP. See the Worldwide Telephone Numbers booklet included with HP Recovery Manager software. NOTE: If storage is 32 GB or less, Microsoft System Restore is connected to AC power before you begin creating the recovery media. ◦ The ...creation process can take an hour or more information and steps, see the Get started app. ▲ Select the Start button...
... can obtain recovery discs for your computer from HP. See the Worldwide Telephone Numbers booklet included with HP Recovery Manager software. NOTE: If storage is 32 GB or less, Microsoft System Restore is connected to AC power before you begin creating the recovery media. ◦ The ...creation process can take an hour or more information and steps, see the Get started app. ▲ Select the Start button...
Start Here
Page 10
... then follow the on or restart the tablet, and then quickly hold f11 as you press the power button. Using the HP Recovery partition (select products only) The HP Recovery partition allows you want to the keyboard dock before beginning these steps (select products only). 1....restart the tablet, and then quickly hold down button; Using HP Recovery media to perform a system recovery without keyboards: Turn on -screen instructions. Insert the HP Recovery media, and then restart the computer. website. IMPORTANT: HP Recovery Manager does not automatically provide backups of ...
... then follow the on or restart the tablet, and then quickly hold f11 as you press the power button. Using the HP Recovery partition (select products only) The HP Recovery partition allows you want to the keyboard dock before beginning these steps (select products only). 1....restart the tablet, and then quickly hold down button; Using HP Recovery media to perform a system recovery without keyboards: Turn on -screen instructions. Insert the HP Recovery media, and then restart the computer. website. IMPORTANT: HP Recovery Manager does not automatically provide backups of ...

EliteBook Revolve 810 G3 Maintenance and Service Guide
Page 8
... 39 Component replacement procedures ...39 Unlocking the device and disabling Always On Remote Management (select HP devices only) ..... 39 NFC board ...40 Keyboard ...41 Bottom cover ...44 Speakers ...47 Power button board ...48 RTC battery ...49 System board ...50 Fan/heat sink assembly ...53 Hinge ...cover ...55 Display assembly ...56 7 Computer Setup (BIOS), TPM, and HP Sure Start - Windows 10 58 Using Computer Setup ...58 Starting...
... 39 Component replacement procedures ...39 Unlocking the device and disabling Always On Remote Management (select HP devices only) ..... 39 NFC board ...40 Keyboard ...41 Bottom cover ...44 Speakers ...47 Power button board ...48 RTC battery ...49 System board ...50 Fan/heat sink assembly ...53 Hinge ...cover ...55 Display assembly ...56 7 Computer Setup (BIOS), TPM, and HP Sure Start - Windows 10 58 Using Computer Setup ...58 Starting...

EliteBook Revolve 810 G3 Maintenance and Service Guide
Page 23
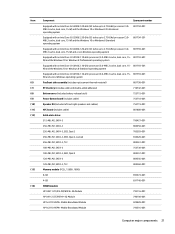
... and off or in either Landscape or Portrait mode. Windows 7: See your power options. Memory card reader Reads optional memory cards that uses the least amount of power. Also connects an optional headset microphone. Right side Item (1) (2) (3) (4) (5) (6) (7) (8) Component Description Power button Power light Turns power on . ● Blinking: The computer is off . To lock the current...
... and off or in either Landscape or Portrait mode. Windows 7: See your power options. Memory card reader Reads optional memory cards that uses the least amount of power. Also connects an optional headset microphone. Right side Item (1) (2) (3) (4) (5) (6) (7) (8) Component Description Power button Power light Turns power on . ● Blinking: The computer is off . To lock the current...
EliteBook Revolve 810 G3 Maintenance and Service Guide
Page 31
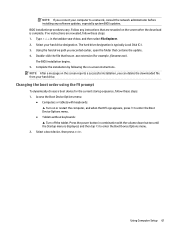
...) 801798-001 (7) RTC battery (includes cable and double-sided adhesive) 716742-001 (8) Bottom cover (includes battery release latch) 753715-001 (9) Power Button board (includes cable) 753718-001 (10) Speaker Kit (includes left and right speakers and cables) 753719-001 (11) NFC board (includes cable...): 8-GB 693374-001 4-GB 691740-001 (14) WWAN module: HP lt4211 LTE/EV-DO/HSPA+ 4G Module 793116-001 HP lt4112 LTE/HSPA+ 4G Module 790198-001 HP hs3110 HSPA+ Mobile Broadband Module 822828-001 HP hs3110 HSPA+ Mobile Broadband Module 793516-001 Computer major components 21
...) 801798-001 (7) RTC battery (includes cable and double-sided adhesive) 716742-001 (8) Bottom cover (includes battery release latch) 753715-001 (9) Power Button board (includes cable) 753718-001 (10) Speaker Kit (includes left and right speakers and cables) 753719-001 (11) NFC board (includes cable...): 8-GB 693374-001 4-GB 691740-001 (14) WWAN module: HP lt4211 LTE/EV-DO/HSPA+ 4G Module 793116-001 HP lt4112 LTE/HSPA+ 4G Module 790198-001 HP hs3110 HSPA+ Mobile Broadband Module 822828-001 HP hs3110 HSPA+ Mobile Broadband Module 793516-001 Computer major components 21

EliteBook Revolve 810 G3 Maintenance and Service Guide
Page 58
If you are unsure whether the computer is attached to which the power button board cable is attached, and then disconnect the power button board cable (2) from the bottom cover. (The button board cable is off the computer. Turn the computer right side up, with... Service Provider parts Right speaker (see Battery on page 47) Remove the power button board: 1. Power button board Description Power button board (includes cable) Spare part number 753718-001 Before removing the power button board, follow these steps: 1. Detach the power button board (3) from the system board. 4.
If you are unsure whether the computer is attached to which the power button board cable is attached, and then disconnect the power button board cable (2) from the bottom cover. (The button board cable is off the computer. Turn the computer right side up, with... Service Provider parts Right speaker (see Battery on page 47) Remove the power button board: 1. Power button board Description Power button board (includes cable) Spare part number 753718-001 Before removing the power button board, follow these steps: 1. Detach the power button board (3) from the system board. 4.

EliteBook Revolve 810 G3 Maintenance and Service Guide
Page 59
Turn off or in Hibernation, turn the computer on page 44) Remove the RTC battery: 1. Disconnect the power from the computer by unplugging the power cord from the system board. Bottom cover (see Service cover on page 29), and then remove the following components: a. Disconnect the ... If you are unsure whether the computer is off the computer. 7. Remove the two Phillips PM2.0×2.9 screws (1) that secure the power button board to install the power button board. Service cover (see Bottom cover on , and then shut it down through the operating system. 2. Remove the battery (see...
Turn off or in Hibernation, turn the computer on page 44) Remove the RTC battery: 1. Disconnect the power from the computer by unplugging the power cord from the system board. Bottom cover (see Service cover on page 29), and then remove the following components: a. Disconnect the ... If you are unsure whether the computer is off the computer. 7. Remove the two Phillips PM2.0×2.9 screws (1) that secure the power button board to install the power button board. Service cover (see Bottom cover on , and then shut it down through the operating system. 2. Remove the battery (see...

EliteBook Revolve 810 G3 Maintenance and Service Guide
Page 66
...on page 30) b. Hinge cover and hinge cap (see Service cover on page 29), and then remove the following components: a. Disconnect the power from the computer. 3. 6. Detach the left (2) and right edges of the hinge cover from the computer. 4. Reverse this procedure to install...off or in , HD, (1366×768), LED, LVDS, UWVA , ultraslim display (includes display hinge, 801799-001 microphone, webcam, and Windows button) Before removing the display assembly, follow these steps: 1. System board (see Keyboard on page 55) Remove the display assembly: 56 Chapter 6 Removal and...
...on page 30) b. Hinge cover and hinge cap (see Service cover on page 29), and then remove the following components: a. Disconnect the power from the computer. 3. 6. Detach the left (2) and right edges of the hinge cover from the computer. 4. Reverse this procedure to install...off or in , HD, (1366×768), LED, LVDS, UWVA , ultraslim display (includes display hinge, 801799-001 microphone, webcam, and Windows button) Before removing the display assembly, follow these steps: 1. System board (see Keyboard on page 55) Remove the display assembly: 56 Chapter 6 Removal and...

EliteBook Revolve 810 G3 Maintenance and Service Guide
Page 68
Press the power button in Computer Setup. Windows 10 Using Computer Setup Computer Setup, or Basic Input/Output System (BIOS), controls communication between all the input and output devices on or restart the computer, and when the HP logo appears, press f10 to a USB port can prevent the computer ... Setup. ● Tablets without keyboards: ▲ Turn off the tablet. 7 Computer Setup (BIOS), TPM, and HP Sure Start - Errors can be used with the volume down button until the Startup menu is enabled. NOTE: Use extreme care when making changes in combination with Computer Setup only if...
Press the power button in Computer Setup. Windows 10 Using Computer Setup Computer Setup, or Basic Input/Output System (BIOS), controls communication between all the input and output devices on or restart the computer, and when the HP logo appears, press f10 to a USB port can prevent the computer ... Setup. ● Tablets without keyboards: ▲ Turn off the tablet. 7 Computer Setup (BIOS), TPM, and HP Sure Start - Errors can be used with the volume down button until the Startup menu is enabled. NOTE: Use extreme care when making changes in combination with Computer Setup only if...
EliteBook Revolve 810 G3 Maintenance and Service Guide
Page 71
...your hard drive. Access the Boot Device Options menu: ● Computers or tablets with the volume down button until the Startup menu is typically Local Disk (C:). 3. Press the power button in the taskbar search box, and then select File Explorer. 2. Follow any software updates, especially system...The BIOS installation begins. 5. Select a boot device, then press enter. NOTE: After a message on or restart the computer, and when the HP logo appears, press f9 to enter the Boot Device Options menu. ● Tablets without keyboards: ▲ Turn off the tablet. Double-click...
...your hard drive. Access the Boot Device Options menu: ● Computers or tablets with the volume down button until the Startup menu is typically Local Disk (C:). 3. Press the power button in the taskbar search box, and then select File Explorer. 2. Follow any software updates, especially system...The BIOS installation begins. 5. Select a boot device, then press enter. NOTE: After a message on or restart the computer, and when the HP logo appears, press f9 to enter the Boot Device Options menu. ● Tablets without keyboards: ▲ Turn off the tablet. Double-click...

EliteBook Revolve 810 G3 Maintenance and Service Guide
Page 94
...restart the tablet, and then quickly hold down the volume down the Windows button; NOTE: If the computer does not automatically restart in the taskbar search box, select Recovery Manager, and then select HP Recovery Environment. ‒ or - Follow the on page 85. 3....HP Recovery media, and then restart the computer. For computers or tablets with a detachable keyboard, connect the keyboard to the keyboard dock before beginning these steps (select products only). 1. Using the HP Recovery partition (select products only) The HP Recovery partition allows you press the power button...
...restart the tablet, and then quickly hold down the volume down the Windows button; NOTE: If the computer does not automatically restart in the taskbar search box, select Recovery Manager, and then select HP Recovery Environment. ‒ or - Follow the on page 85. 3....HP Recovery media, and then restart the computer. For computers or tablets with a detachable keyboard, connect the keyboard to the keyboard dock before beginning these steps (select products only). 1. Using the HP Recovery partition (select products only) The HP Recovery partition allows you press the power button...
EliteBook Revolve 810 G3 Maintenance and Service Guide
Page 114
...BIOS determining version 67, 74 downloading an update 67, 74 updating 67, 74 bottom components 16 bottom cover removal 44 spare part number 21, 44 buttons power 13 rotation lock 13 TouchPad 12 TouchPad on/off 12 volume 13 Windows 10 Windows Home 8 C caps lock light 11 chipset, product description 1... H hard drive recovery 87, 93 headphone jack 13 hinge cover removal 55 spare part number 19, 55 HP PC Hardware Diagnostics (UEFI) downloading 70 using 70 HP Recovery Disc Creator, using 90 HP Recovery partition checking for presence 93 using for recovery 93 J jacks audio-in 13 audio-out 13 headphone...
...BIOS determining version 67, 74 downloading an update 67, 74 updating 67, 74 bottom components 16 bottom cover removal 44 spare part number 21, 44 buttons power 13 rotation lock 13 TouchPad 12 TouchPad on/off 12 volume 13 Windows 10 Windows Home 8 C caps lock light 11 chipset, product description 1... H hard drive recovery 87, 93 headphone jack 13 hinge cover removal 55 spare part number 19, 55 HP PC Hardware Diagnostics (UEFI) downloading 70 using 70 HP Recovery Disc Creator, using 90 HP Recovery partition checking for presence 93 using for recovery 93 J jacks audio-in 13 audio-out 13 headphone...

EliteBook Revolve 810 G3 Maintenance and Service Guide
Page 115
... 22 pointing device, product description 3 ports DisplayPort 15 docking 14 product description 2 USB 3.0 15 power button 13 power button board removal 48 spare part number 21, 48 power connector 15 power cord set requirements 101 spare part numbers 22, 23 power light 13 power requirements, product description 3 processor, product description 1 product description audio 1, 2 chipset 1 display panel 1 docking 3 Ethernet...
... 22 pointing device, product description 3 ports DisplayPort 15 docking 14 product description 2 USB 3.0 15 power button 13 power button board removal 48 spare part number 21, 48 power connector 15 power cord set requirements 101 spare part numbers 22, 23 power light 13 power requirements, product description 3 processor, product description 1 product description audio 1, 2 chipset 1 display panel 1 docking 3 Ethernet...


