HP Mini User Guide - Windows XP
Page 15
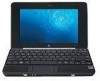
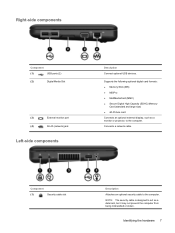
NOTE: The security cable is designed to the computer. Right-side components Component (1) USB ports (2) (2) Digital Media Slot (3) External monitor port (4) RJ-45 (network) jack Left-side components Description Connect optional USB devices. Connects a network cable. Supports the following optional digital card formats: ..., such as a monitor or projector, to act as a deterrent, but it may not prevent the computer from being mishandled or stolen. Component (1) Security cable slot Description Attaches an optional security cable to the computer. Identifying the hardware 7
NOTE: The security cable is designed to the computer. Right-side components Component (1) USB ports (2) (2) Digital Media Slot (3) External monitor port (4) RJ-45 (network) jack Left-side components Description Connect optional USB devices. Connects a network cable. Supports the following optional digital card formats: ..., such as a monitor or projector, to act as a deterrent, but it may not prevent the computer from being mishandled or stolen. Component (1) Security cable slot Description Attaches an optional security cable to the computer. Identifying the hardware 7
HP Mini User Guide - Windows XP
Page 18
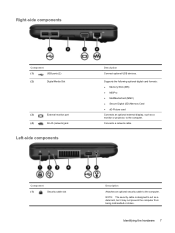
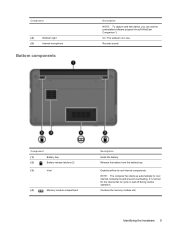
... and off during routine operation. To access these notices, click Start > Help and Support > User Guides. 10 Chapter 2 Knowing the parts Contains the memory module slot. It is normal for the internal fan to cool internal components and prevent overheating. Component (3) Vent (4) Memory module compartment Wireless antennas Description Enables airflow to...
... and off during routine operation. To access these notices, click Start > Help and Support > User Guides. 10 Chapter 2 Knowing the parts Contains the memory module slot. It is normal for the internal fan to cool internal components and prevent overheating. Component (3) Vent (4) Memory module compartment Wireless antennas Description Enables airflow to...

HP Mini User Guide - Windows XP
Page 42
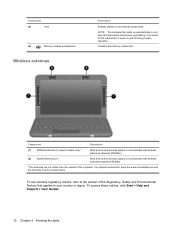
NOTE: HP Mobile Broadband will be disabled if the battery is firmly seated. 8. Then shut down the computer. Disconnect all external devices connected to the computer. 4. Reconnect ... or in Hibernation, turn the computer on a flat surface, with the battery bay toward you. 6. Turn on the computer. 7. Insert the SIM into the SIM slot, and gently push the SIM into the slot until it is not replaced. 9. Replace the battery. Reconnect external devices. 11.
NOTE: HP Mobile Broadband will be disabled if the battery is firmly seated. 8. Then shut down the computer. Disconnect all external devices connected to the computer. 4. Reconnect ... or in Hibernation, turn the computer on a flat surface, with the battery bay toward you. 6. Turn on the computer. 7. Insert the SIM into the SIM slot, and gently push the SIM into the slot until it is not replaced. 9. Replace the battery. Reconnect external devices. 11.

HP Mini User Guide - Windows XP
Page 43
Press in on the computer. Replace the battery. 9. Using HP Mobile Broadband (select models only) 35 Reconnect external power. 10. 7. Turn on the SIM (1), and then remove it from the slot (2). 8. Reconnect external devices. 11.
Press in on the computer. Replace the battery. 9. Using HP Mobile Broadband (select models only) 35 Reconnect external power. 10. 7. Turn on the SIM (1), and then remove it from the slot (2). 8. Reconnect external devices. 11.
HP Mini User Guide - Windows XP
Page 60
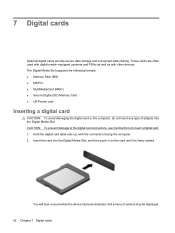
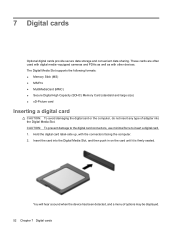
You will hear a sound when the device has been detected, and a menu of adapter into the Digital Media Slot, and then push in on the card until it is firmly seated. The Digital Media Slot supports the following formats: ● Memory Stick (MS) ● MS/Pro ● MultiMediaCard (MMC) ● Secure ...or the computer, do not insert any type of options may be displayed. 52 Chapter 7 Digital cards Insert the card into the Digital Media Slot. Hold the digital card label-side up, with other devices. These cards are often used with digital media-equipped cameras and PDAs as well ...
You will hear a sound when the device has been detected, and a menu of adapter into the Digital Media Slot, and then push in on the card until it is firmly seated. The Digital Media Slot supports the following formats: ● Memory Stick (MS) ● MS/Pro ● MultiMediaCard (MMC) ● Secure ...or the computer, do not insert any type of options may be displayed. 52 Chapter 7 Digital cards Insert the card into the Digital Media Slot. Hold the digital card label-side up, with other devices. These cards are often used with digital media-equipped cameras and PDAs as well ...
HP Mini User Guide - Windows XP
Page 61
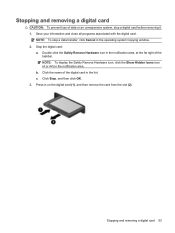
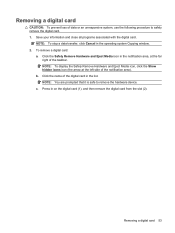
NOTE: To stop a data transfer, click Cancel in the notification area, at the far right of data or an unresponsive system, stop a digital card before removing it. 1. NOTE: To display the Safely Remove Hardware icon, click the Show Hidden Icons icon (< or Save your information and close all programs associated with the digital card. Stop the digital card: a. Double-click the Safely Remove Hardware icon in the operating system Copying window. 2. Stopping and removing a digital card CAUTION: To prevent loss of the taskbar.
NOTE: To stop a data transfer, click Cancel in the notification area, at the far right of data or an unresponsive system, stop a digital card before removing it. 1. NOTE: To display the Safely Remove Hardware icon, click the Show Hidden Icons icon (< or Save your information and close all programs associated with the digital card. Stop the digital card: a. Double-click the Safely Remove Hardware icon in the operating system Copying window. 2. Stopping and removing a digital card CAUTION: To prevent loss of the taskbar.

HP Mini User Guide - Windows XP
Page 71
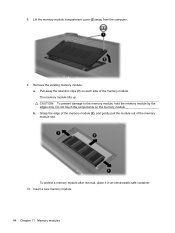
... the computer through the operating system. 3. 11 Memory modules The computer has one memory module compartment, which is off or in the primary memory module slot. Shut down the computer and close the display. Disconnect all batteries before installing a memory module. Unplug the power cord from the computer. 7. Save your work...
... the computer through the operating system. 3. 11 Memory modules The computer has one memory module compartment, which is off or in the primary memory module slot. Shut down the computer and close the display. Disconnect all batteries before installing a memory module. Unplug the power cord from the computer. 7. Save your work...
HP Mini User Guide - Windows XP
Page 72
... Chapter 11 Memory modules Pull away the retention clips (1) on the memory module. Do not touch the components on each side of the memory module slot. b. To protect a memory module after removal, place it in an electrostatic-safe container. 10. CAUTION: To prevent damage to the memory module, hold the memory...
... Chapter 11 Memory modules Pull away the retention clips (1) on the memory module. Do not touch the components on each side of the memory module slot. b. To protect a memory module after removal, place it in an electrostatic-safe container. 10. CAUTION: To prevent damage to the memory module, hold the memory...
HP Mini User Guide - Windows XP
Page 73
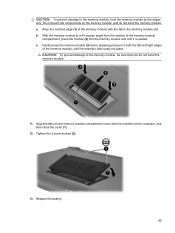
...memory module (3) down, applying pressure to both the left and right edges of the memory module, until the retention clips snap into the memory module slot until it is seated. CAUTION: To prevent damage to the memory module, hold the memory module by the edges only. CAUTION: To prevent damage... you do not bend the memory module. b. Do not touch the components on the memory module compartment cover with the tab in the memory module slot. Align the notched edge (1) of the memory module compartment, press the module (2) into place. With the memory module at a 45-degree angle from the...
...memory module (3) down, applying pressure to both the left and right edges of the memory module, until the retention clips snap into the memory module slot until it is seated. CAUTION: To prevent damage to the memory module, hold the memory module by the edges only. CAUTION: To prevent damage... you do not bend the memory module. b. Do not touch the components on the memory module compartment cover with the tab in the memory module slot. Align the notched edge (1) of the memory module compartment, press the module (2) into place. With the memory module at a 45-degree angle from the...

HP Mini User Guide - Windows XP
Page 84
... 23 cord, power 11 corporate WLAN connection 31 critical battery level 20 D Diagnostics menu 75 digital card inserting 52 removing 53 stopping 53 Digital Media Slot, identifying 7 diskette drive 61 display image, switching 58 screen brightness hotkeys 58 display switch, identifying 9 displaying system information 73 drive light, identifying 6 drive media 13...
... 23 cord, power 11 corporate WLAN connection 31 critical battery level 20 D Diagnostics menu 75 digital card inserting 52 removing 53 stopping 53 Digital Media Slot, identifying 7 diskette drive 61 display image, switching 58 screen brightness hotkeys 58 display switch, identifying 9 displaying system information 73 drive light, identifying 6 drive media 13...
HP Mini User Guide - Windows XP
Page 86
... 13 regulatory information HP Mobile Broadband Module serial number 12 regulatory label 12 wireless 12 release latches battery 9, 18 restoring default settings 73 right TouchPad button, identifying 4 RJ-45 (network) jack, identifying 7 S screen brightness hotkeys 58 screen image, switching 58 security cable slot, identifying 7 Security menu 74 security, cable slot 7 security, wireless 30...
... 13 regulatory information HP Mobile Broadband Module serial number 12 regulatory label 12 wireless 12 release latches battery 9, 18 restoring default settings 73 right TouchPad button, identifying 4 RJ-45 (network) jack, identifying 7 S screen brightness hotkeys 58 screen image, switching 58 security cable slot, identifying 7 Security menu 74 security, cable slot 7 security, wireless 30...
Mini User Guide - Windows 7
Page 17
... prevent the computer from being mishandled or stolen. Right-side components Component (1) USB ports (2) (2) Digital Media Slot (3) External monitor port (4) RJ-45 (network) jack Left-side components Description Connect optional USB devices. Component (1) Security cable slot Description Attaches an optional security cable to the computer. Identifying the hardware 7 Connects a network cable. NOTE...
... prevent the computer from being mishandled or stolen. Right-side components Component (1) USB ports (2) (2) Digital Media Slot (3) External monitor port (4) RJ-45 (network) jack Left-side components Description Connect optional USB devices. Component (1) Security cable slot Description Attaches an optional security cable to the computer. Identifying the hardware 7 Connects a network cable. NOTE...
Mini User Guide - Windows 7
Page 19
... routine operation. Identifying the hardware 9 Enables airflow to cool internal components and prevent overheating. Release the battery from the battery bay. Contains the memory module slot. Component (4) Webcam light (5) Internal microphone Bottom components Description NOTE: To capture and edit videos, you can use . NOTE: The computer fan starts up automatically to...
... routine operation. Identifying the hardware 9 Enables airflow to cool internal components and prevent overheating. Release the battery from the battery bay. Contains the memory module slot. Component (4) Webcam light (5) Internal microphone Bottom components Description NOTE: To capture and edit videos, you can use . NOTE: The computer fan starts up automatically to...

Mini User Guide - Windows 7
Page 44
... on by sliding the power switch. Turn the computer upside down the computer. Insert the SIM into the SIM slot, and gently push the SIM into the slot until it is not replaced. 9. NOTE: HP Mobile Broadband is disabled if the battery is firmly seated. 8. Reconnect external devices. 11. If you are not...
... on by sliding the power switch. Turn the computer upside down the computer. Insert the SIM into the SIM slot, and gently push the SIM into the slot until it is not replaced. 9. NOTE: HP Mobile Broadband is disabled if the battery is firmly seated. 8. Reconnect external devices. 11. If you are not...

Mini User Guide - Windows 7
Page 45
4. Remove the battery. 7. Reconnect external devices. 11. Using HP Mobile Broadband (select models only) 35 Turn on a flat surface, with the battery bay toward you. 6. Turn the computer upside down on the computer. Reconnect external power. 10. Replace the battery. 9. Press in on the SIM (1), and then remove it from the AC outlet. 5. Unplug the power cord from the slot (2). 8.
4. Remove the battery. 7. Reconnect external devices. 11. Using HP Mobile Broadband (select models only) 35 Turn on a flat surface, with the battery bay toward you. 6. Turn the computer upside down on the computer. Reconnect external power. 10. Replace the battery. 9. Press in on the SIM (1), and then remove it from the AC outlet. 5. Unplug the power cord from the slot (2). 8.
Mini User Guide - Windows 7
Page 62
The Digital Media Slot supports the following formats: ● Memory Stick (MS) ● MS/Pro ● MultiMediaCard (MMC) ● Secure Digital... card. 1. You will hear a sound when the device has been detected, and a menu of adapter into the Digital Media Slot, and then push in on the card until it is firmly seated. These cards are often used with digital media-equipped cameras and... Hold the digital card label-side up, with other devices. Insert the card into the Digital Media Slot. 7 Digital cards Optional digital cards provide secure data storage and convenient data sharing.
The Digital Media Slot supports the following formats: ● Memory Stick (MS) ● MS/Pro ● MultiMediaCard (MMC) ● Secure Digital... card. 1. You will hear a sound when the device has been detected, and a menu of adapter into the Digital Media Slot, and then push in on the card until it is firmly seated. These cards are often used with digital media-equipped cameras and... Hold the digital card label-side up, with other devices. Insert the card into the Digital Media Slot. 7 Digital cards Optional digital cards provide secure data storage and convenient data sharing.
Mini User Guide - Windows 7
Page 63
... safely remove the digital card. 1. NOTE: To stop a data transfer, click Cancel in on the digital card (1), and then remove the digital card from the slot (2). To remove a digital card: a. Click the name of the notification area). NOTE: To display the Safely Remove Hardware and Eject Media icon, click the Show...
... safely remove the digital card. 1. NOTE: To stop a data transfer, click Cancel in on the digital card (1), and then remove the digital card from the slot (2). To remove a digital card: a. Click the name of the notification area). NOTE: To display the Safely Remove Hardware and Eject Media icon, click the Show...
Mini User Guide - Windows 7
Page 73
...: 1. Remove the battery from the AC outlet. 5. 11 Memory modules The computer has one memory module compartment, which is off or in the memory module slot.
...: 1. Remove the battery from the AC outlet. 5. 11 Memory modules The computer has one memory module compartment, which is off or in the memory module slot.

Mini User Guide - Windows 7
Page 74
The memory module tilts up. Do not touch the components on each side of the memory module slot. Grasp the edge of the memory module (2), and gently pull the module out of the memory module. Insert a new memory module: 64 Chapter 11 Memory ...
The memory module tilts up. Do not touch the components on each side of the memory module slot. Grasp the edge of the memory module (2), and gently pull the module out of the memory module. Insert a new memory module: 64 Chapter 11 Memory ...

Mini User Guide - Windows 7
Page 75
... module, and do not bend the memory module. 11. Align the tabs on the memory module compartment cover with the tab in the memory module slot. Tighten the 2 cover screws (2). 13. Align the notched edge (1) of the memory module compartment, press the module (2) into the memory module... slot until the retention clips snap into place. a. Do not touch the components on the computer, and then close the cover (1). 12. CAUTION: To prevent damage ...
... module, and do not bend the memory module. 11. Align the tabs on the memory module compartment cover with the tab in the memory module slot. Tighten the 2 cover screws (2). 13. Align the notched edge (1) of the memory module compartment, press the module (2) into the memory module... slot until the retention clips snap into place. a. Do not touch the components on the computer, and then close the cover (1). 12. CAUTION: To prevent damage ...