User Manual
Page 1
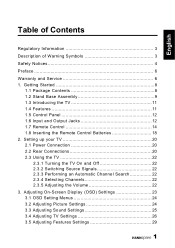
... of Contents Regulatory Information 3 Description of Warning Symbols 3 Safety Notices 4 Preface 6 Warranty and Service 6 1. Setting up your TV 20 2.1 Power Connection 20 2.2 Rear Connections 20 2.3 Using the TV 22 2.3.1 Turning the TV On and Off 22 2.3.2 Switching Source Signals 22 2.3.3 Performing an Automatic Channel Search 22 2.3.4 Selecting Channels 22 2.3.5 Adjusting the...
... of Contents Regulatory Information 3 Description of Warning Symbols 3 Safety Notices 4 Preface 6 Warranty and Service 6 1. Setting up your TV 20 2.1 Power Connection 20 2.2 Rear Connections 20 2.3 Using the TV 22 2.3.1 Turning the TV On and Off 22 2.3.2 Switching Source Signals 22 2.3.3 Performing an Automatic Channel Search 22 2.3.4 Selecting Channels 22 2.3.5 Adjusting the...
User Manual
Page 2
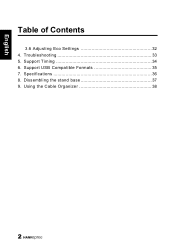
Troubleshooting 33 5. Support USB Compatible Formats 35 7. Dissembling the stand base 37 9. Specifications 36 8. Support Timing 34 6. Using the Cable Organizer 38 2 English Table of Contents 3.6 Adjusting Eco Settings 32 4.
Troubleshooting 33 5. Support USB Compatible Formats 35 7. Dissembling the stand base 37 9. Specifications 36 8. Support Timing 34 6. Using the Cable Organizer 38 2 English Table of Contents 3.6 Adjusting Eco Settings 32 4.
User Manual
Page 3
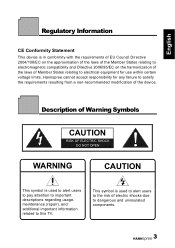
Hannspree cannot accept responsibility for use within certain voltage limits. Description of Warning Symbols CAUTION RISK OF ELECTRIC SHOCK DO NOT OPEN WARNING CAUTION This symbol is used to alert users to pay attention to important descriptions regarding usage, maintenance (repair), and additional important information related to this TV. This symbol is used to alert...
Hannspree cannot accept responsibility for use within certain voltage limits. Description of Warning Symbols CAUTION RISK OF ELECTRIC SHOCK DO NOT OPEN WARNING CAUTION This symbol is used to alert users to pay attention to important descriptions regarding usage, maintenance (repair), and additional important information related to this TV. This symbol is used to alert...

User Manual
Page 4
Leave sufficient distance between the TV and the wall to provide enough space for use by qualified service personnel only. WARNING To prevent the spread of fire, keep candles or other strong sources of heat. CAUTION These servicing instructions are ...
Leave sufficient distance between the TV and the wall to provide enough space for use by qualified service personnel only. WARNING To prevent the spread of fire, keep candles or other strong sources of heat. CAUTION These servicing instructions are ...

User Manual
Page 5
... flammable materials into the TV, contact an authorized service technician. 6. Be careful when disconnecting the power plug. Personal Safety 1. Do not attempt to use a VGA monitor cable with ferrite shield. To avoid electric shock, do not place the TV on a bed, sofa, carpet, or in locations where... TV. 4. Avoid blocking the TV's vents, do not disassemble the casing. 3. English Notes: • The LED-LCD HDTV is for entertainment use only and visual display tasks are located inside the TV. If the screen is made of main frequency on the power cord. Do not place...
... flammable materials into the TV, contact an authorized service technician. 6. Be careful when disconnecting the power plug. Personal Safety 1. Do not attempt to use a VGA monitor cable with ferrite shield. To avoid electric shock, do not place the TV on a bed, sofa, carpet, or in locations where... TV. 4. Avoid blocking the TV's vents, do not disassemble the casing. 3. English Notes: • The LED-LCD HDTV is for entertainment use only and visual display tasks are located inside the TV. If the screen is made of main frequency on the power cord. Do not place...
User Manual
Page 6
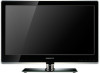
Preface Thank you in setting up , using the TV. Your new TV will allow you to assist you for purchasing a Hannspree Liquid Crystal Display Television (LEDLCD HDTV). The information in this manual in advance. English 3. This instruction manual is subject to avoid ...operations of the TV, it is given to the "Warranty Card" enclosed with advanced technology. To the extent allowed by applicable law, Hannspree, Inc. ("Hannspree") shall not be liable for accuracy; Install the outdoor antenna away from any defect or omission in this manual has been carefully checked...
Preface Thank you in setting up , using the TV. Your new TV will allow you to assist you for purchasing a Hannspree Liquid Crystal Display Television (LEDLCD HDTV). The information in this manual in advance. English 3. This instruction manual is subject to avoid ...operations of the TV, it is given to the "Warranty Card" enclosed with advanced technology. To the extent allowed by applicable law, Hannspree, Inc. ("Hannspree") shall not be liable for accuracy; Install the outdoor antenna away from any defect or omission in this manual has been carefully checked...

User Manual
Page 7
... are trademarks or registered trademarks of Hannspree, except for identification purpose only, and may be deemed to distribute or reproduce the copyrighted software. This manual is protected by copyright and distributed under licenses restricting its use that arises by operation of law in..., any copyrighted software contained in the product described herein shall not be reproduced in any means without the prior written authorization of Hannspree (or of a product. Accordingly, and to the extent allowed by any manner without the prior written authorization of Dolby Laboratories....
... are trademarks or registered trademarks of Hannspree, except for identification purpose only, and may be deemed to distribute or reproduce the copyrighted software. This manual is protected by copyright and distributed under licenses restricting its use that arises by operation of law in..., any copyrighted software contained in the product described herein shall not be reproduced in any means without the prior written authorization of Hannspree (or of a product. Accordingly, and to the extent allowed by any manner without the prior written authorization of Dolby Laboratories....
User Manual
Page 11
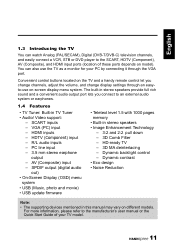
...STB or DVD player to the SCART, HDTV (Component), AV (Composite), and HDMI input ports (location of your PC by connecting it through an easyto-use on model). Dynamic contrast • Eco design • Noise Reduction Note: • The supporting devices mentioned in TV Tuner • Audio/ Video ...support: - English 1.3 Introducing the TV You can also use the TV as a monitor for your TV model. 11 VGA (PC) input - HD-ready TV - 3D MA deinterlacing - The built-in stereo speakers...
...STB or DVD player to the SCART, HDTV (Component), AV (Composite), and HDMI input ports (location of your PC by connecting it through an easyto-use on model). Dynamic contrast • Eco design • Noise Reduction Note: • The supporting devices mentioned in TV Tuner • Audio/ Video ...support: - English 1.3 Introducing the TV You can also use the TV as a monitor for your TV model. 11 VGA (PC) input - HD-ready TV - 3D MA deinterlacing - The built-in stereo speakers...

User Manual
Page 14
... cable to devices such as a DVD player or set -top box. Connect an HDMI equipment or an HDMI-DVI adapter cable to select a program directly. Use to devices such as a DVD player or set -top box.
... cable to devices such as a DVD player or set -top box. Connect an HDMI equipment or an HDMI-DVI adapter cable to select a program directly. Use to devices such as a DVD player or set -top box.

User Manual
Page 17
...., or 120Min.). Do not exceed an angle of the image with aspect ratio: Auto, Normal, Zoom1, Zoom2, and Full Screen. Note: • For best results, use the remote control within a proper distance from the front of the TV. English Description Sleep timer Aspect ratio Icon SLEEP ASPECT Function Press repeatedly to...
...., or 120Min.). Do not exceed an angle of the image with aspect ratio: Auto, Normal, Zoom1, Zoom2, and Full Screen. Note: • For best results, use the remote control within a proper distance from the front of the TV. English Description Sleep timer Aspect ratio Icon SLEEP ASPECT Function Press repeatedly to...

User Manual
Page 19
...your local recycling or waste disposal rules and contact a local waste disposal vendor to dispose of used batteries according to manufacturer's instructions. • Refer to the cover. • Do not use force when pulling the remote control cover open; Replace only with the same or equivalent type... recommended by the equipment manufacturer. Chemical fluids may damage the hinge. 19 English CAUTION • If the remote control is not used for a long period, remove the batteries and store them properly. • Handle damaged or leaking batteries carefully, and wash hands with...
...your local recycling or waste disposal rules and contact a local waste disposal vendor to dispose of used batteries according to manufacturer's instructions. • Refer to the cover. • Do not use force when pulling the remote control cover open; Replace only with the same or equivalent type... recommended by the equipment manufacturer. Chemical fluids may damage the hinge. 19 English CAUTION • If the remote control is not used for a long period, remove the batteries and store them properly. • Handle damaged or leaking batteries carefully, and wash hands with...

User Manual
Page 21
... scanning for channels. 8 Earphone • The internal TV speakers will also need a SCART adapter except for a SCART to SCART cable. • When a SCART adapter is used, the S-Video connector and AV connectors cannot be connected at the same time, or the wrong signals might be generated. • The SCART to SCART...
... scanning for channels. 8 Earphone • The internal TV speakers will also need a SCART adapter except for a SCART to SCART cable. • When a SCART adapter is used, the S-Video connector and AV connectors cannot be connected at the same time, or the wrong signals might be generated. • The SCART to SCART...

User Manual
Page 22
...number by pressing the number buttons on the remote control. 2.3.5 Adjusting the Volume 1 Press VOL+ on the control panel or remote control. English 2.3 Using the TV 2.3.1 Turning the TV On and Off 1 Press on the control panel or remote control to increase the volume. 2 Press VOL- The ... Switching Source Signals Press INPUT on the control panel or remote control to select the incoming source signal. 2.3.3 Performing an Automatic Channel Search Before using the TV to view programs, you need to activate the channel search first. 1 Press MENU on the control panel or remote control, then ...
...number by pressing the number buttons on the remote control. 2.3.5 Adjusting the Volume 1 Press VOL+ on the control panel or remote control. English 2.3 Using the TV 2.3.1 Turning the TV On and Off 1 Press on the control panel or remote control to increase the volume. 2 Press VOL- The ... Switching Source Signals Press INPUT on the control panel or remote control to select the incoming source signal. 2.3.3 Performing an Automatic Channel Search Before using the TV to view programs, you need to activate the channel search first. 1 Press MENU on the control panel or remote control, then ...

User Manual
Page 24
...OK Select EXIT Exit 5 Press EXIT to return to the Picture menu entry. 6 Press EXIT to exit the OSD menu. The Picture menu can be used to adjust the Smart Picture, Brightness, Contrast, Colour, Tint, Sharpness, Colour Temperature, Advanced Control, and Advanced Video (PC only) settings. • Smart... pressing / to move the scales from 0 to 7. • Colour Temperature can be set to Normal, Warm, or Cool. • Advanced Control can be used to adjust the Noise Reduction, Flesh Tone, Backlight, and X-Contrast. • Noise Reduction can be set to Auto, Off, Low, Medium, or High. •...
...OK Select EXIT Exit 5 Press EXIT to return to the Picture menu entry. 6 Press EXIT to exit the OSD menu. The Picture menu can be used to adjust the Smart Picture, Brightness, Contrast, Colour, Tint, Sharpness, Colour Temperature, Advanced Control, and Advanced Video (PC only) settings. • Smart... pressing / to move the scales from 0 to 7. • Colour Temperature can be set to Normal, Warm, or Cool. • Advanced Control can be used to adjust the Noise Reduction, Flesh Tone, Backlight, and X-Contrast. • Noise Reduction can be set to Auto, Off, Low, Medium, or High. •...
User Manual
Page 25
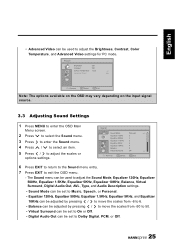
...EXIT to adjust the scales or options settings. English • Advanced Video can be set to On or Off. • Digital Audio Out can be used to adjust the Sound Mode, Equalizer 120Hz, Equalizer 500Hz, Equalizer 1.5KHz, Equalizer 5KHz, Equalizer 10KHz, Balance, Virtual Surround, Digital Audio Out, AVL, ...from -6 to 6. • Balance can be adjusted by pressing / to move the scales from -50 to 50. • Virtual Surround can be used to adjust the Brightness, Contrast, Color Temperature, and Advanced Video settings for PC mode. The Sound menu can be set to Dolby Digital, PCM, or...
...EXIT to adjust the scales or options settings. English • Advanced Video can be set to On or Off. • Digital Audio Out can be used to adjust the Sound Mode, Equalizer 120Hz, Equalizer 500Hz, Equalizer 1.5KHz, Equalizer 5KHz, Equalizer 10KHz, Balance, Virtual Surround, Digital Audio Out, AVL, ...from -6 to 6. • Balance can be adjusted by pressing / to move the scales from -50 to 50. • Virtual Surround can be used to adjust the Brightness, Contrast, Color Temperature, and Advanced Video settings for PC mode. The Sound menu can be set to Dolby Digital, PCM, or...
User Manual
Page 26
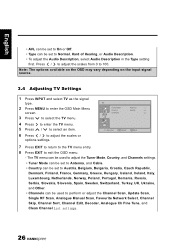
.... 3 Press to select the TV menu. 4 Press to enter the TV menu. 5 Press / to select an item. 6 Press / to 100. The TV menu can be used to adjust the Tuner Mode, Country, and Channels settings. • Tuner Mode can be set to Antenna, and Cable. • Country can be set to... OK Select EXIT Exit 7 Press EXIT to return to the TV menu entry. 8 Press EXIT to exit the OSD menu. - English • AVL can be used to perform or adjust the Channel Scan, Update Scan, Single RF Scan, Analogue Manual Scan, Favourite Network Select, Channel Skip, Channel Sort, Channel Edit, Decoder...
.... 3 Press to select the TV menu. 4 Press to enter the TV menu. 5 Press / to select an item. 6 Press / to 100. The TV menu can be used to adjust the Tuner Mode, Country, and Channels settings. • Tuner Mode can be set to Antenna, and Cable. • Country can be set to... OK Select EXIT Exit 7 Press EXIT to return to the TV menu entry. 8 Press EXIT to exit the OSD menu. - English • AVL can be used to perform or adjust the Channel Scan, Update Scan, Single RF Scan, Analogue Manual Scan, Favourite Network Select, Channel Skip, Channel Sort, Channel Edit, Decoder...
User Manual
Page 28
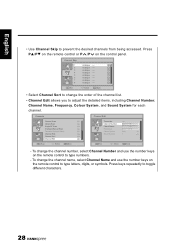
...OK Set Select EXIT Back - Select EXIT Back • Select Channel Sort to change the channel number, select Channel Number and use the number keys on the remote control to type numbers. - Press keys repeatedly to prevent the desired channels from being accessed. English •...; Use Channel Skip to toggle different characters. 28 To change the channel name, select Channel Name and use the number keys on the remote control to adjust the detailed items, including Channel Number...
...OK Set Select EXIT Back - Select EXIT Back • Select Channel Sort to change the channel number, select Channel Number and use the number keys on the remote control to type numbers. - Press keys repeatedly to prevent the desired channels from being accessed. English •...; Use Channel Skip to toggle different characters. 28 To change the channel name, select Channel Name and use the number keys on the remote control to adjust the detailed items, including Channel Number...
User Manual
Page 30
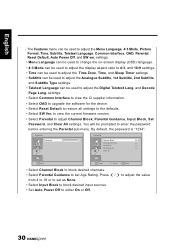
...the password is "1234". settings. • Menu Language can be used to change the on-screen display (OSD) language. • 4:3 Mode can be used to adjust the display aspect ratio to 4:3, and 16:9 settings. • Time can be used to adjust the Time Zone, Time, and Sleep Timer settings. ... adjust the Analogue Subtitle, 1st Subtitle, 2nd Subtitle, and Subtitle Type settings. • Teletext Language can be used to adjust the Digital Teletext Lang. You will be used to adjust Channel Block, Parental Guidance, Input Block, Set Password, and Clear All settings. Press / to adjust the ...
...the password is "1234". settings. • Menu Language can be used to change the on-screen display (OSD) language. • 4:3 Mode can be used to adjust the display aspect ratio to 4:3, and 16:9 settings. • Time can be used to adjust the Time Zone, Time, and Sleep Timer settings. ... adjust the Analogue Subtitle, 1st Subtitle, 2nd Subtitle, and Subtitle Type settings. • Teletext Language can be used to adjust the Digital Teletext Lang. You will be used to adjust Channel Block, Parental Guidance, Input Block, Set Password, and Clear All settings. Press / to adjust the ...
User Manual
Page 32
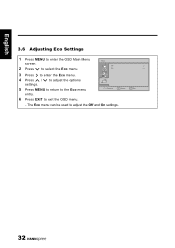
English 3.6 Adjusting Eco Settings 1 Press MENU to enter the OSD Main Menu screen. 2 Press to exit the OSD menu. Remove OK Select EXIT Exit - Eco Off On 3 Press to enter the Eco menu. 4 Press / to adjust the options settings. 5 Press MENU to return to the Eco menu entry. 6 Press EXIT to select the Eco menu. The Eco menu can be used to adjust the Off and On settings. 32
English 3.6 Adjusting Eco Settings 1 Press MENU to enter the OSD Main Menu screen. 2 Press to exit the OSD menu. Remove OK Select EXIT Exit - Eco Off On 3 Press to enter the Eco menu. 4 Press / to adjust the options settings. 5 Press MENU to return to the Eco menu entry. 6 Press EXIT to select the Eco menu. The Eco menu can be used to adjust the Off and On settings. 32
User Manual
Page 33
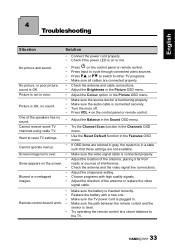
...• • No picture, or poor picture, • sound is OK. • Picture is not in a state such that those settings are connected properly. Use the Reset Default function in the Sound OSD menu. Adjust the location of the antenna, placing it far from roads or sources of the antenna... device is OK, no sound. • • • One of the speakers has no sound. • Cannot receive some TV • channels using cable TV. Turn the mute off. Replace the battery with high quality signals. Make sure the TV power cord is clear. Try operating the remote...
...• • No picture, or poor picture, • sound is OK. • Picture is not in a state such that those settings are connected properly. Use the Reset Default function in the Sound OSD menu. Adjust the location of the antenna, placing it far from roads or sources of the antenna... device is OK, no sound. • • • One of the speakers has no sound. • Cannot receive some TV • channels using cable TV. Turn the mute off. Replace the battery with high quality signals. Make sure the TV power cord is clear. Try operating the remote...


