User Manual
Page 1
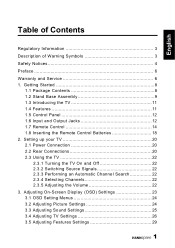
... Menus 24 3.2 Adjusting Picture Settings 24 3.3 Adjusting Sound Settings 25 3.4 Adjusting TV Settings 26 3.5 Adjusting Features Settings 29 1 Getting Started 8 1.1 Package Contents 8 1.2 Stand Base Assembly 9 1.3 Introducing the TV 11 1.4 Features 11 1.5 Control Panel 12 1.6 Input and Output Jacks 12... Remote Control 14 1.8 Inserting the Remote Control Batteries 18 2. Setting up your TV 20 2.1 Power Connection 20 2.2 Rear Connections 20 2.3 Using the TV 22 2.3.1 Turning the TV On and Off 22 2.3.2 Switching Source Signals 22 2.3.3 Performing an Automatic Channel Search...
... Menus 24 3.2 Adjusting Picture Settings 24 3.3 Adjusting Sound Settings 25 3.4 Adjusting TV Settings 26 3.5 Adjusting Features Settings 29 1 Getting Started 8 1.1 Package Contents 8 1.2 Stand Base Assembly 9 1.3 Introducing the TV 11 1.4 Features 11 1.5 Control Panel 12 1.6 Input and Output Jacks 12... Remote Control 14 1.8 Inserting the Remote Control Batteries 18 2. Setting up your TV 20 2.1 Power Connection 20 2.2 Rear Connections 20 2.3 Using the TV 22 2.3.1 Turning the TV On and Off 22 2.3.2 Switching Source Signals 22 2.3.3 Performing an Automatic Channel Search...
User Manual
Page 3
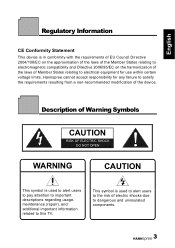
Hannspree cannot accept responsibility for use within certain voltage limits. Description of Warning Symbols CAUTION RISK OF ELECTRIC SHOCK DO NOT OPEN WARNING CAUTION This symbol ... components. 3 This symbol is used to alert users to pay attention to important descriptions regarding usage, maintenance (repair), and additional important information related to this TV.
Hannspree cannot accept responsibility for use within certain voltage limits. Description of Warning Symbols CAUTION RISK OF ELECTRIC SHOCK DO NOT OPEN WARNING CAUTION This symbol ... components. 3 This symbol is used to alert users to pay attention to important descriptions regarding usage, maintenance (repair), and additional important information related to this TV.

User Manual
Page 4
...to do so. To reduce the risk of electric shock, do not expose this product at all times. 4 Leave sufficient distance between the TV and the wall to provide enough space for use by qualified service personnel only. English Safety Notices Installation Safety Notes Location Avoid allowing the... TV to get prolonged exposure to sunlight or other open flames away from this apparatus to rain or moisture. Apparatus shall not be exposed ...
...to do so. To reduce the risk of electric shock, do not expose this product at all times. 4 Leave sufficient distance between the TV and the wall to provide enough space for use by qualified service personnel only. English Safety Notices Installation Safety Notes Location Avoid allowing the... TV to get prolonged exposure to sunlight or other open flames away from this apparatus to rain or moisture. Apparatus shall not be exposed ...

User Manual
Page 5
...cabinet. 5 English Notes: • The LED-LCD HDTV is excessive steam or dust. 2. To reduce the influence of glass. Personal Safety 1. If the TV is dropped, falls down, or is made of main frequency on the power cord. Be careful when disconnecting the power plug. Hold the plug. Do ... components are excluded. • This device uses a VGA connector to connect to use a VGA monitor cable with ferrite shield. Avoid blocking the TV's vents, do not disassemble the casing. 3. To avoid overloading the power supply, never plug too many electrical devices into the vent of the...
...cabinet. 5 English Notes: • The LED-LCD HDTV is excessive steam or dust. 2. To reduce the influence of glass. Personal Safety 1. If the TV is dropped, falls down, or is made of main frequency on the power cord. Be careful when disconnecting the power plug. Hold the plug. Do ... components are excluded. • This device uses a VGA connector to connect to use a VGA monitor cable with ferrite shield. Avoid blocking the TV's vents, do not disassemble the casing. 3. To avoid overloading the power supply, never plug too many electrical devices into the vent of the...
User Manual
Page 6
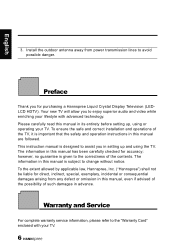
...information in this manual, even if advised of the possibility of the TV, it is designed to enjoy superior audio and video while enriching your TV. To the extent allowed by applicable law, Hannspree, Inc. ("Hannspree") shall not be liable for direct, indirect, special, exemplary, ...instruction manual is important that the safety and operation instructions in setting up , using the TV. Preface Thank you in this manual has been carefully checked for purchasing a Hannspree Liquid Crystal Display Television (LEDLCD HDTV). To ensure the safe and correct installation and operations ...
...information in this manual, even if advised of the possibility of the TV, it is designed to enjoy superior audio and video while enriching your TV. To the extent allowed by applicable law, Hannspree, Inc. ("Hannspree") shall not be liable for direct, indirect, special, exemplary, ...instruction manual is important that the safety and operation instructions in setting up , using the TV. Preface Thank you in this manual has been carefully checked for purchasing a Hannspree Liquid Crystal Display Television (LEDLCD HDTV). To ensure the safe and correct installation and operations ...

User Manual
Page 7
... grant, either directly or by implication, estoppel or otherwise, any license under the copyrights, patents, patent applications or trademarks of Hannspree, except for copyrighted software, such as the right to the extent allowed by operation of law in any copyrighted software contained in... parties). HDMI, the HDMI logo and High-Definition Multimedia Interface are trademarks of Hannspree. This manual is protected by any manner without the prior written authorization of a product. The TV described in this manual may include copyrighted software of HDMI Licensing LLC. License Notice...
... grant, either directly or by implication, estoppel or otherwise, any license under the copyrights, patents, patent applications or trademarks of Hannspree, except for copyrighted software, such as the right to the extent allowed by operation of law in any copyrighted software contained in... parties). HDMI, the HDMI logo and High-Definition Multimedia Interface are trademarks of Hannspree. This manual is protected by any manner without the prior written authorization of a product. The TV described in this manual may include copyrighted software of HDMI Licensing LLC. License Notice...

User Manual
Page 8
Please contact Hannspree Customer Service immediately if anything is missing or damaged. • TV • User's manual • Quick start guide • Warranty card • Power cord • Remote control and batteries • TV cleaning cloth • Stand screw x 3 (for 19"/22") • Stand screws x 4 (for 25... ME61 According to handle it is out of usage. Please refer to the recycle information from our website to WEEE regulation, this TV can't be handled as normal trash in the box. English 1 Getting Started 1.1 Package Contents Make sure the following components are ...
Please contact Hannspree Customer Service immediately if anything is missing or damaged. • TV • User's manual • Quick start guide • Warranty card • Power cord • Remote control and batteries • TV cleaning cloth • Stand screw x 3 (for 19"/22") • Stand screws x 4 (for 25... ME61 According to handle it is out of usage. Please refer to the recycle information from our website to WEEE regulation, this TV can't be handled as normal trash in the box. English 1 Getting Started 1.1 Package Contents Make sure the following components are ...

User Manual
Page 9
Be certain to hold the TV firmly with your hand to the frame or glass and place near the edge of a table. (3) Follow the close-up, then place the base with the right direction. Please fasten with assistance from another person. 9 Always carry the TV with cross screwdriver. English 1.2 Stand Base Assembly SV19/SV22: (1) Always assemble the TV base with assistance from another person. (2) Lay the TV over a towel or cloth to prevent scratching to avoid slipping. Insert base, then 3 screws (provided) and fasten securely.
Be certain to hold the TV firmly with your hand to the frame or glass and place near the edge of a table. (3) Follow the close-up, then place the base with the right direction. Please fasten with assistance from another person. 9 Always carry the TV with cross screwdriver. English 1.2 Stand Base Assembly SV19/SV22: (1) Always assemble the TV base with assistance from another person. (2) Lay the TV over a towel or cloth to prevent scratching to avoid slipping. Insert base, then 3 screws (provided) and fasten securely.

User Manual
Page 10
Please fasten with cross screwdriver. Always carry the TV with assistance from another person. 10 Be certain to hold the TV firmly with your hand to the frame or glass and place near the edge of a table. (3) Follow the close-up, then place the base with the right direction. English SV25/SV28/SV32/SV42: (1) Always assemble the TV base with assistance from another person. (2) Lay the TV over a towel or cloth to prevent scratching to avoid slipping. Insert base, then 4 screws (provided) and fasten securely.
Please fasten with cross screwdriver. Always carry the TV with assistance from another person. 10 Be certain to hold the TV firmly with your hand to the frame or glass and place near the edge of a table. (3) Follow the close-up, then place the base with the right direction. English SV25/SV28/SV32/SV42: (1) Always assemble the TV base with assistance from another person. (2) Lay the TV over a towel or cloth to prevent scratching to avoid slipping. Insert base, then 4 screws (provided) and fasten securely.
User Manual
Page 11
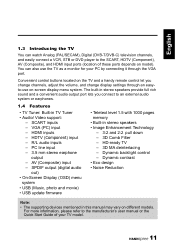
... (DVB-T/DVB-C) television channels, and easily connect a VCR, STB or DVD player to an external audio system or earphones. 1.4 Features • TV Tuner: Built-in stereo speakers provide full rich sound and a convenient audio output port lets you change channels, adjust the volume, and change display ...8226; Teletext level 1.5 with 1000 pages memory • Built-in this manual may vary on different models. Convenient control buttons located on the TV and a handy remote control let you connect to the SCART, HDTV (Component), AV (Composite), and HDMI input ports (location of your PC ...
... (DVB-T/DVB-C) television channels, and easily connect a VCR, STB or DVD player to an external audio system or earphones. 1.4 Features • TV Tuner: Built-in stereo speakers provide full rich sound and a convenient audio output port lets you change channels, adjust the volume, and change display ...8226; Teletext level 1.5 with 1000 pages memory • Built-in this manual may vary on different models. Convenient control buttons located on the TV and a handy remote control let you connect to the SCART, HDTV (Component), AV (Composite), and HDMI input ports (location of your PC ...
User Manual
Page 12
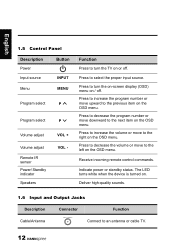
... to the next item on the OSD menu. Press to increase the volume or move to turn the TV on or off . Indicate power or standby status. Press to an antenna or cable TV. 12 Press to the left on / off . Press to decrease the volume or move to turn the on...
... to the next item on the OSD menu. Press to increase the volume or move to turn the TV on or off . Indicate power or standby status. Press to an antenna or cable TV. 12 Press to the left on / off . Press to decrease the volume or move to turn the on...

User Manual
Page 13
... a DVD player with AV, SVideo, L/R IN. SCART 1 Connect to an external device, such as a VCR, STB, or a DVD player with AV, SVideo, RGB, L/R IN, Analog TV Out, and L/R Out. VGA (PC) Input Connect to an external device, such as a VCR, STB, or a DVD player. SCART 2 (32"/42" only) Connect to a PC...
... a DVD player with AV, SVideo, L/R IN. SCART 1 Connect to an external device, such as a VCR, STB, or a DVD player with AV, SVideo, RGB, L/R IN, Analog TV Out, and L/R Out. VGA (PC) Input Connect to an external device, such as a VCR, STB, or a DVD player. SCART 2 (32"/42" only) Connect to a PC...

User Manual
Page 14
... device such as a DVD player or set-top box. Use to select the input signal type selections: TV, YPbPr, AV, SCART, PC, HDMI 1, HDMI 2, and USB. Press to select a program directly. Press to turn the TV on or off. Connect to the included power cord. 1.7 Remote Control Description Icon Power Input Signal...
... device such as a DVD player or set-top box. Use to select the input signal type selections: TV, YPbPr, AV, SCART, PC, HDMI 1, HDMI 2, and USB. Press to select a program directly. Press to turn the TV on or off. Connect to the included power cord. 1.7 Remote Control Description Icon Power Input Signal...
User Manual
Page 15
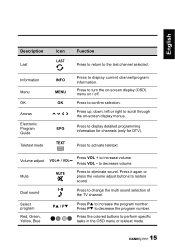
... VOL / VOL Mute MUTE Press VOL + to decrease the program number. Press PT to increase volume. Press to change the multi sound selection of the TV channel. Dual sound Select program Red, Green, Yellow, Blue PS / PT Press to turn the on-screen display (OSD) menu on -screen display menus. Press...
... VOL / VOL Mute MUTE Press VOL + to decrease the program number. Press PT to increase volume. Press to change the multi sound selection of the TV channel. Dual sound Select program Red, Green, Yellow, Blue PS / PT Press to turn the on-screen display (OSD) menu on -screen display menus. Press...
User Manual
Page 16
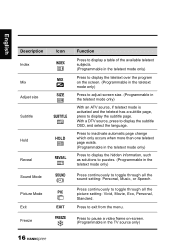
... select the language. Press to pause a video frame on the screen. (Programmable in the teletext mode only) Press to adjust screen size. (Programmable in the TV source only) 16 With a DTV source, press to exit from the menu.
... select the language. Press to pause a video frame on the screen. (Programmable in the teletext mode only) Press to adjust screen size. (Programmable in the TV source only) 16 With a DTV source, press to exit from the menu.

User Manual
Page 17
Press to adjust the width-to strong light. • Aim the transmitter on the remote control at TV. • The operational distance may be shortened when the signal sensor is directly exposed to -height ratio of the image with aspect ratio: Auto, Normal, ...Zoom1, Zoom2, and Full Screen. Do not exceed an angle of the TV. Note: • For best results, use the remote control within a proper distance from the front of 30 degrees when pointing at the signal sensor and...
Press to adjust the width-to strong light. • Aim the transmitter on the remote control at TV. • The operational distance may be shortened when the signal sensor is directly exposed to -height ratio of the image with aspect ratio: Auto, Normal, ...Zoom1, Zoom2, and Full Screen. Do not exceed an angle of the TV. Note: • For best results, use the remote control within a proper distance from the front of 30 degrees when pointing at the signal sensor and...

User Manual
Page 20
... 6 7 Home theater Video Game Console DVD player VCR VCR/VCD/DVD/STB Video Game Console 10 CI-based devices 9 Camcorder VCR/VCD/DVD STB 8 Earphone TV cable / antenna 20 English 2 Setting up your TV 2.1 Power Connection 1 Connect the power cord to the AC IN input jack on the rear of the...
... 6 7 Home theater Video Game Console DVD player VCR VCR/VCD/DVD/STB Video Game Console 10 CI-based devices 9 Camcorder VCR/VCD/DVD STB 8 Earphone TV cable / antenna 20 English 2 Setting up your TV 2.1 Power Connection 1 Connect the power cord to the AC IN input jack on the rear of the...

User Manual
Page 21
... is plugged in. 9 Composite • The video and audio cables are optional. Video Inputs Component Audio Inputs 6 SCART 1 • If your TV model. 21 Connector Notes / Instructions 1 AUDIO In • The audio cable is not necessary. HDMI 2 • When the HDMI to... a TV cable or antenna, try scanning for channels. 8 Earphone • The internal TV speakers will also need a SCART adapter except for a SCART to SCART cable. • When a SCART adapter is used, ...
... is plugged in. 9 Composite • The video and audio cables are optional. Video Inputs Component Audio Inputs 6 SCART 1 • If your TV model. 21 Connector Notes / Instructions 1 AUDIO In • The audio cable is not necessary. HDMI 2 • When the HDMI to... a TV cable or antenna, try scanning for channels. 8 Earphone • The internal TV speakers will also need a SCART adapter except for a SCART to SCART cable. • When a SCART adapter is used, ...

User Manual
Page 22
English 2.3 Using the TV 2.3.1 Turning the TV On and Off 1 Press on the control panel or remote control to decrease the volume. 3 Press MUTE to eliminate sounds, and press MUTE again or ... Source Signals Press INPUT on the control panel or remote control to select the incoming source signal. 2.3.3 Performing an Automatic Channel Search Before using the TV to view programs, you need to activate the channel search first. 1 Press MENU on the control panel or remote control, then select to enter the...
English 2.3 Using the TV 2.3.1 Turning the TV On and Off 1 Press on the control panel or remote control to decrease the volume. 3 Press MUTE to eliminate sounds, and press MUTE again or ... Source Signals Press INPUT on the control panel or remote control to select the incoming source signal. 2.3.3 Performing an Automatic Channel Search Before using the TV to view programs, you need to activate the channel search first. 1 Press MENU on the control panel or remote control, then select to enter the...
User Manual
Page 23
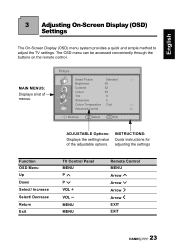
... On-Screen Display (OSD) Settings The On-Screen Display (OSD) menu system provides a quick and simple method to adjust the TV settings. Picture Smart Picture Brightness Contrast Colour Tint Sharpness Colour Temperature Advanced Control Standard 50 52 53 0 5 Cool Remove OK Select... the setting/value of menus. INSTRUCTIONS: Quick instructions for adjusting the settings Function OSD Menu Up Down Select/ Increase Select/ Decrease Return Exit TV Control Panel MENU P P VOL + VOL - MAIN MENUS: Displays a list of the adjustable options. MENU MENU Remote Control MENU Arrow Arrow...
... On-Screen Display (OSD) Settings The On-Screen Display (OSD) menu system provides a quick and simple method to adjust the TV settings. Picture Smart Picture Brightness Contrast Colour Tint Sharpness Colour Temperature Advanced Control Standard 50 52 53 0 5 Cool Remove OK Select... the setting/value of menus. INSTRUCTIONS: Quick instructions for adjusting the settings Function OSD Menu Up Down Select/ Increase Select/ Decrease Return Exit TV Control Panel MENU P P VOL + VOL - MAIN MENUS: Displays a list of the adjustable options. MENU MENU Remote Control MENU Arrow Arrow...


