User Manual
Page 2
... interference by turning the equipment off and on a circuit different from that to which can radiate radio frequency energy, and if not installed and used in accordance with regard to Low Voltage directive. Operation is no guarantee that interference will not occur in a residential... installation. Socket-outlet shall be near the equipment and shall be retained for help. These limits are designed to radio communications. This equipment ...
... interference by turning the equipment off and on a circuit different from that to which can radiate radio frequency energy, and if not installed and used in accordance with regard to Low Voltage directive. Operation is no guarantee that interference will not occur in a residential... installation. Socket-outlet shall be near the equipment and shall be retained for help. These limits are designed to radio communications. This equipment ...
User Manual
Page 4
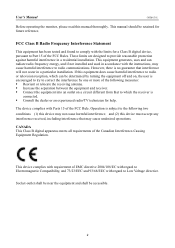
User's Manual TABLE OF CONTENTS SAFETY NOTICE 5 PRECAUTIONS 5 SPECIAL NOTES ON LCD MONITORS 6 BEFORE YOU OPERATE THE MONITOR 7 FEATURES...7 CHECKING THE CONTENTS OF THE PACKAGE 7 INSTALLATION INSTRUCTIONS 8 POWER...8 SETTING THE MONITOR ON THE WALL 9 MAKING CONNECTIONS 10 DJUSTING THE VIEWING ANGLE 11 OPERATING INSTRUCTIONS 13 GENERAL INSTRUCTIONS 13 FRONT PANEL CONTROL 14 HOW TO ADJUST A SETTINGS 16 PLUG AND PLAY 19 TECHNICAL SUPPORT (FAQ 20 Q & A FOR GENERAL PROBLEMS 20 ERROR MESSAGE & POSSIBLE SOLUTIONS 22 APPENDIX ...24 SPECIFICATIONS 24 4
User's Manual TABLE OF CONTENTS SAFETY NOTICE 5 PRECAUTIONS 5 SPECIAL NOTES ON LCD MONITORS 6 BEFORE YOU OPERATE THE MONITOR 7 FEATURES...7 CHECKING THE CONTENTS OF THE PACKAGE 7 INSTALLATION INSTRUCTIONS 8 POWER...8 SETTING THE MONITOR ON THE WALL 9 MAKING CONNECTIONS 10 DJUSTING THE VIEWING ANGLE 11 OPERATING INSTRUCTIONS 13 GENERAL INSTRUCTIONS 13 FRONT PANEL CONTROL 14 HOW TO ADJUST A SETTINGS 16 PLUG AND PLAY 19 TECHNICAL SUPPORT (FAQ 20 Q & A FOR GENERAL PROBLEMS 20 ERROR MESSAGE & POSSIBLE SOLUTIONS 22 APPENDIX ...24 SPECIFICATIONS 24 4

User Manual
Page 5
... source indicated on a wall or shelf, use attachments/accesories specified by the manufacturer or sold with the emission limits. 3. near the equipment and shall be installed near a bathtub, washbowl, kitchen sink, laundry tub, swimming pool or in fire or electric shock. • Never push any , must be sure these openings are...
... source indicated on a wall or shelf, use attachments/accesories specified by the manufacturer or sold with the emission limits. 3. near the equipment and shall be installed near a bathtub, washbowl, kitchen sink, laundry tub, swimming pool or in fire or electric shock. • Never push any , must be sure these openings are...
User Manual
Page 8
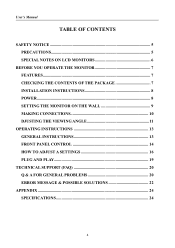
... the Base INSTALLATION: 1. REMOVAL: 1. Make sure that the power cord is the correct type required in place. 3. Press the 2 clips on the base that the monitor is connected ... either 100/120V AC or 220/240V AC voltage area (No user adjustment is upside down. 2. Snap the monitor into its base. User's Manual INSTALLATION INSTRUCTIONS INSTALL REMOVE Figure.1. Note that the clips are unattached. This LCD monitor has an Internal universal power supply that it is required.) 3. Gently press and hold...
... the Base INSTALLATION: 1. REMOVAL: 1. Make sure that the power cord is the correct type required in place. 3. Press the 2 clips on the base that the monitor is connected ... either 100/120V AC or 220/240V AC voltage area (No user adjustment is upside down. 2. Snap the monitor into its base. User's Manual INSTALLATION INSTRUCTIONS INSTALL REMOVE Figure.1. Note that the clips are unattached. This LCD monitor has an Internal universal power supply that it is required.) 3. Gently press and hold...
User Manual
Page 9
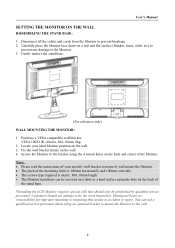
...the cables and cords from the Monitor to the Monitor. 3. You can be screwed on the back and center of the stand base. *Installing the LCD Monitor requires special skill that results in accident or injury. Gently remove the stand base. (For reference only) WALL MOUNTING THE...cloth, etc) to prevent any damage to prevent breakage. 2. User's Manual SETTING THE MONITOR ON THE WALL DISSEMBLING THE STAND BASE: 1. Hannspree bears no responsibility for improper mounting or mounting that should not attempt to the wall. 9 Locate your specific wall bracket to properly wall mount ...
...the cables and cords from the Monitor to the Monitor. 3. You can be screwed on the back and center of the stand base. *Installing the LCD Monitor requires special skill that results in accident or injury. Gently remove the stand base. (For reference only) WALL MOUNTING THE...cloth, etc) to prevent any damage to prevent breakage. 2. User's Manual SETTING THE MONITOR ON THE WALL DISSEMBLING THE STAND BASE: 1. Hannspree bears no responsibility for improper mounting or mounting that should not attempt to the wall. 9 Locate your specific wall bracket to properly wall mount ...
User Manual
Page 15
NOTES: • Do not install the monitor in a location near heat sources such as radiators or air dusts, or in a place subject to direct sunlight, or excessive dust or mechanical ...
NOTES: • Do not install the monitor in a location near heat sources such as radiators or air dusts, or in a place subject to direct sunlight, or excessive dust or mechanical ...
User Manual
Page 21
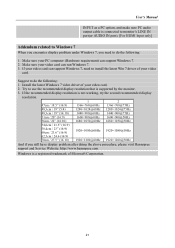
... 62,5cm / 24.6 (16:9) 70cm / 27.5" (16:10) 1920×1200@60Hz 1920×1200@50Hz And if you need to install the latest Win 7 driver of your video card. Install the latest Windows 7 video driver of your video card. 2. Suggest to do the following : 1. User's Manual INPUT as a PC option, and... Input only] Addendum related to Windows 7 When you encounter display problem under Windows 7, you still have display problem after doing the above procedure, please visit Hannspree support and Service Website: http://www.hannspree.com Windows is supported by the monitor. 3.
... 62,5cm / 24.6 (16:9) 70cm / 27.5" (16:10) 1920×1200@60Hz 1920×1200@50Hz And if you need to install the latest Win 7 driver of your video card. Install the latest Windows 7 video driver of your video card. 2. Suggest to do the following : 1. User's Manual INPUT as a PC option, and... Input only] Addendum related to Windows 7 When you encounter display problem under Windows 7, you still have display problem after doing the above procedure, please visit Hannspree support and Service Website: http://www.hannspree.com Windows is supported by the monitor. 3.