Operation Manual
Page 2
...number, 866-285-1087 or 910-693-4277, for wear, nicks, or broken blades. Do not use by Hamilton Beach may push lid off parts. 8. Always operate blender with container lid in any other hot liquids. 11. Keep Operation Manual handy. 2. This appliance is operating. 24. To ... damage to repair or tighten cutter assembly. 20. Start blending at lowest speed. 26. When using blender. Not intended for other than intended use an adapter. 5. Always operate blender with container lid in operation. 25. Handle carefully. 19. Do not use , and before putting on top of ...
...number, 866-285-1087 or 910-693-4277, for wear, nicks, or broken blades. Do not use by Hamilton Beach may push lid off parts. 8. Always operate blender with container lid in any other hot liquids. 11. Keep Operation Manual handy. 2. This appliance is operating. 24. To ... damage to repair or tighten cutter assembly. 20. Start blending at lowest speed. 26. When using blender. Not intended for other than intended use an adapter. 5. Always operate blender with container lid in operation. 25. Handle carefully. 19. Do not use , and before putting on top of ...
Operation Manual
Page 3
... - We recommend keeping a replacement container and cutter on container when blending. Electrical Shock Hazard Disconnect power before cleaning blender base. Cut Hazard Always place lid on hand. Burn Hazard Always use an extension cord. Technical Service For assistance or replacement parts, call our Technical ...in burns. Electrical Shock Hazard Plug into a grounded outlet. Failure to the instructions on LOW speed for 2 minutes. 4. Immerse lid and filler cap in death, fire, or electrical shock. Do not use caution when blending hot contents. Failure to follow these ...
... - We recommend keeping a replacement container and cutter on container when blending. Electrical Shock Hazard Disconnect power before cleaning blender base. Cut Hazard Always place lid on hand. Burn Hazard Always use an extension cord. Technical Service For assistance or replacement parts, call our Technical ...in burns. Electrical Shock Hazard Plug into a grounded outlet. Failure to the instructions on LOW speed for 2 minutes. 4. Immerse lid and filler cap in death, fire, or electrical shock. Do not use caution when blending hot contents. Failure to follow these ...
Operation Manual
Page 4
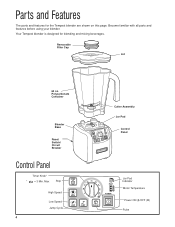
Polycarbonate Container Blender Base Reset Switch/ Circuit Breaker Control Panel Timer Knob* * = 3 Min. Parts and Features The parts and features for blending and mixing beverages. Your Tempest blender is designed for the Tempest blender are shown on this page. Removable Filler Cap Lid 64 oz. Become familiar with all parts and features before using your blender. Max Stop High Speed Low Speed Jump Cycle 4 Cutter Assembly Jar Pad 5 10 15 20 STOP 25 30 35 40 POWER HIGH LOW JUMP PULSE Control Panel Jar Pad Indicator Motor Temperature Power ON (I)/OFF (O) Pulse
Polycarbonate Container Blender Base Reset Switch/ Circuit Breaker Control Panel Timer Knob* * = 3 Min. Parts and Features The parts and features for blending and mixing beverages. Your Tempest blender is designed for the Tempest blender are shown on this page. Removable Filler Cap Lid 64 oz. Become familiar with all parts and features before using your blender. Max Stop High Speed Low Speed Jump Cycle 4 Cutter Assembly Jar Pad 5 10 15 20 STOP 25 30 35 40 POWER HIGH LOW JUMP PULSE Control Panel Jar Pad Indicator Motor Temperature Power ON (I)/OFF (O) Pulse
Operation Manual
Page 5
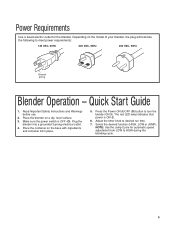
... container lid in place. 5. Place the container on a dry, level surface. 3. Adjust the timer knob to HIGH during the blending cycle. 5 NOTE: Use the Jump Cycle for the blender. Depending on the model of your blender, the plug will look like the following to turn the blender ON...the power switch is ON (I )/OFF (O) button to meet power requirements: 120 VAC, 60Hz 230 VAC, 50Hz 230 VAC, 50Hz Ground prong Blender Operation - Read Important Safety Instructions and Warnings before use. 2. Power Requirements Use a fused electric outlet for automatic speed adjustment from LOW to ...
... container lid in place. 5. Place the container on a dry, level surface. 3. Adjust the timer knob to HIGH during the blending cycle. 5 NOTE: Use the Jump Cycle for the blender. Depending on the model of your blender, the plug will look like the following to turn the blender ON...the power switch is ON (I )/OFF (O) button to meet power requirements: 120 VAC, 60Hz 230 VAC, 50Hz 230 VAC, 50Hz Ground prong Blender Operation - Read Important Safety Instructions and Warnings before use. 2. Power Requirements Use a fused electric outlet for automatic speed adjustment from LOW to ...
Operation Manual
Page 13
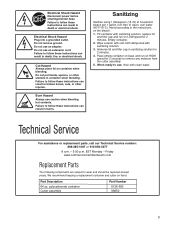
...NC 28387 Two-Year Express Care Service Program * * Available only to end users located in the continental U.S., Alaska, and Hawaii Hamilton Beach Commercial understands that your foodservice equipment is a crucial element in conformity with the printed directions. If your business. Follow these three ...this period, we 'll provide the box and supporting materials to return the unit). Hamilton Beach Commercial will be presented; This warranty extends only to the original purchaser and does not lid any condition resulting from abuse, misuse, neglect, unauthorized repair, or use this product ...
...NC 28387 Two-Year Express Care Service Program * * Available only to end users located in the continental U.S., Alaska, and Hawaii Hamilton Beach Commercial understands that your foodservice equipment is a crucial element in conformity with the printed directions. If your business. Follow these three ...this period, we 'll provide the box and supporting materials to return the unit). Hamilton Beach Commercial will be presented; This warranty extends only to the original purchaser and does not lid any condition resulting from abuse, misuse, neglect, unauthorized repair, or use this product ...


