
Operation Manual
Page 2
...16. Do not operate any kitchen utensils in operation. 27. To reduce risk of personal injury and to prevent damage to blender or container and cutter assembly, DO NOT insert utensils into a grounded 3-prong outlet. 3. Inspect container and cutter assembly ... contacting moving an appliance containing hot oil or other liquid. 9. IMPORTANT SAFETY INSTRUCTIONS WARNING - Plug into blender container while operating blender. 17. Blender Safety IMPORTANT: This operation manual should be supervised to ensure that they have been given supervision or instruction ...
...16. Do not operate any kitchen utensils in operation. 27. To reduce risk of personal injury and to prevent damage to blender or container and cutter assembly, DO NOT insert utensils into a grounded 3-prong outlet. 3. Inspect container and cutter assembly ... contacting moving an appliance containing hot oil or other liquid. 9. IMPORTANT SAFETY INSTRUCTIONS WARNING - Plug into blender container while operating blender. 17. Blender Safety IMPORTANT: This operation manual should be supervised to ensure that they have been given supervision or instruction ...

Operation Manual
Page 3
....commercial.hamiltonbeach.com Replacement Parts The following component is subject to remove any moisture from the cutter assembly. 5. Electrical Shock Hazard Disconnect power before cleaning blender base. Electrical Shock Hazard Plug into a grounded outlet.
....commercial.hamiltonbeach.com Replacement Parts The following component is subject to remove any moisture from the cutter assembly. 5. Electrical Shock Hazard Disconnect power before cleaning blender base. Electrical Shock Hazard Plug into a grounded outlet.

Operation Manual
Page 4
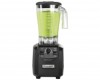
Removable Filler Cap Lid 64-oz. Parts and Features The parts and features for blending and mixing beverages. Become familiar with all parts and features before using your blender. Polycarbonate Container ON/OFF/Circuit Breaker Control Panel Timer Knob* * = 3 Min. Your blender is designed for the blender are shown on this page. Max High Speed Low Speed Pulse (Pulse runs at high speed) 4 Cutter Assembly Jar Pad Blender Base Control Panel Start ON (I) STOP Light indicates ready to operate
Removable Filler Cap Lid 64-oz. Parts and Features The parts and features for blending and mixing beverages. Become familiar with all parts and features before using your blender. Polycarbonate Container ON/OFF/Circuit Breaker Control Panel Timer Knob* * = 3 Min. Your blender is designed for the blender are shown on this page. Max High Speed Low Speed Pulse (Pulse runs at high speed) 4 Cutter Assembly Jar Pad Blender Base Control Panel Start ON (I) STOP Light indicates ready to operate

Operation Manual
Page 5
...to make sure cutter assembly spins freely. Inspect container and cutter assembly daily. Maintenance Inspect the blender and its various parts and replace as follows: Daily Unplug the blender and remove the container from blender base. If cutter cannot be turned, the container needs to be fluid and free-running.../I) and the control panel switch is in the ON (I) position. • Check to see if unit is too full. Weekly Unplug the blender, and then inspect the power cord insulation and power plug for wear, nicks, and broken or loose blades. Mixture should turn smoothly. If ...
...to make sure cutter assembly spins freely. Inspect container and cutter assembly daily. Maintenance Inspect the blender and its various parts and replace as follows: Daily Unplug the blender and remove the container from blender base. If cutter cannot be turned, the container needs to be fluid and free-running.../I) and the control panel switch is in the ON (I) position. • Check to see if unit is too full. Weekly Unplug the blender, and then inspect the power cord insulation and power plug for wear, nicks, and broken or loose blades. Mixture should turn smoothly. If ...


