Operation Manual
Page 2
...putting on examination, repair, or electrical or mechanical adjustment. 17. Hot liquids may cause injuries. 14. To prevent possible burns: Do not fill blender jar beyond the 1 quart (1 liter) level. IMPORTANT SAFETY INSTRUCTIONS WARNING - Do not use broken or cracked cutting blades. 21. To protect against... electrical shock, do not immerse cord, plug, or blender base in water or any kitchen utensils in use of your operator training program. Do not use . 19. If cutter assembly blades are...
...putting on examination, repair, or electrical or mechanical adjustment. 17. Hot liquids may cause injuries. 14. To prevent possible burns: Do not fill blender jar beyond the 1 quart (1 liter) level. IMPORTANT SAFETY INSTRUCTIONS WARNING - Do not use broken or cracked cutting blades. 21. To protect against... electrical shock, do not immerse cord, plug, or blender base in water or any kitchen utensils in use of your operator training program. Do not use . 19. If cutter assembly blades are...

Operation Manual
Page 3
... adapter. EST Monday - Do not use , rinse with clean water. Do not use caution when blending hot contents. Electrical Shock Hazard Disconnect power before cleaning blender base. We recommend keeping a replacement container and cutter on the bleach. 1. Cut Hazard Always place lid on LOW speed for 2 minutes. 4. Failure to follow these...
... adapter. EST Monday - Do not use , rinse with clean water. Do not use caution when blending hot contents. Electrical Shock Hazard Disconnect power before cleaning blender base. We recommend keeping a replacement container and cutter on the bleach. 1. Cut Hazard Always place lid on LOW speed for 2 minutes. 4. Failure to follow these...
Operation Manual
Page 4
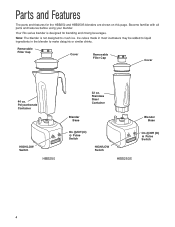
... designed for the HBB250 and HBB250S blenders are shown on this page. Your Rio series blender is not designed to make daiquiris or similar drinks. Stainless Steel Container Blender Base Blender Base On (I)/Off (O) Pulse Switch HIGH/LOW Switch HBB250S On (I)/Off (O) Pulse Switch 4 Removable Filler Cap...Filler Cap Cover 44 oz. Become familiar with all parts and features before using your blender. Ice cubes made in most icemakers may be added to liquid ingredients in the blender to crush ice. Polycarbonate Container HIGH/LOW Switch HBB250 32 oz. Parts and Features The...
... designed for the HBB250 and HBB250S blenders are shown on this page. Your Rio series blender is not designed to make daiquiris or similar drinks. Stainless Steel Container Blender Base Blender Base On (I)/Off (O) Pulse Switch HIGH/LOW Switch HBB250S On (I)/Off (O) Pulse Switch 4 Removable Filler Cap...Filler Cap Cover 44 oz. Become familiar with all parts and features before using your blender. Ice cubes made in most icemakers may be added to liquid ingredients in the blender to crush ice. Polycarbonate Container HIGH/LOW Switch HBB250 32 oz. Parts and Features The...
Operation Manual
Page 5
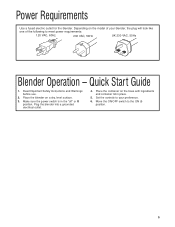
... and container lid in the "off" or O position. Place the container on a dry, level surface. 3. Set the controls to your blender, the plug will look like one of your preference. 6. Make sure the power switch is in place. 5. Move the ON/OFF switch to... meet power requirements: 120 VAC, 60Hz 230 VAC, 50Hz UK 230 VAC, 50Hz Blender Operation - Quick Start Guide 1. Plug the blender into a grounded electrical outlet. 4. Read Important Safety Instructions and Warnings before use. 2. Power Requirements Use a fused electric outlet...
... and container lid in the "off" or O position. Place the container on a dry, level surface. 3. Set the controls to your blender, the plug will look like one of your preference. 6. Make sure the power switch is in place. 5. Move the ON/OFF switch to... meet power requirements: 120 VAC, 60Hz 230 VAC, 50Hz UK 230 VAC, 50Hz Blender Operation - Quick Start Guide 1. Plug the blender into a grounded electrical outlet. 4. Read Important Safety Instructions and Warnings before use. 2. Power Requirements Use a fused electric outlet...
Operation Manual
Page 10
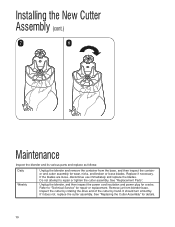
Unplug the blender, and then inspect the power cord insulation and power plug for details. 10 See "Replacement Parts". Replace if necessary. It should turn smoothly. If it ... the container and cutter assembly for repair or replacement. Installing the New Cutter Assembly (cont.) 7 8 Maintenance Inspect the blender and its various parts and replace as follows: Daily Weekly Unplug the blender and remove the container from blender base. Do not attempt to "Technical Service" for wear, nicks, and broken or loose blades.
Unplug the blender, and then inspect the power cord insulation and power plug for details. 10 See "Replacement Parts". Replace if necessary. It should turn smoothly. If it ... the container and cutter assembly for repair or replacement. Installing the New Cutter Assembly (cont.) 7 8 Maintenance Inspect the blender and its various parts and replace as follows: Daily Weekly Unplug the blender and remove the container from blender base. Do not attempt to "Technical Service" for wear, nicks, and broken or loose blades.
Operation Manual
Page 11
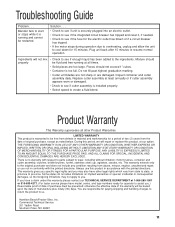
... of purchase must be presented; otherwise the effective date of the warranty will repair or replace this product in accordance with the printed directions. Hamilton Beach/Proctor-Silex, Inc. Blender fails to start or stops while it is running at 1-866-285-1087 or 910-693-4277. (For faster service please have other...
... of purchase must be presented; otherwise the effective date of the warranty will repair or replace this product in accordance with the printed directions. Hamilton Beach/Proctor-Silex, Inc. Blender fails to start or stops while it is running at 1-866-285-1087 or 910-693-4277. (For faster service please have other...


