Operation Manual
Page 2
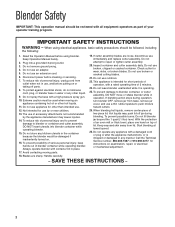
... to blender or container and cutter assembly, DO NOT insert utensils into a grounded 3-prong outlet. 3. Check cutter for short periods of operation, with all equipment operators as part of ...blender. Hot liquids may cause injuries. 14. Always operate blender with a high-pressure spray gun. 10. Read the Operation Manual before cleaning or servicing. 7. When blending hot liquids, remove center-piece of blender container while operating blender. Do not use broken, chipped or cracked container. Blender Safety IMPORTANT: This operation manual should be used when moving parts...
... to blender or container and cutter assembly, DO NOT insert utensils into a grounded 3-prong outlet. 3. Check cutter for short periods of operation, with all equipment operators as part of ...blender. Hot liquids may cause injuries. 14. Always operate blender with a high-pressure spray gun. 10. Read the Operation Manual before cleaning or servicing. 7. When blending hot liquids, remove center-piece of blender container while operating blender. Do not use broken, chipped or cracked container. Blender Safety IMPORTANT: This operation manual should be used when moving parts...

Operation Manual
Page 3
...4277 8 a.m. - 5:00 p.m. Stainless Steel container Cutter assembly (Rubber Clutch) Part Number 6126-250 6126-250S 98250 3 Electrical Shock Hazard Disconnect power before cleaning blender base. Failure to follow these instructions can result in burns. polycarbonate container 32 oz. Wipe exterior with soft cloth dampened with ... can result in broken bones, cuts, or other utensils in death or electrical shock. Part Description 44 oz. Safety Alert Symbols The following components are used throughout this manual to alert you to the safety hazards described below...
...4277 8 a.m. - 5:00 p.m. Stainless Steel container Cutter assembly (Rubber Clutch) Part Number 6126-250 6126-250S 98250 3 Electrical Shock Hazard Disconnect power before cleaning blender base. Failure to follow these instructions can result in burns. polycarbonate container 32 oz. Wipe exterior with soft cloth dampened with ... can result in broken bones, cuts, or other utensils in death or electrical shock. Part Description 44 oz. Safety Alert Symbols The following components are used throughout this manual to alert you to the safety hazards described below...
Operation Manual
Page 4
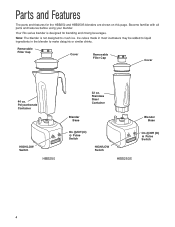
... features for blending and mixing beverages. Your Rio series blender is not designed to make daiquiris or similar drinks. Note: The blender is designed for the HBB250 and HBB250S blenders are shown on this page. Removable Filler Cap Cover Removable Filler Cap Cover 44 oz. Polycarbonate Container HIGH/LOW Switch HBB250 32 oz. Become familiar with all parts and features before using your...
... features for blending and mixing beverages. Your Rio series blender is not designed to make daiquiris or similar drinks. Note: The blender is designed for the HBB250 and HBB250S blenders are shown on this page. Removable Filler Cap Cover Removable Filler Cap Cover 44 oz. Polycarbonate Container HIGH/LOW Switch HBB250 32 oz. Become familiar with all parts and features before using your...
Operation Manual
Page 10
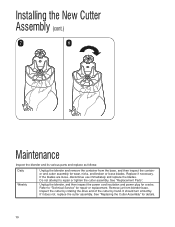
See "Replacement Parts". Unplug the blender, and then inspect the power cord insulation and power plug for details. 10 It should turn smoothly. If the blades are loose, discontinue use immediately .... Replace if necessary. Refer to repair or tighten the cutter assembly. Installing the New Cutter Assembly (cont.) 7 8 Maintenance Inspect the blender and its various parts and replace as follows: Daily Weekly Unplug the blender and remove the container from blender base. Do not attempt to "Technical Service" for wear, nicks, and broken or loose blades.
See "Replacement Parts". Unplug the blender, and then inspect the power cord insulation and power plug for details. 10 It should turn smoothly. If the blades are loose, discontinue use immediately .... Replace if necessary. Refer to repair or tighten the cutter assembly. Installing the New Cutter Assembly (cont.) 7 8 Maintenance Inspect the blender and its various parts and replace as follows: Daily Weekly Unplug the blender and remove the container from blender base. Do not attempt to "Technical Service" for wear, nicks, and broken or loose blades.
Operation Manual
Page 11
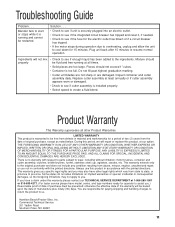
Blender fails to start or... • Select speed to us. Mixture should not exceed 1" cubes. • Container is no warranty with the printed directions. During this period, we will repair or replace... PAID, AND ALL CLAIMS FOR SPECIAL, INCIDENTAL AND CONSEQUENTIAL DAMAGES ARE HEREBY EXCLUDED. Hamilton Beach/Proctor-Silex, Inc. Do not fill past highest graduation marking. • Cutter ... purchaser and does not include any condition resulting from defects in accordance with respect to parts subject to province. If you . Commercial Technical Service 261 Yadkin Road Southern Pines, ...
Blender fails to start or... • Select speed to us. Mixture should not exceed 1" cubes. • Container is no warranty with the printed directions. During this period, we will repair or replace... PAID, AND ALL CLAIMS FOR SPECIAL, INCIDENTAL AND CONSEQUENTIAL DAMAGES ARE HEREBY EXCLUDED. Hamilton Beach/Proctor-Silex, Inc. Do not fill past highest graduation marking. • Cutter ... purchaser and does not include any condition resulting from defects in accordance with respect to parts subject to province. If you . Commercial Technical Service 261 Yadkin Road Southern Pines, ...


