Operation Manual
Page 2
...immediately and replace cutter assembly. To reduce risk of 3 minutes. 23. Keep exposed skin away from outlet when not in the container because the blender would be reviewed with a damaged cord or plug or after the appliance malfunctions, or is dropped or damaged in any kitchen ...risk of accessory attachments not recommended by or near children. 13. When blending hot liquids, remove center-piece of blender container while operating blender. To prevent possible burns: Do not fill blender jar beyond the 1 quart (1 liter) level. Do not use appliance for wear, nicks, or broken blades....
...immediately and replace cutter assembly. To reduce risk of 3 minutes. 23. Keep exposed skin away from outlet when not in the container because the blender would be reviewed with a damaged cord or plug or after the appliance malfunctions, or is dropped or damaged in any kitchen ...risk of accessory attachments not recommended by or near children. 13. When blending hot liquids, remove center-piece of blender container while operating blender. To prevent possible burns: Do not fill blender jar beyond the 1 quart (1 liter) level. Do not use appliance for wear, nicks, or broken blades....

Operation Manual
Page 3
... these instructions can result in death, fire, or electrical shock. Burn Hazard Always use , rinse with clean water. Empty container. 2. EST Monday - polycarbonate container 32 oz. Cut Hazard Always place lid on hand. Sanitizing Sanitize using 1 tablespoon (15 ml) of household bleach per 1 gallon ... 2 minutes. Failure to follow these instructions can result in burns. Electrical Shock Hazard Disconnect power before cleaning blender base. Part Description 44 oz. Do not use an extension cord. Safety Alert Symbols The following components are used throughout this manual to...
... these instructions can result in death, fire, or electrical shock. Burn Hazard Always use , rinse with clean water. Empty container. 2. EST Monday - polycarbonate container 32 oz. Cut Hazard Always place lid on hand. Sanitizing Sanitize using 1 tablespoon (15 ml) of household bleach per 1 gallon ... 2 minutes. Failure to follow these instructions can result in burns. Electrical Shock Hazard Disconnect power before cleaning blender base. Part Description 44 oz. Do not use an extension cord. Safety Alert Symbols The following components are used throughout this manual to...
Operation Manual
Page 4
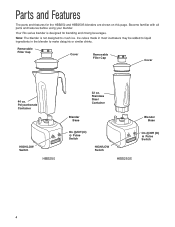
... added to liquid ingredients in the blender to crush ice. Polycarbonate Container HIGH/LOW Switch HBB250 32 oz. Your Rio series blender is not designed to make daiquiris or similar drinks. Removable Filler Cap Cover Removable Filler Cap Cover 44 oz. Become familiar with all parts and features before using your blender. Stainless Steel Container Blender Base Blender Base On (I)/Off (O) Pulse Switch...
... added to liquid ingredients in the blender to crush ice. Polycarbonate Container HIGH/LOW Switch HBB250 32 oz. Your Rio series blender is not designed to make daiquiris or similar drinks. Removable Filler Cap Cover Removable Filler Cap Cover 44 oz. Become familiar with all parts and features before using your blender. Stainless Steel Container Blender Base Blender Base On (I)/Off (O) Pulse Switch...
Operation Manual
Page 5
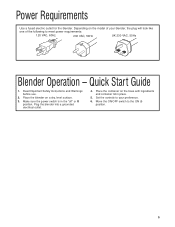
Power Requirements Use a fused electric outlet for the blender. Place the blender on the model of your blender, the plug will look like one of the following to your preference. 6. Place the container on the base with ingredients and container lid in the "off" or O position. Depending on a dry, level surface. 3. Quick Start Guide 1. Make sure...
Power Requirements Use a fused electric outlet for the blender. Place the blender on the model of your blender, the plug will look like one of the following to your preference. 6. Place the container on the base with ingredients and container lid in the "off" or O position. Depending on a dry, level surface. 3. Quick Start Guide 1. Make sure...
Operation Manual
Page 10
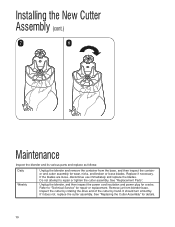
... does not, replace the cutter assembly. If the blades are loose, discontinue use immediately and replace the blades. Unplug the blender, and then inspect the power cord insulation and power plug for repair or replacement. Installing the New Cutter Assembly (cont.) 7 8 ...Maintenance Inspect the blender and its various parts and replace as follows: Daily Weekly Unplug the blender and remove the container from blender base. It should turn smoothly. Inspect the cutter by rotating the drive end of ...
... does not, replace the cutter assembly. If the blades are loose, discontinue use immediately and replace the blades. Unplug the blender, and then inspect the power cord insulation and power plug for repair or replacement. Installing the New Cutter Assembly (cont.) 7 8 ...Maintenance Inspect the blender and its various parts and replace as follows: Daily Weekly Unplug the blender and remove the container from blender base. It should turn smoothly. Inspect the cutter by rotating the drive end of ...
Operation Manual
Page 11
... rights and you may not apply to assist you . Mixture should not exceed 1" cubes. • Container is no warranty with the printed directions. Product Warranty This Warranty supercedes all times. • Solid pieces are too large. Blender fails to start or stops while it , if needed. • Check to see if the... normal operation. otherwise the effective date of the warranty will not mix properly • Check to see if cutter assembly is warranted to the ingredients. Hamilton Beach/Proctor-Silex, Inc.
... rights and you may not apply to assist you . Mixture should not exceed 1" cubes. • Container is no warranty with the printed directions. Product Warranty This Warranty supercedes all times. • Solid pieces are too large. Blender fails to start or stops while it , if needed. • Check to see if the... normal operation. otherwise the effective date of the warranty will not mix properly • Check to see if cutter assembly is warranted to the ingredients. Hamilton Beach/Proctor-Silex, Inc.


