Operation Manual
Page 2
...is dropped or damaged in use, and before putting on . 16. When blending hot liquids, remove center-piece of blender container while operating blender. Read the Operation Manual before cleaning or servicing. 7. Do not remove ground prong. 4. Disconnect power before using electrical...cord from lid. Do not use broken, chipped or cracked container. The use a thin rubber spatula to blender or container and cutter assembly, DO NOT insert utensils into a grounded 3-prong outlet. 3. Always operate blender with container lid in water or any kitchen utensils in operation. To...
...is dropped or damaged in use, and before putting on . 16. When blending hot liquids, remove center-piece of blender container while operating blender. Read the Operation Manual before cleaning or servicing. 7. Do not remove ground prong. 4. Disconnect power before using electrical...cord from lid. Do not use broken, chipped or cracked container. The use a thin rubber spatula to blender or container and cutter assembly, DO NOT insert utensils into a grounded 3-prong outlet. 3. Always operate blender with container lid in water or any kitchen utensils in operation. To...

Operation Manual
Page 3
...container with sanitizing solution, replace lid and filler cap and run on hand. Part Description 44 oz. polycarbonate container 32 oz.... Safety Alert Symbols The following components are used throughout this manual to alert you to follow these instructions can result in broken bones, cuts, or other utensils in container... EST Monday - Stainless Steel container Cutter assembly (Rubber Clutch) ... empty container on base and run on container when ...Empty container. 2. Do not remove ground. We recommend keeping a replacement container and...
...container with sanitizing solution, replace lid and filler cap and run on hand. Part Description 44 oz. polycarbonate container 32 oz.... Safety Alert Symbols The following components are used throughout this manual to alert you to follow these instructions can result in broken bones, cuts, or other utensils in container... EST Monday - Stainless Steel container Cutter assembly (Rubber Clutch) ... empty container on base and run on container when ...Empty container. 2. Do not remove ground. We recommend keeping a replacement container and...
Operation Manual
Page 4
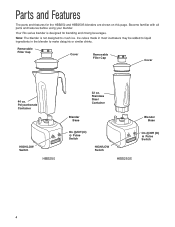
... Switch HBB250S On (I)/Off (O) Pulse Switch 4 Your Rio series blender is not designed to make daiquiris or similar drinks. Note: The blender is designed for the HBB250 and HBB250S blenders are shown on this page. Polycarbonate Container HIGH/LOW Switch HBB250 32 oz. Become familiar with all parts and features before using your blender. Removable Filler Cap Cover Removable Filler Cap Cover 44 oz.
... Switch HBB250S On (I)/Off (O) Pulse Switch 4 Your Rio series blender is not designed to make daiquiris or similar drinks. Note: The blender is designed for the HBB250 and HBB250S blenders are shown on this page. Polycarbonate Container HIGH/LOW Switch HBB250 32 oz. Become familiar with all parts and features before using your blender. Removable Filler Cap Cover Removable Filler Cap Cover 44 oz.
Operation Manual
Page 5
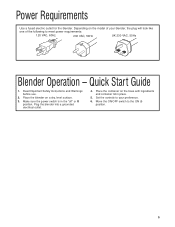
... your preference. 6. Quick Start Guide 1. Plug the blender into a grounded electrical outlet. 4. Place the container on the base with ingredients and container lid in the "off" or O position. Power Requirements Use a fused electric outlet for the blender. Make sure the power switch is in place. 5. Place the blender on the model of the following to...
... your preference. 6. Quick Start Guide 1. Plug the blender into a grounded electrical outlet. 4. Place the container on the base with ingredients and container lid in the "off" or O position. Power Requirements Use a fused electric outlet for the blender. Make sure the power switch is in place. 5. Place the blender on the model of the following to...
Operation Manual
Page 10
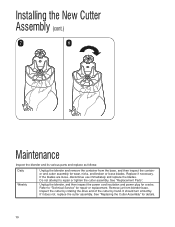
... to "Technical Service" for cracks. See "Replacement Parts". It should turn smoothly. Remove jar from the base, and then inspect the container and cutter assembly for details. 10 Refer to repair or tighten the cutter assembly. See "Replacing the Cutter Assembly" for wear, nicks,...or loose blades. If it does not, replace the cutter assembly. Installing the New Cutter Assembly (cont.) 7 8 Maintenance Inspect the blender and its various parts and replace as follows: Daily Weekly Unplug the blender and remove the container from blender base. Replace if necessary.
... to "Technical Service" for cracks. See "Replacement Parts". It should turn smoothly. Remove jar from the base, and then inspect the container and cutter assembly for details. 10 Refer to repair or tighten the cutter assembly. See "Replacing the Cutter Assembly" for wear, nicks,...or loose blades. If it does not, replace the cutter assembly. Installing the New Cutter Assembly (cont.) 7 8 Maintenance Inspect the blender and its various parts and replace as follows: Daily Weekly Unplug the blender and remove the container from blender base. Replace if necessary.
Operation Manual
Page 11
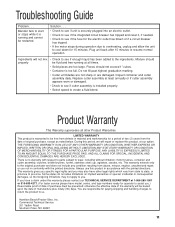
...if the integrated circuit breaker has tripped and reset it is running at our option. Hamilton Beach/Proctor-Silex, Inc. Pieces should be fluid and free-running and cannot be presented;... shipping and handling charges to return the product to wear, including without limitation: motor brushes, container and cutter assembly, clutches, bristle brushes, funnel, stainless steel cup, agitators, carafes, etc...., incidental or consequential damages, so the foregoing limitations may not apply to the ingredients. Blender fails to start or stops while it , if needed. • Check to see if...
...if the integrated circuit breaker has tripped and reset it is running at our option. Hamilton Beach/Proctor-Silex, Inc. Pieces should be fluid and free-running and cannot be presented;... shipping and handling charges to return the product to wear, including without limitation: motor brushes, container and cutter assembly, clutches, bristle brushes, funnel, stainless steel cup, agitators, carafes, etc...., incidental or consequential damages, so the foregoing limitations may not apply to the ingredients. Blender fails to start or stops while it , if needed. • Check to see if...


