Use and Care Manual
Page 2
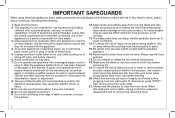
..., electric shock, and/or injury to a full stop before plugging cord into food chute by a person responsible for information on or taking off parts, and before operating appliance. 16. Do not operate any manner. The blades and discs are closely supervised and instructed concerning use the pushers to ..., unplug cord from outlet and disassemble unit to clear the food chute. This appliance is broken. 10. then remove plug from moving parts. 7. Close supervision is necessary when any part is not intended for use , before putting on examination, repair, or adjustment. 8.
..., electric shock, and/or injury to a full stop before plugging cord into food chute by a person responsible for information on or taking off parts, and before operating appliance. 16. Do not operate any manner. The blades and discs are closely supervised and instructed concerning use the pushers to ..., unplug cord from outlet and disassemble unit to clear the food chute. This appliance is broken. 10. then remove plug from moving parts. 7. Close supervision is necessary when any part is not intended for use , before putting on examination, repair, or adjustment. 8.

Use and Care Manual
Page 4
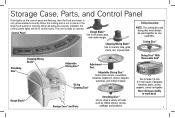
... Fill Line Removable Lid Seal* 4 Food Chute Base Lid* Control Panel Dicing Cleaning Tool* they are very sharp. Handle blades and discs carefully; Parts and Features *To order parts: US: 1.800.851.8900 www.hamiltonbeach.com Canada: 1.800.267.2826 Mexico: 01 800 71 16 100 Locking Arm Large Food Pusher* Medium...
... Fill Line Removable Lid Seal* 4 Food Chute Base Lid* Control Panel Dicing Cleaning Tool* they are very sharp. Handle blades and discs carefully; Parts and Features *To order parts: US: 1.800.851.8900 www.hamiltonbeach.com Canada: 1.800.267.2826 Mexico: 01 800 71 16 100 Locking Arm Large Food Pusher* Medium...
Use and Care Manual
Page 5
When all parts are flashing, then the food processor is ready to mix bread, pizza, and cookie doughs. Control Panel Dough Blade* Use to operate. Dicing Disc* With ...* Adjustable Slicing Disc* Use to coarsely chop, grate, mince, mix, or puree food. Storage Case* and Parts Shredding Disc* Use to make 1/2-inch (12-mm) cubes of foods such as one assembly. Storage Case, Parts, and Control Panel If the lights on the control panel are properly installed, the control panel lights...
When all parts are flashing, then the food processor is ready to mix bread, pizza, and cookie doughs. Control Panel Dough Blade* Use to operate. Dicing Disc* With ...* Adjustable Slicing Disc* Use to coarsely chop, grate, mince, mix, or puree food. Storage Case* and Parts Shredding Disc* Use to make 1/2-inch (12-mm) cubes of foods such as one assembly. Storage Case, Parts, and Control Panel If the lights on the control panel are properly installed, the control panel lights...

Use and Care Manual
Page 7
... metal clips. w WARNING Laceration Hazard: Always use food pusher to clean out the grid. 8 9 Press DICE button. How to Use Dicing Assembly (cont.) NOTE: Dicing parts are colorcoded green to remind you to use the medium pusher when dicing and the green cleaning tool to feed food into bowl.
... metal clips. w WARNING Laceration Hazard: Always use food pusher to clean out the grid. 8 9 Press DICE button. How to Use Dicing Assembly (cont.) NOTE: Dicing parts are colorcoded green to remind you to use the medium pusher when dicing and the green cleaning tool to feed food into bowl.
Use and Care Manual
Page 13
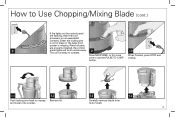
..., press STOP and control use the PULSE TO CHOP unplug. button. 11 12 13 14 Push locking arm back to unsnap Remove lid. When all parts are flashing, then the food processor is missing. and lower onto counter.
..., press STOP and control use the PULSE TO CHOP unplug. button. 11 12 13 14 Push locking arm back to unsnap Remove lid. When all parts are flashing, then the food processor is missing. and lower onto counter.
Use and Care Manual
Page 15
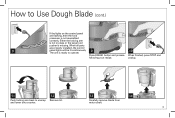
How to Use Dough Blade (cont.) If the lights on the control panel are properly installed, the control 8 panel lights will be lit continuously. When all parts are flashing, then the food processor is ready to unsnap and lower onto counter. 12 Remove lid. 13 14 Carefully remove blade from motor shaft. 15 The unit is not assembled correctly. Either the locking arm is not in place or the large food pusher is missing. unplug. 11 Push locking arm back to operate. 9 10 Press KNEAD button and process When finished, press STOP and following your recipe.
How to Use Dough Blade (cont.) If the lights on the control panel are properly installed, the control 8 panel lights will be lit continuously. When all parts are flashing, then the food processor is ready to unsnap and lower onto counter. 12 Remove lid. 13 14 Carefully remove blade from motor shaft. 15 The unit is not assembled correctly. Either the locking arm is not in place or the large food pusher is missing. unplug. 11 Push locking arm back to operate. 9 10 Press KNEAD button and process When finished, press STOP and following your recipe.
Use and Care Manual
Page 17
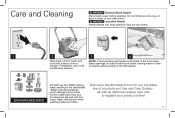
... not immerse cord, plug, or base in the dishwasher. NOTE: If food particles get trapped in the sink with a damp cloth or sponge. All removable parts may also be cleaned in the back of the food chute, place openings on sides of products and Use and Care Guides - they are very...
... not immerse cord, plug, or base in the dishwasher. NOTE: If food particles get trapped in the sink with a damp cloth or sponge. All removable parts may also be cleaned in the back of the food chute, place openings on sides of products and Use and Care Guides - they are very...


