
Use and Care Manual
Page 2
...when any appliance with reduced physical, sensory, or mental capabilities, or lack of experience and knowledge, unless they do not put cord, plug, or mixer body in a heated oven. 13. Do not place on examination, repair, or adjustment. 10. In order to avoid a hazard due to ...inadvertent resetting of injury to persons and/or damage to mixer. 7. The use of fire, electric shock, and/or injury to persons, including the following: 1. Call the provided customer service number for their safety...
...when any appliance with reduced physical, sensory, or mental capabilities, or lack of experience and knowledge, unless they do not put cord, plug, or mixer body in a heated oven. 13. Do not place on examination, repair, or adjustment. 10. In order to avoid a hazard due to ...inadvertent resetting of injury to persons and/or damage to mixer. 7. The use of fire, electric shock, and/or injury to persons, including the following: 1. Call the provided customer service number for their safety...

Use and Care Manual
Page 3
... is provided with a polarized plug (one way into the outlet, reverse the plug. WATTAGE/PEAK POWER INFORMATION The marked rating of the stand mixer is necessary, an approved extension cord may consume during initial operation at high speed under a loaded condition. If a longer cord is determined by...of electric shock. Peak power is intended for household use only. Do not defeat the safety purpose of the maximum wattage a stand mixer may be used on by children or accidentally tripped over the countertop or tabletop where it can be equal to arrange the extension cord...
... is provided with a polarized plug (one way into the outlet, reverse the plug. WATTAGE/PEAK POWER INFORMATION The marked rating of the stand mixer is necessary, an approved extension cord may consume during initial operation at high speed under a loaded condition. If a longer cord is determined by...of electric shock. Peak power is intended for household use only. Do not defeat the safety purpose of the maximum wattage a stand mixer may be used on by children or accidentally tripped over the countertop or tabletop where it can be equal to arrange the extension cord...
Use and Care Manual
Page 4
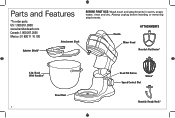
Bowl With Handles* Bowl Rest 4 Head Tilt Button Speed Control Dial Whisk* Nonstick Dough Hook* Handle ATTACHMENTS Mixer Head Nonstick Flat Beater* 4-Qt. Parts and Features *To order parts: US: 1.800.851.8900 www.hamiltonbeach.com Canada: 1.800.267.2826 Mexico: 01 800 71 16 100 Attachment Shaft Splatter Shield* BEFORE FIRST USE: Wash bowl and attachments in warm, soapy water; Always unplug before inserting or removing attachments. rinse and dry.
Bowl With Handles* Bowl Rest 4 Head Tilt Button Speed Control Dial Whisk* Nonstick Dough Hook* Handle ATTACHMENTS Mixer Head Nonstick Flat Beater* 4-Qt. Parts and Features *To order parts: US: 1.800.851.8900 www.hamiltonbeach.com Canada: 1.800.267.2826 Mexico: 01 800 71 16 100 Attachment Shaft Splatter Shield* BEFORE FIRST USE: Wash bowl and attachments in warm, soapy water; Always unplug before inserting or removing attachments. rinse and dry.

Use and Care Manual
Page 5
... up onto attachment shaft and turn dial to desired speed. 9. Push attachment up and pull out. How to lift mixer head. 2 3. rinse and dry. Unplug mixer before inserting or removing attachments. 1. Do not place fingers in place before adding the splatter shield. To avoid splashing ...bowl rest and turn clockwise until it is set on OFF ( ). Speed control should always be in hinge area. Unplug. Always make sure mixer is unplugged and speed control is locked in warm, sudsy water; NOTE: Attachment must be set to OFF ( ). 10. Plug into outlet....
... up onto attachment shaft and turn dial to desired speed. 9. Push attachment up and pull out. How to lift mixer head. 2 3. rinse and dry. Unplug mixer before inserting or removing attachments. 1. Do not place fingers in place before adding the splatter shield. To avoid splashing ...bowl rest and turn clockwise until it is set on OFF ( ). Speed control should always be in hinge area. Unplug. Always make sure mixer is unplugged and speed control is locked in warm, sudsy water; NOTE: Attachment must be set to OFF ( ). 10. Plug into outlet....
Use and Care Manual
Page 6
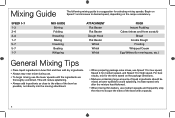
...sides of the bowl as possible, not directly into the moving attachment. • When preparing package cake mixes, use medium speeds and frequently stop the mixer to scrape the sides of liquid ingredients should be mixed at lower speeds to desired speed, depending on Speed 1 and increase to avoid splashing. Increase... is a suggestion for meringues, etc.) General Mixing Tips • Place liquid ingredients in bowl first and then add dry ingredients. • Always stay near mixer during use. • To begin mixing, use the lower speeds until the ingredients are thoroughly combined.
...sides of the bowl as possible, not directly into the moving attachment. • When preparing package cake mixes, use medium speeds and frequently stop the mixer to scrape the sides of liquid ingredients should be mixed at lower speeds to desired speed, depending on Speed 1 and increase to avoid splashing. Increase... is a suggestion for meringues, etc.) General Mixing Tips • Place liquid ingredients in bowl first and then add dry ingredients. • Always stay near mixer during use. • To begin mixing, use the lower speeds until the ingredients are thoroughly combined.
Use and Care Manual
Page 7
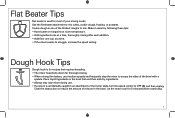
... Make it easier by following these tips: • Have butter or margarine at room temperature. • Add ingredients one at a time. • If the mixer seems to struggle, increase the speed setting. Dough Hook Tips Dough hook is for recipes that requires kneading. • The... beater attachment to OFF ( ) and then unplug. Place liquid ingredients in the bowl first and then add dry ingredients. • Always stay near mixer during use medium speeds and frequently stop the mixer to scrape the sides of the bowl with a spatula. Let the motor cool for 5 minutes before continuing. 7
... Make it easier by following these tips: • Have butter or margarine at room temperature. • Add ingredients one at a time. • If the mixer seems to struggle, increase the speed setting. Dough Hook Tips Dough hook is for recipes that requires kneading. • The... beater attachment to OFF ( ) and then unplug. Place liquid ingredients in the bowl first and then add dry ingredients. • Always stay near mixer during use medium speeds and frequently stop the mixer to scrape the sides of the bowl with a spatula. Let the motor cool for 5 minutes before continuing. 7
Use and Care Manual
Page 8
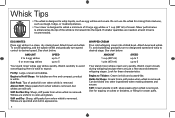
... speed and whip to Thicken: Cream is white. AMOUNT 2 to 4 egg whites 6 or more egg whites SPEED up to 7 up to 5 Your stand mixer whips egg whites quickly. Watch carefully to whisk a minimum of 2 large egg whites or 1 cup (237 ml) of the whisk is removed. product is ... for cream puffs. 8 Attach bowl and whisk. See chart below . Begins to whip liquids, such as dough, fudge, or mashed potatoes. • Your mixer is removed, but whites are still soft. Almost Stiff: Sharp peaks form when whisk is designed to avoid overwhipping. Whites are speckled and dull in...
... speed and whip to Thicken: Cream is white. AMOUNT 2 to 4 egg whites 6 or more egg whites SPEED up to 7 up to 5 Your stand mixer whips egg whites quickly. Watch carefully to whisk a minimum of 2 large egg whites or 1 cup (237 ml) of the whisk is removed. product is ... for cream puffs. 8 Attach bowl and whisk. See chart below . Begins to whip liquids, such as dough, fudge, or mashed potatoes. • Your mixer is removed, but whites are still soft. Almost Stiff: Sharp peaks form when whisk is designed to avoid overwhipping. Whites are speckled and dull in...
Use and Care Manual
Page 9
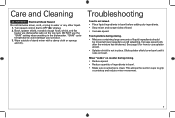
...should be mixed at lower speeds to use the "SANI" setting when washing in bowl before adding dry ingredients. • Stop mixer and scrape sides of stand mixer with a damp cloth or sponge and dry. Slide splatter shield over bowl until it rests on the top rack. Troubleshooting Food is... clean. Mixer "walks" on counter during mixing. • Mixtures containing large amounts of ingredients in place. See page 5 for how to avoid splashing. This allows...
...should be mixed at lower speeds to use the "SANI" setting when washing in bowl before adding dry ingredients. • Stop mixer and scrape sides of stand mixer with a damp cloth or sponge and dry. Slide splatter shield over bowl until it rests on the top rack. Troubleshooting Food is... clean. Mixer "walks" on counter during mixing. • Mixtures containing large amounts of ingredients in place. See page 5 for how to avoid splashing. This allows...
Use and Care Manual
Page 10
Using flat beater attachment, cream butter and sugar on racks. Add remaining flour mixture; Turn mixer on to setting 4 and mix until tests done. Bake 30 to 30 ml) cold brewed coffee 1 teaspoon (5 ml) vanilla Directions: Using flat beater attachment, beat ... well after each addition. Set aside. Add vanilla and beat until smooth. Add half of flour mixture, then all of bowl. Add vanilla. Turn off mixer and scrape sides and bottom of sour cream. Reduce speed to 350°F (177°C). Divide batter between 2 greased and wax paper-lined 9-inch (23...
Using flat beater attachment, cream butter and sugar on racks. Add remaining flour mixture; Turn mixer on to setting 4 and mix until tests done. Bake 30 to 30 ml) cold brewed coffee 1 teaspoon (5 ml) vanilla Directions: Using flat beater attachment, beat ... well after each addition. Set aside. Add vanilla and beat until smooth. Add half of flour mixture, then all of bowl. Add vanilla. Turn off mixer and scrape sides and bottom of sour cream. Reduce speed to 350°F (177°C). Divide batter between 2 greased and wax paper-lined 9-inch (23...
Use and Care Manual
Page 12
... side up. Beat on low speed, add in vanilla and sour cream. Streusel: In another small bowl, combine flour, brown sugar, cinnamon and butter. With mixer on medium speed for 3 minutes. Gradually add flour.
... side up. Beat on low speed, add in vanilla and sour cream. Streusel: In another small bowl, combine flour, brown sugar, cinnamon and butter. With mixer on medium speed for 3 minutes. Gradually add flour.


