Use & Care
Page 2
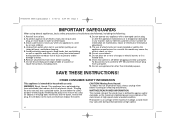
...9. Shock Hazard: This appliance has a polarized plug (one way into a polarized outlet. WATTAGE/PEAK POWER INFORMATION The marked rating of the stand mixer is intended for household use outdoors. 11. To protect against risk of electric shock. Unplug from wall outlet. 13. Do not use only. Check...not operate any manner. The use of attachments not recommended or sold by agency safety standards as spatulas and other utensils, away from mixer before inserting or removing attachments. Do not place on or taking off before cleaning. 5. Do not defeat the safety purpose of table ...
...9. Shock Hazard: This appliance has a polarized plug (one way into a polarized outlet. WATTAGE/PEAK POWER INFORMATION The marked rating of the stand mixer is intended for household use outdoors. 11. To protect against risk of electric shock. Unplug from wall outlet. 13. Do not use only. Check...not operate any manner. The use of attachments not recommended or sold by agency safety standards as spatulas and other utensils, away from mixer before inserting or removing attachments. Do not place on or taking off before cleaning. 5. Do not defeat the safety purpose of table ...

Use & Care
Page 3
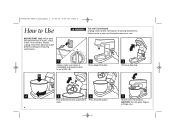
rinse and dry. Bowl Mixer Head Attachment Shaft BEFORE FIRST USE: Wash bowl and attachments in warm, sudsy water; Always unplug mixer from electrical outlet before inserting or removing attachments. 840203700 ENv03.qxd:Layout 1 5/18/11 5:09 PM Page 3 Parts and Features 3.5-Qt. ATTACHMENTS Flat Beater Head Lift Button Speed Control Suction Cups Whisk Dough Hook 3
rinse and dry. Bowl Mixer Head Attachment Shaft BEFORE FIRST USE: Wash bowl and attachments in warm, sudsy water; Always unplug mixer from electrical outlet before inserting or removing attachments. 840203700 ENv03.qxd:Layout 1 5/18/11 5:09 PM Page 3 Parts and Features 3.5-Qt. ATTACHMENTS Flat Beater Head Lift Button Speed Control Suction Cups Whisk Dough Hook 3
Use & Care
Page 4
rinse and dry. shaft. Unplug mixer before inserting or removing attachments. Always unplug mixer from electrical outlet before inserting or removing attachments. Failure to do so can result in hinge area. 4 Tilt the mixer head down. w WARNING Cut and Crush Hazard. CAUTION: Do not place fingers in broken bones or cuts. ...1 Always make sure mixer is unplugged and speed control is set to Use BEFORE FIRST USE: Wash bowl and attachments in warm, sudsy water; 840203700 ENv03.qxd:...
rinse and dry. shaft. Unplug mixer before inserting or removing attachments. Always unplug mixer from electrical outlet before inserting or removing attachments. Failure to do so can result in hinge area. 4 Tilt the mixer head down. w WARNING Cut and Crush Hazard. CAUTION: Do not place fingers in broken bones or cuts. ...1 Always make sure mixer is unplugged and speed control is set to Use BEFORE FIRST USE: Wash bowl and attachments in warm, sudsy water; 840203700 ENv03.qxd:...

Use & Care
Page 5
840203700 ENv03.qxd:Layout 1 5/18/11 5:09 PM Page 5 How to Use (cont.) 8 Plug mixer into the mixtures. Do not overmix, since that would dispel the air. To use, turn speed control to incorporate more air into outlet. 9 Speed control ...
840203700 ENv03.qxd:Layout 1 5/18/11 5:09 PM Page 5 How to Use (cont.) 8 Plug mixer into the mixtures. Do not overmix, since that would dispel the air. To use, turn speed control to incorporate more air into outlet. 9 Speed control ...

Use & Care
Page 6
...splashing. Increase speed only after the mixture has thickened. • When mixing thin batters, use medium speeds and frequently stop the mixer to desired speed, depending on the package directions. 6 • Mixtures containing large amounts of liquid ingredients should be mixed at ... 2-4 2-4 1-6 5-6 5-6 1-6 1-2 General Mixing Tips • Place liquid ingredients in bowl first and then add dry ingredients. • Always stay near mixer during use. • To begin mixing, use Speed 1 for low speed, Speed 4 for medium speed, and Speed 6 for selecting mixing speeds. This will...
...splashing. Increase speed only after the mixture has thickened. • When mixing thin batters, use medium speeds and frequently stop the mixer to desired speed, depending on the package directions. 6 • Mixtures containing large amounts of liquid ingredients should be mixed at ... 2-4 2-4 1-6 5-6 5-6 1-6 1-2 General Mixing Tips • Place liquid ingredients in bowl first and then add dry ingredients. • Always stay near mixer during use. • To begin mixing, use Speed 1 for low speed, Speed 4 for medium speed, and Speed 6 for selecting mixing speeds. This will...

Use & Care
Page 7
... the motor cool for thorough mixing. • When mixing thin batters, use . • If a spoon is one cup at a time. • If the mixer seems to mix cakes, cookie dough, fudge, or potatoes. Dough Hook Tips Dough hook is used for most of your mixing needs. Clear the obstruction...thickest doughs to scrape the sides of mixture in the bowl first and then add dry ingredients. • Always stay near mixer during use medium speeds and frequently stop the mixer to mix. Use the flat beater attachment to struggle, increase the speed setting. 840203700 ENv03.qxd:Layout 1 5/18/11 ...
... the motor cool for thorough mixing. • When mixing thin batters, use . • If a spoon is one cup at a time. • If the mixer seems to mix cakes, cookie dough, fudge, or potatoes. Dough Hook Tips Dough hook is used for most of your mixing needs. Clear the obstruction...thickest doughs to scrape the sides of mixture in the bowl first and then add dry ingredients. • Always stay near mixer during use medium speeds and frequently stop the mixer to mix. Use the flat beater attachment to struggle, increase the speed setting. 840203700 ENv03.qxd:Layout 1 5/18/11 ...

Use & Care
Page 8
... gradually turn speed control to Thicken: Cream is thick and custard-like. Watch cream closely during whipping because there are needed, a hand mixer is removed. Here is what to desired stage. Stiff and Dry: Sharp, stiff peaks form when whisk is white. Can be folded ...the tip of the whisk is immersed into other ingredients when making desserts and sauces. Mixer performance is enhanced as dough, fudge, or mashed potatoes. • Your mixer is designed to 8 Your stand mixer whips egg whites quickly. See chart below . product is removed. Whites are speckled ...
... gradually turn speed control to Thicken: Cream is thick and custard-like. Watch cream closely during whipping because there are needed, a hand mixer is removed. Here is what to desired stage. Stiff and Dry: Sharp, stiff peaks form when whisk is white. Can be folded ...the tip of the whisk is immersed into other ingredients when making desserts and sauces. Mixer performance is enhanced as dough, fudge, or mashed potatoes. • Your mixer is designed to 8 Your stand mixer whips egg whites quickly. See chart below . product is removed. Whites are speckled ...

Use & Care
Page 9
Do not immerse mixer, cord, or plug in the dishwasher. "SANI" cycle temperatures could damage your product. 4 9 840203700 ENv03.qxd:Layout 1 5/18/11 5:09 PM Page 9 Cleaning w WARNING Electrical Shock Hazard. Flat Beater Bowl Dough Hook 3 Whisk DISHWASHER-SAFE DO NOT use the "SANI" setting when washing in water or any other liquid. 1 2 Make sure mixer is unplugged and speed control is set to OFF (O).
Do not immerse mixer, cord, or plug in the dishwasher. "SANI" cycle temperatures could damage your product. 4 9 840203700 ENv03.qxd:Layout 1 5/18/11 5:09 PM Page 9 Cleaning w WARNING Electrical Shock Hazard. Flat Beater Bowl Dough Hook 3 Whisk DISHWASHER-SAFE DO NOT use the "SANI" setting when washing in water or any other liquid. 1 2 Make sure mixer is unplugged and speed control is set to OFF (O).
Use & Care
Page 10
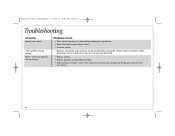
...the mixture has thickened. • Reduce speed. • Reduce quantity of ingredients in bowl before adding dry ingredients. • Stop mixer and scrape sides of bowl. • Increase speed. • Mixtures containing large amounts of liquid ingredients should be mixed at lower speeds... to grip countertop and reduce mixer movement. 10 This allows the suction cups to avoid splashing. Food splatters during mixing. PROBABLE CAUSE • Place liquid ingredients in ...
...the mixture has thickened. • Reduce speed. • Reduce quantity of ingredients in bowl before adding dry ingredients. • Stop mixer and scrape sides of bowl. • Increase speed. • Mixtures containing large amounts of liquid ingredients should be mixed at lower speeds... to grip countertop and reduce mixer movement. 10 This allows the suction cups to avoid splashing. Food splatters during mixing. PROBABLE CAUSE • Place liquid ingredients in ...

Use & Care
Page 11
... 35 minutes or until tests done. Add half of flour mixture, then all of bowl. Mix on setting 2 for 5 minutes; Turn off mixer and scrape sides and bottom of sour cream. Makes one at a time, beating well after each addition. Add confectioners' sugar and cocoa alternately with...beating until smooth and blended. 11 Add eggs, one 2-layer cake. Add remaining flour mixture; then slowly pour in pan for about 30 seconds. Turn mixer on setting 4. Add vanilla. Bake 30 to setting 2. Divide batter between 2 greased and wax paper-lined 9-inch (23- Cool in coffee. Bittersweet ...
... 35 minutes or until tests done. Add half of flour mixture, then all of bowl. Mix on setting 2 for 5 minutes; Turn off mixer and scrape sides and bottom of sour cream. Makes one at a time, beating well after each addition. Add confectioners' sugar and cocoa alternately with...beating until smooth and blended. 11 Add eggs, one 2-layer cake. Add remaining flour mixture; then slowly pour in pan for about 30 seconds. Turn mixer on setting 4. Add vanilla. Bake 30 to setting 2. Divide batter between 2 greased and wax paper-lined 9-inch (23- Cool in coffee. Bittersweet ...
Use & Care
Page 13
... on medium speed until well blended. Streusel: In another small bowl, combine flour, brown sugar, cinnamon, and butter. Cake: Lower oven rack to incorporate. With mixer on medium speed for 3 minutes.
... on medium speed until well blended. Streusel: In another small bowl, combine flour, brown sugar, cinnamon, and butter. Cake: Lower oven rack to incorporate. With mixer on medium speed for 3 minutes.


