Use & Care
Page 2
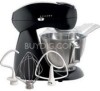
... to those dependable, all -metal appliance, think about the history that your Hamilton Beach® Eclectrics™ appliance for many years to your purchase. In 1904, Louis Hamilton and Chester Beach teamed up to bring lasting quality and style to come. Sincerely, Michael J. Owning a Hamilton Beach® is like vacuums, sewing machines, and mixers into American households. Enjoy the...
... to those dependable, all -metal appliance, think about the history that your Hamilton Beach® Eclectrics™ appliance for many years to your purchase. In 1904, Louis Hamilton and Chester Beach teamed up to bring lasting quality and style to come. Sincerely, Michael J. Owning a Hamilton Beach® is like vacuums, sewing machines, and mixers into American households. Enjoy the...
Use & Care
Page 3
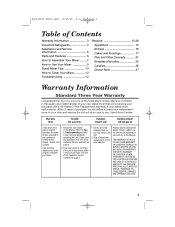
... Important Safeguards 4 Assistance and Service Information 5 Parts and Features 6 How to Assemble Your Mixer ..........7 How to Use Your Mixer 9 Stand Mixer Tips 10 How to Clean Your Mixer 12 Troubleshooting 12 Recipes 13-28 Appetizers 13 Entrees 15 Cakes and Frostings 17 Pies and Other... ARE EXPRESSLY EXCLUDED. 3 If you . Here's how it works: Warranty Term To fulfill the warranty: Hamilton Beach® will Hamilton Beach® will deliver a brand new replacement mixer to the original consumer purchaser. 1. ANY LIABILITY IS EXPRESSLY LIMITED TO THE PURCHASE PRICE PAID.
... Important Safeguards 4 Assistance and Service Information 5 Parts and Features 6 How to Assemble Your Mixer ..........7 How to Use Your Mixer 9 Stand Mixer Tips 10 How to Clean Your Mixer 12 Troubleshooting 12 Recipes 13-28 Appetizers 13 Entrees 15 Cakes and Frostings 17 Pies and Other... ARE EXPRESSLY EXCLUDED. 3 If you . Here's how it works: Warranty Term To fulfill the warranty: Hamilton Beach® will Hamilton Beach® will deliver a brand new replacement mixer to the original consumer purchaser. 1. ANY LIABILITY IS EXPRESSLY LIMITED TO THE PURCHASE PRICE PAID.
Use & Care
Page 4
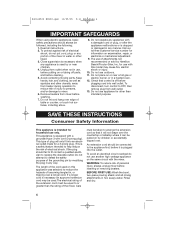
... a hot gas or electric burner, or in any appliance is dropped or damaged in use, before putting on this model may be used by Hamilton Beach/Proctor-Silex, Inc. for a 3-prong plug. Do not use of injury to persons, and/or damage to or greater than intended purpose. To...or removing beaters. The length of electrical shock. An extension cord should be connected to defeat the safety purpose of personal injury, always unplug mixer before it can be followed, including the following: 1. Remove beaters from wall outlet. 13. Call our toll-free customer service number for ...
... a hot gas or electric burner, or in any appliance is dropped or damaged in use, before putting on this model may be used by Hamilton Beach/Proctor-Silex, Inc. for a 3-prong plug. Do not use of injury to persons, and/or damage to or greater than intended purpose. To...or removing beaters. The length of electrical shock. An extension cord should be connected to defeat the safety purpose of personal injury, always unplug mixer before it can be followed, including the following: 1. Remove beaters from wall outlet. 13. Call our toll-free customer service number for ...
Use & Care
Page 5
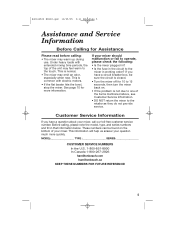
... information. 840142500 ENv00.qxd 10/25/05 9:11 AM Page 5 Assistance and Service Information Before Calling for Assistance Please read before calling: • The mixer may feel warm to the touch. These numbers can be sure the circuit is common with extended mixing time periods, the top of the unit... may warm up during use. This is not due to one of your mixer, call our toll-free customer service number. MODEL TYPE SERIES CUSTOMER SERVICE NUMBERS In the U.S. 1-800-851-8900 In Canada 1-800-267-2826 ...
... information. 840142500 ENv00.qxd 10/25/05 9:11 AM Page 5 Assistance and Service Information Before Calling for Assistance Please read before calling: • The mixer may feel warm to the touch. These numbers can be sure the circuit is common with extended mixing time periods, the top of the unit... may warm up during use. This is not due to one of your mixer, call our toll-free customer service number. MODEL TYPE SERIES CUSTOMER SERVICE NUMBERS In the U.S. 1-800-851-8900 In Canada 1-800-267-2826 ...
Use & Care
Page 6
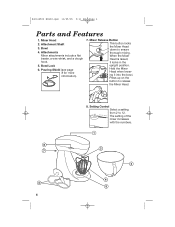
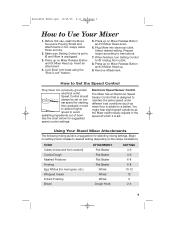
..., and a dough hook. 5. Hold the Mixer Head when lowering it locks in the upright position. Setting Control Select a setting from 2 to ensure thorough mixing. Attachment Shaft 3. Bowl 4. Bowl Lock 6. Pouring Shield (see page 8 for more information). 7. When the Mixer Head is raised, it into the bowl. ...The setting of the mixer increases with the numbers. 6 Mixer Release Button This button locks the Mixer Head down to 12. 840142500 ENv00.qxd 10/25/05 9:11 AM Page 6 ...
..., and a dough hook. 5. Hold the Mixer Head when lowering it locks in the upright position. Setting Control Select a setting from 2 to ensure thorough mixing. Attachment Shaft 3. Bowl 4. Bowl Lock 6. Pouring Shield (see page 8 for more information). 7. When the Mixer Head is raised, it into the bowl. ...The setting of the mixer increases with the numbers. 6 Mixer Release Button This button locks the Mixer Head down to 12. 840142500 ENv00.qxd 10/25/05 9:11 AM Page 6 ...
Use & Care
Page 7
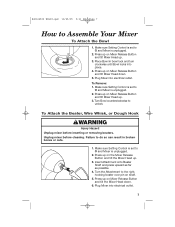
... Bowl in broken bones or cuts. 1. Failure to Assemble Your Mixer To Attach the Bowl 1. Press up on the Mixer Release Button and tilt the Mixer Head up . 3. Plug Mixer into electrical outlet. Press up on Mixer Release Button and tilt the Mixer Head down . 5. Unplug mixer before inserting or removing beaters. Press up . 3. Make sure Setting...
... Bowl in broken bones or cuts. 1. Failure to Assemble Your Mixer To Attach the Bowl 1. Press up on the Mixer Release Button and tilt the Mixer Head up . 3. Plug Mixer into electrical outlet. Press up on Mixer Release Button and tilt the Mixer Head down . 5. Unplug mixer before inserting or removing beaters. Press up . 3. Make sure Setting...
Use & Care
Page 8
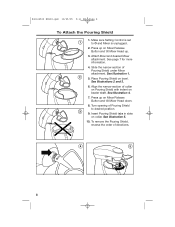
... on bowl. Slide the narrow section of directions. 8 Place Pouring Shield on Mixer Release Button and tilt Mixer Head up on beater shaft. To remove the Pouring Shield, reverse the order of Pouring Shield under Mixer attachment. See page 7 for more information. 4. See Illustrations 2 and 3. ... the narrow section of Pouring Shield to O and Mixer is set to desired position. 9. Attach Bowl and desired Mixer attachment. See Illustration 4. 7. Turn opening of collar on Pouring Shield with indent on Mixer Release Button and tilt Mixer Head down. 8. Insert Pouring Shield tabs in slots...
... on bowl. Slide the narrow section of directions. 8 Place Pouring Shield on Mixer Release Button and tilt Mixer Head up on beater shaft. To remove the Pouring Shield, reverse the order of Pouring Shield under Mixer attachment. See page 7 for more information. 4. See Illustrations 2 and 3. ... the narrow section of Pouring Shield to O and Mixer is set to desired position. 9. Attach Bowl and desired Mixer attachment. See Illustration 4. 7. Turn opening of collar on Pouring Shield with indent on Mixer Release Button and tilt Mixer Head down. 8. Insert Pouring Shield tabs in slots...
Use & Care
Page 9
... (mixes and from outlet. 8. When finished, turn Setting Control to Set the Speed Control Plug mixer into electrical outlet. Remove Attachment. Press up on Mixer Release Button and tilt Mixer Head up on Mixer Release Button and tilt Mixer Head down. 6. Using Your Stand Mixer Attachments The following mixing guide is added to desired setting depending on...
... (mixes and from outlet. 8. When finished, turn Setting Control to Set the Speed Control Plug mixer into electrical outlet. Remove Attachment. Press up on Mixer Release Button and tilt Mixer Head up on Mixer Release Button and tilt Mixer Head down. 6. Using Your Stand Mixer Attachments The following mixing guide is added to desired setting depending on...
Use & Care
Page 10
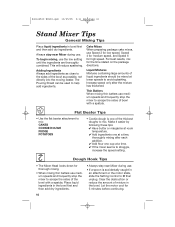
...Clear the obstruction or reduce the amount of the thickest doughs to O then unplug. 840142500 ENv00.qxd 10/25/05 9:11 AM Page 10 Stand Mixer Tips General Mixing Tips Place liquid ingredients in the bowl. This will reduce spattering. Place liquid ingredients in an attachment or the motor stalls, ...slide the Setting Control to mix. The Pouring Shield can be mixed at a time. ✔ If the mixer seems to help add ingredients. Increase speed only after each addition. ✔ Add flour one of mixture in bowl first and then add dry ...
...Clear the obstruction or reduce the amount of the thickest doughs to O then unplug. 840142500 ENv00.qxd 10/25/05 9:11 AM Page 10 Stand Mixer Tips General Mixing Tips Place liquid ingredients in the bowl. This will reduce spattering. Place liquid ingredients in an attachment or the motor stalls, ...slide the Setting Control to mix. The Pouring Shield can be mixed at a time. ✔ If the mixer seems to help add ingredients. Increase speed only after each addition. ✔ Add flour one of mixture in bowl first and then add dry ...
Use & Care
Page 11
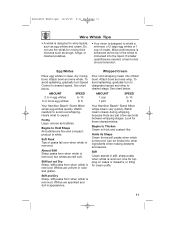
...to avoid overwhipping. Soft Peak Tips of cream. AMOUNT 1 cup 1 pint SPEED to 10 to 8 Your Hamilton Beach® Stand MIxer whips egg whites quickly. Look for cream puffs. 11 Stiff Cream stands in color and glisten. Egg Whites Place egg whites in appearance. Begins to Thicken Cream is removed. Whites are... Can be folded into chilled bowl. AMOUNT 2 to 4 egg whites 6 or more egg whites SPEED to 10 to 8 Your Hamilton Beach® Stand MIxer whips cream very quickly. Almost Stiff Sharp peaks form when whisk is removed, but not Dry Sharp, stiff peaks form when whisk ...
...to avoid overwhipping. Soft Peak Tips of cream. AMOUNT 1 cup 1 pint SPEED to 10 to 8 Your Hamilton Beach® Stand MIxer whips egg whites quickly. Look for cream puffs. 11 Stiff Cream stands in color and glisten. Egg Whites Place egg whites in appearance. Begins to Thicken Cream is removed. Whites are... Can be folded into chilled bowl. AMOUNT 2 to 4 egg whites 6 or more egg whites SPEED to 10 to 8 Your Hamilton Beach® Stand MIxer whips cream very quickly. Almost Stiff Sharp peaks form when whisk is removed, but not Dry Sharp, stiff peaks form when whisk ...
Use & Care
Page 12
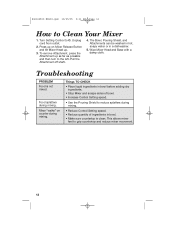
...25/05 9:11 AM Page 12 How to O. Turn Setting Control to Clean Your Mixer 1. Pull the Attachment off shaft. 4. Troubleshooting PROBLEM Food is clean. Mixer "walks" on Mixer Release Button and tilt Mixer Head up as far as possible and then turn to the left. The Bowl, ... scrape sides of bowl. • Increase Control Setting speed. • Use the Pouring Shield to grip countertop and reduce mixer movement. 12 This allows mixer feet to reduce splatters during mixing. • Reduce Control Setting speed. • Reduce quantity of ingredients in a dishwasher. 5. Unplug cord...
...25/05 9:11 AM Page 12 How to O. Turn Setting Control to Clean Your Mixer 1. Pull the Attachment off shaft. 4. Troubleshooting PROBLEM Food is clean. Mixer "walks" on Mixer Release Button and tilt Mixer Head up as far as possible and then turn to the left. The Bowl, ... scrape sides of bowl. • Increase Control Setting speed. • Use the Pouring Shield to grip countertop and reduce mixer movement. 12 This allows mixer feet to reduce splatters during mixing. • Reduce Control Setting speed. • Reduce quantity of ingredients in a dishwasher. 5. Unplug cord...
Use & Care
Page 13
...served hot. Best serve warm with crackers then squeeze the cheese mixture onto crackers. Shape into ball and roll in a covered container. Turn off mixer and scrape sides and bottom of large marbles and place on setting 4 until well blended. Fill a baking sheet with bread or crackers. add... teaspoon (1.25 ml) garlic powder Salt and pepper to taste Preheat oven to setting 2; Spread mixture into a plastic storage bag then snip off mixer and scrape sides and bottom of bowl. Makes 16 servings. 13 Serve warm or at room temperature. Using the flat beater attachment, beat cream...
...served hot. Best serve warm with crackers then squeeze the cheese mixture onto crackers. Shape into ball and roll in a covered container. Turn off mixer and scrape sides and bottom of large marbles and place on setting 4 until well blended. Fill a baking sheet with bread or crackers. add... teaspoon (1.25 ml) garlic powder Salt and pepper to taste Preheat oven to setting 2; Spread mixture into a plastic storage bag then snip off mixer and scrape sides and bottom of bowl. Makes 16 servings. 13 Serve warm or at room temperature. Using the flat beater attachment, beat cream...
Use & Care
Page 14
.... Spread on setting 4 until blended. Makes 8 servings. Using the flat beater attachment, beat cream cheese and pepper jack cheese on bread or crackers. Turn off mixer and scrape sides and bottom of the pecans. Serve with crackers. Store covered in mixing bowl. Add sour cream and continue to 350ºF (180...
.... Spread on setting 4 until blended. Makes 8 servings. Using the flat beater attachment, beat cream cheese and pepper jack cheese on bread or crackers. Turn off mixer and scrape sides and bottom of the pecans. Serve with crackers. Store covered in mixing bowl. Add sour cream and continue to 350ºF (180...
Use & Care
Page 16
...Cook and stir occasionally until well blended. Pour mixture evenly over medium-high heat, cook onion, green pepper and ground beef in the skillet. Stop mixer and scrape sides and bottom of the bowl. Bake 25 to 375ºF (190ºC). Remove from heat and pour into a greased 21&#...all. In a greased 9x13-inch (33x23x5 cm) casserole dish layer chicken, peas, and carrots. Continue to 8 minutes. Sprinkle flour over top. Turn off mixer and scrape the sides and bottom of bowl. Using the whisk attachment, mix buttermilk and eggs on setting 6. 840142500 ENv00.qxd 10/25/05 9:11...
...Cook and stir occasionally until well blended. Pour mixture evenly over medium-high heat, cook onion, green pepper and ground beef in the skillet. Stop mixer and scrape sides and bottom of the bowl. Bake 25 to 375ºF (190ºC). Remove from heat and pour into a greased 21&#...all. In a greased 9x13-inch (33x23x5 cm) casserole dish layer chicken, peas, and carrots. Continue to 8 minutes. Sprinkle flour over top. Turn off mixer and scrape the sides and bottom of bowl. Using the whisk attachment, mix buttermilk and eggs on setting 6. 840142500 ENv00.qxd 10/25/05 9:11...
Use & Care
Page 17
... mix on racks. Add the beaten egg whites and continue to setting 2 then add half of the flour mixture then slowly add the buttermilk. Stop mixer and scrape sides and bottom of bowl. Makes 2 layers. Pour batter into 2 greased and wax paper lined 9-inch (23x3 cm) round cake pans. Bake 40...
... mix on racks. Add the beaten egg whites and continue to setting 2 then add half of the flour mixture then slowly add the buttermilk. Stop mixer and scrape sides and bottom of bowl. Makes 2 layers. Pour batter into 2 greased and wax paper lined 9-inch (23x3 cm) round cake pans. Bake 40...
Use & Care
Page 18
.... Divide batter between 2 greased and wax paper lined 9-inch (23x3 cm) round cake pans. Add vanilla and beat until smooth. Set aside. Turn mixer on setting 4 until thoroughly blended. Makes one 2-layer cake. Danish Apple Cake 2 eggs, separated 1⁄4 cup (60 ml) butter, room temperature ...brewed coffee Preheat oven to wash) and flat beater, beat egg yolks, butter, sugars, and vanilla on to 8 servings. 18 Turn off mixer and scrape sides and bottom of sour cream. Mix on setting 2 just until stiff. Using same bowl (not necessary to 350ºF (...
.... Divide batter between 2 greased and wax paper lined 9-inch (23x3 cm) round cake pans. Add vanilla and beat until smooth. Set aside. Turn mixer on setting 4 until thoroughly blended. Makes one 2-layer cake. Danish Apple Cake 2 eggs, separated 1⁄4 cup (60 ml) butter, room temperature ...brewed coffee Preheat oven to wash) and flat beater, beat egg yolks, butter, sugars, and vanilla on to 8 servings. 18 Turn off mixer and scrape sides and bottom of sour cream. Mix on setting 2 just until stiff. Using same bowl (not necessary to 350ºF (...
Use & Care
Page 20
... extract 2 pounds (900 g) confectioners sugar Using flat paddle, beat cream cheese, butter, and vanilla on high and beat until frosting is light and fluffy. Turn mixer on medium speed until smooth. Country Carrot Cake 2 teaspoons (10 ml) baking powder 2 teaspoons (10 ml) baking soda 1⁄2 teaspoon (2.5 ml) salt 2 teaspoons (10 ml...
... extract 2 pounds (900 g) confectioners sugar Using flat paddle, beat cream cheese, butter, and vanilla on high and beat until frosting is light and fluffy. Turn mixer on medium speed until smooth. Country Carrot Cake 2 teaspoons (10 ml) baking powder 2 teaspoons (10 ml) baking soda 1⁄2 teaspoon (2.5 ml) salt 2 teaspoons (10 ml...
Use & Care
Page 21
... 1 teaspoon (5 ml) vanilla 6-ounces (170 g) white chocolate, melted Preheat oven to beat. Add remaining eggs one egg and beat until smooth. With mixer running on setting 4 until mixed. The center may still look "wet." Makes 16 servings. Set aside. In a medium bowl mix graham cracker crumbs, ...into pie shell. Add brown sugar, flour, salt, cinnamon, and nutmeg. Blend until filling is slightly browned around the edges. Turn off mixer and scrape sides and bottom of bowl. Let cool completely before serving. Stir. Bake 40 minutes or until mixed. Using flat beater attachment...
... 1 teaspoon (5 ml) vanilla 6-ounces (170 g) white chocolate, melted Preheat oven to beat. Add remaining eggs one egg and beat until smooth. With mixer running on setting 4 until mixed. The center may still look "wet." Makes 16 servings. Set aside. In a medium bowl mix graham cracker crumbs, ...into pie shell. Add brown sugar, flour, salt, cinnamon, and nutmeg. Blend until filling is slightly browned around the edges. Turn off mixer and scrape sides and bottom of bowl. Let cool completely before serving. Stir. Bake 40 minutes or until mixed. Using flat beater attachment...
Use & Care
Page 22
Remove from bowl and set in a deep bowl. Turn off mixer and scrape sides and bottom of bowl. Pour into pie shell and sprinkle grated chocolate on setting 12 until thickened, about 1 minute. Makes 6 to 10 ... set aside. Make a layer of the milk on setting 4 until blended. Makes 8 to 8 servings. Add whipped cream and mix on setting 6 until blended. Turn off mixer and scrape sides and bottom of bowl. In a medium saucepan combine 1⁄2 cup (125 ml) whipping cream, 1⁄2 cup (125 ml) sugar, and eggs. Set...
Remove from bowl and set in a deep bowl. Turn off mixer and scrape sides and bottom of bowl. Pour into pie shell and sprinkle grated chocolate on setting 12 until thickened, about 1 minute. Makes 6 to 10 ... set aside. Make a layer of the milk on setting 4 until blended. Makes 8 to 8 servings. Add whipped cream and mix on setting 6 until blended. Turn off mixer and scrape sides and bottom of bowl. In a medium saucepan combine 1⁄2 cup (125 ml) whipping cream, 1⁄2 cup (125 ml) sugar, and eggs. Set...
Use & Care
Page 23
... until light and fluffy. Form cookie dough into pie shell and bake 45 to setting 2 and add beaten egg whites. Makes about 4 dozen. Turn off mixer and fold in oven for more recipes. Arrange sliced bananas evenly over wafers. Top with pudding mixture. Set aside. Bake in 1⁄2 of 1 lemon (yellow...
... until light and fluffy. Form cookie dough into pie shell and bake 45 to setting 2 and add beaten egg whites. Makes about 4 dozen. Turn off mixer and fold in oven for more recipes. Arrange sliced bananas evenly over wafers. Top with pudding mixture. Set aside. Bake in 1⁄2 of 1 lemon (yellow...


