Use & Care
Page 4
... risk of electrical shock, do not use of the mixer in water or other utensils, away from mixer before inserting or removing beaters. Keep hands, hair, and clothing, as well as spatulas and other liquid. 3. Do not operate any portion of attachments not recommended or sold by Hamilton Beach/Proctor-Silex,... Inc. Do not use , before putting on or taking off before plugging cord into wall outlet. The length of the cord used on this model may be used by modifying the plug in a heated oven. 12. To avoid an electrical circuit overload ...
... risk of electrical shock, do not use of the mixer in water or other utensils, away from mixer before inserting or removing beaters. Keep hands, hair, and clothing, as well as spatulas and other liquid. 3. Do not operate any portion of attachments not recommended or sold by Hamilton Beach/Proctor-Silex,... Inc. Do not use , before putting on or taking off before plugging cord into wall outlet. The length of the cord used on this model may be used by modifying the plug in a heated oven. 12. To avoid an electrical circuit overload ...
Use & Care
Page 5
...items mentioned above, see Customer Service Information. • DO NOT return the mixer to the retailer as they do not provide service. Under heavy loads with electric motors. • If the flat beater hits the bowl, stop the mixer. If you have a circuit breaker box, be found on . •... If the problem is closed. • Turn the mixer off for more quickly. MODEL TYPE SERIES CUSTOMER ...
...items mentioned above, see Customer Service Information. • DO NOT return the mixer to the retailer as they do not provide service. Under heavy loads with electric motors. • If the flat beater hits the bowl, stop the mixer. If you have a circuit breaker box, be found on . •... If the problem is closed. • Turn the mixer off for more quickly. MODEL TYPE SERIES CUSTOMER ...
Use & Care
Page 7
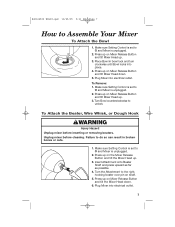
... broken bones or cuts. 1. Press up on Mixer Release Button and tilt Mixer Head up on Mixer Release Button and tilt Mixer Head down . 6. Insert Attachment onto Beater Shaft and press upward as far as possible. 4. Plug Mixer into electrical outlet. 7 Make sure Setting Control is set to O and Mixer is unplugged. 2. Press up . 3. 840142500 ENv00.qxd...
... broken bones or cuts. 1. Press up on Mixer Release Button and tilt Mixer Head up on Mixer Release Button and tilt Mixer Head down . 6. Insert Attachment onto Beater Shaft and press upward as far as possible. 4. Plug Mixer into electrical outlet. 7 Make sure Setting Control is set to O and Mixer is unplugged. 2. Press up . 3. 840142500 ENv00.qxd...
Use & Care
Page 9
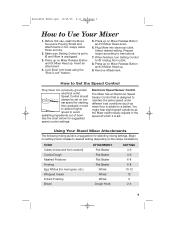
... You might hear slight speed variations as when flour is unplugged. 3. Begin on setting 2 and increase to Set the Speed Control Plug mixer into electrical outlet. FOOD Cakes (mixes and from outlet. 8. Lock Bowl onto base using the "Bowl Lock" feature. 5. Select desired setting. ...of bowl. Electronic Speed Sensor Control The Mixer has an Electronic Speed Sensor Control that is designed to maintain the same speed under different load conditions (such as the Mixer electronically adjusts to Use Your Mixer 1. Using Your Stand Mixer Attachments The following mixing guide is set...
... You might hear slight speed variations as when flour is unplugged. 3. Begin on setting 2 and increase to Set the Speed Control Plug mixer into electrical outlet. FOOD Cakes (mixes and from outlet. 8. Lock Bowl onto base using the "Bowl Lock" feature. 5. Select desired setting. ...of bowl. Electronic Speed Sensor Control The Mixer has an Electronic Speed Sensor Control that is designed to maintain the same speed under different load conditions (such as the Mixer electronically adjusts to Use Your Mixer 1. Using Your Stand Mixer Attachments The following mixing guide is set...

