
Use And Care
Page 1
840117600 ENv00.qxd 6/1/03 12:43 PM Page 1 Stand Mixer 840117600 Important Safeguards 2 Parts and Features 3 How to Assemble Your Mixer ........4 Using Your Mixer 5 Cleaning Your Mixer 6 Recipes 7 Customer Service 12 In USA: 1-800-851-8900
840117600 ENv00.qxd 6/1/03 12:43 PM Page 1 Stand Mixer 840117600 Important Safeguards 2 Parts and Features 3 How to Assemble Your Mixer ........4 Using Your Mixer 5 Cleaning Your Mixer 6 Recipes 7 Customer Service 12 In USA: 1-800-851-8900
Use And Care
Page 2
...including stove. 11. Do not place on or near children. 4. To disconnect, turn control to O/OFF, then remove plug from the Mixer before plugging cord into an electrical outlet made for information on examination, repair, or electrical or mechanical adjustment. 7. This is necessary an ...tripping over edge of electrical shock, do not use , before putting on or taking off before washing. 6. The electrical rating of the mixer. 840117600 ENv00.qxd 6/1/03 12:43 PM Page 2 IMPORTANT SAFEGUARDS When using electrical appliances, basic safety precautions should always be pulled on ...
...including stove. 11. Do not place on or near children. 4. To disconnect, turn control to O/OFF, then remove plug from the Mixer before plugging cord into an electrical outlet made for information on examination, repair, or electrical or mechanical adjustment. 7. This is necessary an ...tripping over edge of electrical shock, do not use , before putting on or taking off before washing. 6. The electrical rating of the mixer. 840117600 ENv00.qxd 6/1/03 12:43 PM Page 2 IMPORTANT SAFEGUARDS When using electrical appliances, basic safety precautions should always be pulled on ...
Use And Care
Page 3
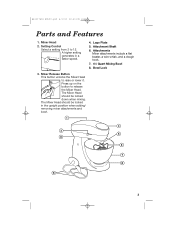
A higher setting generates in the upright position when adding/ removing mixer attachments and bowl. 3 The Mixer Head should be locked down when mixing. Attachment Shaft 6. Mixer Release Button This button unlocks the Mixer Head to release the Mixer Head. The Mixer Head should be locked in a faster speed. 4. 840117600 ENv00.qxd 6/1/03 12:43 PM Page 3 Parts...
A higher setting generates in the upright position when adding/ removing mixer attachments and bowl. 3 The Mixer Head should be locked down when mixing. Attachment Shaft 6. Mixer Release Button This button unlocks the Mixer Head to release the Mixer Head. The Mixer Head should be locked in a faster speed. 4. 840117600 ENv00.qxd 6/1/03 12:43 PM Page 3 Parts...
Use And Care
Page 4
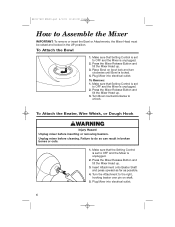
... beater over pin on bowl lock and turn clockwise until Bowl is unplugged. 2. Press the Mixer Release Button and tilt the Mixer Head up . 3. Turn the Attachment to OFF and the Mixer is unplugged. 2. Unplug mixer before inserting or removing beaters. 840117600 ENv00.qxd 6/1/03 12:43 PM Page 4 How to... Assemble the Mixer IMPORTANT: To remove or insert the Bowl or Attachments, the Mixer Head must be raised and locked in broken bones or cuts. 1. To Attach the Bowl 1. To Attach the Beater, Wire Whisk...
... beater over pin on bowl lock and turn clockwise until Bowl is unplugged. 2. Press the Mixer Release Button and tilt the Mixer Head up . 3. Turn the Attachment to OFF and the Mixer is unplugged. 2. Unplug mixer before inserting or removing beaters. 840117600 ENv00.qxd 6/1/03 12:43 PM Page 4 How to... Assemble the Mixer IMPORTANT: To remove or insert the Bowl or Attachments, the Mixer Head must be raised and locked in broken bones or cuts. 1. To Attach the Bowl 1. To Attach the Beater, Wire Whisk...
Use And Care
Page 5
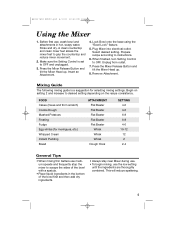
..."Bowl Lock" feature. 5. Select desired setting. Press the Mixer Release Button and tilt the Mixer Head up . A clean countertop and clean mixer feet allows the mixer feet to instructions. 6. Prepare recipe according to grip the countertop and reduce mixer movement. 2. This will reduce spattering. 5 Make sure the... the sides of the bowl first and then add dry ingredients. • Always stay near Mixer during use. • To begin mixing, use medium speeds and frequently stop the mixer to OFF and unplugged. 3. Insert an Attachment. 4. Remove Attachment. 840117600 ENv00.qxd 6/1/03...
..."Bowl Lock" feature. 5. Select desired setting. Press the Mixer Release Button and tilt the Mixer Head up . A clean countertop and clean mixer feet allows the mixer feet to instructions. 6. Prepare recipe according to grip the countertop and reduce mixer movement. 2. This will reduce spattering. 5 Make sure the... the sides of the bowl first and then add dry ingredients. • Always stay near Mixer during use. • To begin mixing, use medium speeds and frequently stop the mixer to OFF and unplugged. 3. Insert an Attachment. 4. Remove Attachment. 840117600 ENv00.qxd 6/1/03...
Use And Care
Page 6
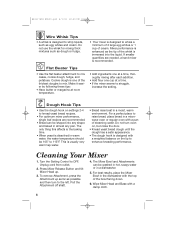
....qxd 6/1/03 12:43 PM Page 6 Wire Whisk Tips • A whisk is designed to enhance kneading performance. Cookie dough is recommended. Cleaning Your Mixer 1. To remove Attachment, press the Attachment up . 3. If smaller quantities are recommended. • Bread can be 105° to whisk a minimum of...by following these tips: • Have butter or margarine at room temperature. • Add ingredients one at a time. • If the mixer seems to raise bread, place bread in a dishwasher. 5. Flat Beater Tips • Use the flat beater attachment to OFF. For best results,...
....qxd 6/1/03 12:43 PM Page 6 Wire Whisk Tips • A whisk is designed to enhance kneading performance. Cookie dough is recommended. Cleaning Your Mixer 1. To remove Attachment, press the Attachment up . 3. If smaller quantities are recommended. • Bread can be 105° to whisk a minimum of...by following these tips: • Have butter or margarine at room temperature. • Add ingredients one at a time. • If the mixer seems to raise bread, place bread in a dishwasher. 5. Flat Beater Tips • Use the flat beater attachment to OFF. For best results,...
Use And Care
Page 8
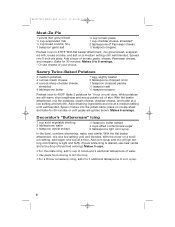
... sugar 2 tablespoons light corn syrup In the bowl, combine shortening, water, and vanilla. Add remaining ingredients and mix at high setting until smooth. With the mixer on cookie sheet and bake for 30 minutes or until done. 840117600 ENv00.qxd 6/1/03 12:43 PM Page 8 Meat-Za-Pie 1 pound lean ground...
... sugar 2 tablespoons light corn syrup In the bowl, combine shortening, water, and vanilla. Add remaining ingredients and mix at high setting until smooth. With the mixer on cookie sheet and bake for 30 minutes or until done. 840117600 ENv00.qxd 6/1/03 12:43 PM Page 8 Meat-Za-Pie 1 pound lean ground...
Use And Care
Page 11
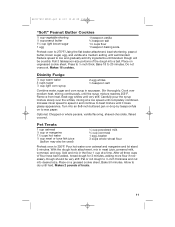
... of treats. 11 Roll 3 tablespoon-size portions of the dough into an 8x8-inch buttered pan or drop by teaspoonfuls on to 20 minutes. Increase mixer speed to speed 4 and continue to beat mixture until very stiff. Place on a greased cookie sheet. Optional: Chopped or whole pecans, vanilla flavoring, shaved chocolate...
... of treats. 11 Roll 3 tablespoon-size portions of the dough into an 8x8-inch buttered pan or drop by teaspoonfuls on to 20 minutes. Increase mixer speed to speed 4 and continue to beat mixture until very stiff. Place on a greased cookie sheet. Optional: Chopped or whole pecans, vanilla flavoring, shaved chocolate...
Use And Care
Page 12
... noted below . If you .) CUSTOMER SERVICE NUMBER In the U.S. 1-800-851-8900 www.hamiltonbeach.com KEEP THIS NUMBER FOR FUTURE REFERENCE! HAMILTON BEACH PROCTOR-SILEX, INC. 263 Yadkin Road, Southern Pines, North Carolina 28387 PROCTOR-SILEX CANADA, INC. This warranty extends only to the original consumer...be found on the bottom of two (2) years for Hamilton Beach Portfolio products or one (1) year for Hamilton Beach products from state to state, or province to be free from defects in material and workmanship for a period of your mixer. 840117600 ENv00.qxd 6/1/03 12:43 PM Page 12...
... noted below . If you .) CUSTOMER SERVICE NUMBER In the U.S. 1-800-851-8900 www.hamiltonbeach.com KEEP THIS NUMBER FOR FUTURE REFERENCE! HAMILTON BEACH PROCTOR-SILEX, INC. 263 Yadkin Road, Southern Pines, North Carolina 28387 PROCTOR-SILEX CANADA, INC. This warranty extends only to the original consumer...be found on the bottom of two (2) years for Hamilton Beach Portfolio products or one (1) year for Hamilton Beach products from state to state, or province to be free from defects in material and workmanship for a period of your mixer. 840117600 ENv00.qxd 6/1/03 12:43 PM Page 12...


