Use & Care
Page 2
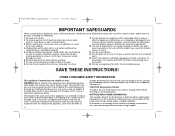
...wattage a hand mixer may cause fire, electric shock, or injury. 11. If it can be used. Moving Parts Hazard. To reduce the risk of attachments not recommended or sold by the appliance manufacturer for information on or near children. 4. Do not use , before putting on this model may ...has a polarized plug (one way into wall outlet. The use of personal injury, always unplug mixer before washing. 7. The plug fits only one wide blade) that control is an average of the hand mixer is used on or taking off before cleaning. 5. Peak power is off parts, and before...
...wattage a hand mixer may cause fire, electric shock, or injury. 11. If it can be used. Moving Parts Hazard. To reduce the risk of attachments not recommended or sold by the appliance manufacturer for information on or near children. 4. Do not use , before putting on this model may ...has a polarized plug (one way into wall outlet. The use of personal injury, always unplug mixer before washing. 7. The plug fits only one wide blade) that control is an average of the hand mixer is used on or taking off before cleaning. 5. Peak power is off parts, and before...
Use & Care
Page 3
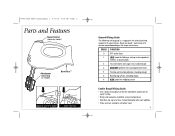
840171608 ENv03.qxd:Layout 1 4/9/10 9:30 AM Page 3 Parts and Features Speed Control (varies by hand. 3 most packaged cake mixes 4 Frosting and mashed potatoes; kneading dough 6 HIGH speed for whipping cream Cookie Dough Mixing Guide • Use a large mixing ... at a time, mixing thoroughly after each addition. • Chips and nuts should be stirred by model) Attachment (depending on the recipe consistency. Begin on speed 1 and increase to desired speed depending on model) Bowl Rest™ OR Speed Control Eject Eject Button General Mixing Guide The following mixing guide is...
840171608 ENv03.qxd:Layout 1 4/9/10 9:30 AM Page 3 Parts and Features Speed Control (varies by hand. 3 most packaged cake mixes 4 Frosting and mashed potatoes; kneading dough 6 HIGH speed for whipping cream Cookie Dough Mixing Guide • Use a large mixing ... at a time, mixing thoroughly after each addition. • Chips and nuts should be stirred by model) Attachment (depending on the recipe consistency. Begin on speed 1 and increase to desired speed depending on model) Bowl Rest™ OR Speed Control Eject Eject Button General Mixing Guide The following mixing guide is...
Use & Care
Page 4
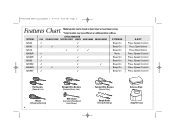
MODEL ATTACHMENTS FLAT STRAIGHT WIRE TWISTED WIRE WHISK MILK SHAKE DOUGH HOOKS STORAGE 62630 3 3 Snap-On 62650 3 3 3 Snap-On 62676 3 3 3 Snap-On 62680R 3 62682R 3 62683 3 None 3 Snap-On 3 Snap-On 62695D 3 62695N 3 3 3 3 Snap-On 3 Snap-On 62695V 3 3 Snap-On EJECT Press Speed Control Press ...General Use) Dough Hooks (Mixing/Kneading) Suitcase Style Snap-On Case 840171608 ENv03.qxd:Layout 1 4/9/10 9:30 AM Page 4 Features Chart Model number can be found on hand mixer or hand mixer carton. *Select models may have different or additional letter suffixes.
MODEL ATTACHMENTS FLAT STRAIGHT WIRE TWISTED WIRE WHISK MILK SHAKE DOUGH HOOKS STORAGE 62630 3 3 Snap-On 62650 3 3 3 Snap-On 62676 3 3 3 Snap-On 62680R 3 62682R 3 62683 3 None 3 Snap-On 3 Snap-On 62695D 3 62695N 3 3 3 3 Snap-On 3 Snap-On 62695V 3 3 Snap-On EJECT Press Speed Control Press ...General Use) Dough Hooks (Mixing/Kneading) Suitcase Style Snap-On Case 840171608 ENv03.qxd:Layout 1 4/9/10 9:30 AM Page 4 Features Chart Model number can be found on hand mixer or hand mixer carton. *Select models may have different or additional letter suffixes.
Use & Care
Page 5
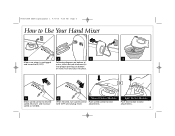
Eject Button Models Push eject button to O (OFF). 2 3 Following diagrams on bottom of mixer, insert desired attachment(s) into place. 4 OR 5 Move speed control to O (OFF) and unplug mixer. attachments. 840171608 ENv03.qxd:Layout 1 4/9/10 9:30 AM Page 5 How to Use Your Hand Mixer 1 Make sure mixer is unplugged and turned to eject attachments. 5 Start at 1 and increase speed as needed. 6 Speed Control Models When finished, turn speed control Push speed control to eject to desired speed. Push and click into proper openings on bottom of mixer.
Eject Button Models Push eject button to O (OFF). 2 3 Following diagrams on bottom of mixer, insert desired attachment(s) into place. 4 OR 5 Move speed control to O (OFF) and unplug mixer. attachments. 840171608 ENv03.qxd:Layout 1 4/9/10 9:30 AM Page 5 How to Use Your Hand Mixer 1 Make sure mixer is unplugged and turned to eject attachments. 5 Start at 1 and increase speed as needed. 6 Speed Control Models When finished, turn speed control Push speed control to eject to desired speed. Push and click into proper openings on bottom of mixer.

