Use & Care
Page 2
...be followed to reduce the risk of attachments not recommended or sold by using electrical appliances, basic safety precautions should always be taken to mixer. 6. If the plug does not fit, reverse the plug. Do not let cord hang over . OTHER CONSUMER SAFETY INFORMATION This appliance ..., an approved extension cord may be equal to reduce risk of electrical shock, do not put cord, plug, or mixer body in any way or by the appliance manufacturer for information on this model may consume during operation to or greater than intended purpose. Read all instructions. 2.
...be followed to reduce the risk of attachments not recommended or sold by using electrical appliances, basic safety precautions should always be taken to mixer. 6. If the plug does not fit, reverse the plug. Do not let cord hang over . OTHER CONSUMER SAFETY INFORMATION This appliance ..., an approved extension cord may be equal to reduce risk of electrical shock, do not put cord, plug, or mixer body in any way or by the appliance manufacturer for information on this model may consume during operation to or greater than intended purpose. Read all instructions. 2.
Use & Care
Page 3
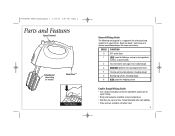
... and Features Speed Control Attachment (depending on the recipe consistency. kneading dough 5 Beating egg whites; Begin on speed 1 and increase to desired speed depending on model) Bowl Rest™ Eject Button General Mixing Guide The following mixing guide is a suggestion for selecting mixing speeds for easier mixing. • Butter and margarine... sugar; kneading dough 6 HIGH speed for whipping cream Cookie Dough Mixing Guide • Use a large mixing bowl so that the ingredients spread out for 6-speed mixers.
... and Features Speed Control Attachment (depending on the recipe consistency. kneading dough 5 Beating egg whites; Begin on speed 1 and increase to desired speed depending on model) Bowl Rest™ Eject Button General Mixing Guide The following mixing guide is a suggestion for selecting mixing speeds for easier mixing. • Butter and margarine... sugar; kneading dough 6 HIGH speed for whipping cream Cookie Dough Mixing Guide • Use a large mixing bowl so that the ingredients spread out for 6-speed mixers.
Use & Care
Page 4
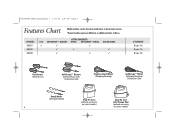
840189902 ENv02.qxd:Layout 1 11/9/10 1:47 PM Page 4 Features Chart Model number can be found on select models) MODEL 62637 62640 62645 FLAT SOFTSCRAPE™ BEATERS 3 3 3 3 ATTACHMENTS WHISK SOFTSCRAPE™ WHISK 3 3 3 DOUGH HOOKS 3 3 STORAGE Snap-On Snap-On Snap-On Flat Beaters (General Use)...Whisk (Whipping/Aerating) Dishwasher-Safe Dough Hooks (Mixing/Kneading) Snap-On Case Snap-On Case (optional accessory with Storage Door on select models) (optional accessory 4 on hand mixer or hand mixer carton. *Select models may have different or additional letter suffixes.
840189902 ENv02.qxd:Layout 1 11/9/10 1:47 PM Page 4 Features Chart Model number can be found on select models) MODEL 62637 62640 62645 FLAT SOFTSCRAPE™ BEATERS 3 3 3 3 ATTACHMENTS WHISK SOFTSCRAPE™ WHISK 3 3 3 DOUGH HOOKS 3 3 STORAGE Snap-On Snap-On Snap-On Flat Beaters (General Use)...Whisk (Whipping/Aerating) Dishwasher-Safe Dough Hooks (Mixing/Kneading) Snap-On Case Snap-On Case (optional accessory with Storage Door on select models) (optional accessory 4 on hand mixer or hand mixer carton. *Select models may have different or additional letter suffixes.
Use & Care
Page 5
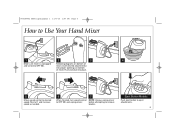
Push and click into proper openings on bottom of mixer, insert desired attachment(s) into place. 5 Move speed control to desired speed. Eject Button Models Push eject button to OFF (O). 840189902 ENv02.qxd:Layout 1 11/9/10 1:47 PM Page 5 How to Use Your Hand Mixer 1 2 3 4 Make sure mixer is unplugged and turned to eject attachments. 5 Start at 1 and increase speed as needed. 6 7 When finished, turn speed control NOTE: Always unplug mixer to remove beaters. before attempting to OFF (O) and unplug mixer. Following diagrams on bottom of mixer.
Push and click into proper openings on bottom of mixer, insert desired attachment(s) into place. 5 Move speed control to desired speed. Eject Button Models Push eject button to OFF (O). 840189902 ENv02.qxd:Layout 1 11/9/10 1:47 PM Page 5 How to Use Your Hand Mixer 1 2 3 4 Make sure mixer is unplugged and turned to eject attachments. 5 Start at 1 and increase speed as needed. 6 7 When finished, turn speed control NOTE: Always unplug mixer to remove beaters. before attempting to OFF (O) and unplug mixer. Following diagrams on bottom of mixer.


