Use And Care
Page 2
...an average of the plug by the appliance manufacturer for household use outdoors. 12. Do not defeat the safety purpose of the maximum wattage a hand mixer may consume during operation to reduce risk of the extension cord must be pulled on by or near a hot gas or electric burner, or...be followed to reduce the risk of fire, electric shock, and/or injury to reduce the hazards of the hand mixer is dropped or damaged in use appliance for information on this model may be used by children or accidentally tripped over a longer cord. WATTAGE/PEAK POWER INFORMATION The marked rating...
...an average of the plug by the appliance manufacturer for household use outdoors. 12. Do not defeat the safety purpose of the maximum wattage a hand mixer may consume during operation to reduce risk of the extension cord must be pulled on by or near a hot gas or electric burner, or...be followed to reduce the risk of fire, electric shock, and/or injury to reduce the hazards of the hand mixer is dropped or damaged in use appliance for information on this model may be used by children or accidentally tripped over a longer cord. WATTAGE/PEAK POWER INFORMATION The marked rating...
Use And Care
Page 3
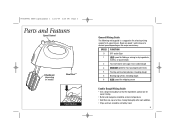
...room temperature. • Add flour one cup at a time, mixing thoroughly after each addition. • Chips and nuts should be stirred by hand. 3 kneading dough 6 HIGH speed for whipping cream Cookie Dough Mixing Guide • Use a large mixing bowl so that the ingredients spread ...Page 3 Parts and Features Speed Control Attachment (depending on the recipe consistency. Begin on speed 1 and increase to desired speed depending on model) Bowl Rest™ Eject Button General Mixing Guide The following mixing guide is a suggestion for selecting mixing speeds for most cookie dough 3 ...
...room temperature. • Add flour one cup at a time, mixing thoroughly after each addition. • Chips and nuts should be stirred by hand. 3 kneading dough 6 HIGH speed for whipping cream Cookie Dough Mixing Guide • Use a large mixing bowl so that the ingredients spread ...Page 3 Parts and Features Speed Control Attachment (depending on the recipe consistency. Begin on speed 1 and increase to desired speed depending on model) Bowl Rest™ Eject Button General Mixing Guide The following mixing guide is a suggestion for selecting mixing speeds for most cookie dough 3 ...
Use And Care
Page 4
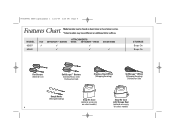
840189901 ENv01.qxd:Layout 1 12/2/09 3:36 PM Page 4 Features Chart Model number can be found on select models) MODEL 62637 62640 FLAT SOFTSCRAPE™ BEATERS 3 3 3 ATTACHMENTS WHISK SOFTSCRAPE™ WHISK 3 3 DOUGH HOOKS 3 STORAGE Snap-On Snap-On Flat Beaters (General Use) SoftScrape™...; Whisk (Whipping/Aerating) Dishwasher-Safe Dough Hooks (Mixing/Kneading) Snap-On Case Snap-On Case (optional accessory with Storage Door on select models) (optional accessory 4 on hand mixer or hand mixer carton. *Select models may have different or additional letter suffixes.
840189901 ENv01.qxd:Layout 1 12/2/09 3:36 PM Page 4 Features Chart Model number can be found on select models) MODEL 62637 62640 FLAT SOFTSCRAPE™ BEATERS 3 3 3 ATTACHMENTS WHISK SOFTSCRAPE™ WHISK 3 3 DOUGH HOOKS 3 STORAGE Snap-On Snap-On Flat Beaters (General Use) SoftScrape™...; Whisk (Whipping/Aerating) Dishwasher-Safe Dough Hooks (Mixing/Kneading) Snap-On Case Snap-On Case (optional accessory with Storage Door on select models) (optional accessory 4 on hand mixer or hand mixer carton. *Select models may have different or additional letter suffixes.
Use And Care
Page 5
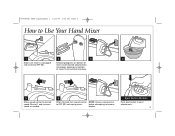
Push and click into proper openings on bottom of mixer, insert desired attachment(s) into place. 5 Move speed control to desired speed. Eject Button Models Push eject button to remove beaters. Following diagrams on bottom of mixer. before attempting to eject attachments. 5 840189901 ENv01.qxd:Layout 1 12/2/09 3:36 PM Page 5 How to Use Your Hand Mixer 1 2 3 4 Make sure mixer is unplugged and turned to OFF (O) and unplug mixer. Start at 1 and increase speed as needed. 6 When finished, turn speed control NOTE: Always unplug mixer to OFF (O).
Push and click into proper openings on bottom of mixer, insert desired attachment(s) into place. 5 Move speed control to desired speed. Eject Button Models Push eject button to remove beaters. Following diagrams on bottom of mixer. before attempting to eject attachments. 5 840189901 ENv01.qxd:Layout 1 12/2/09 3:36 PM Page 5 How to Use Your Hand Mixer 1 2 3 4 Make sure mixer is unplugged and turned to OFF (O) and unplug mixer. Start at 1 and increase speed as needed. 6 When finished, turn speed control NOTE: Always unplug mixer to OFF (O).

