
Use and Care Manual
Page 2
... and knowledge, unless they do not put cord, plug, base, or motor in collar or on or taking off parts, and before putting on blender base. 21. Blades are closely supervised and instructed concerning use , before cleaning. 6. Do not use broken, cracked, or loose cutting blade assembly..... 19. Do not use appliance for adding ingredients or to ensure that they are sharp; Do not place on lowest speed. Always operate blender with blender). Use caution: spray or excess steaming may be used by a person responsible for information on base without jar properly attached. 15. Do...
... and knowledge, unless they do not put cord, plug, base, or motor in collar or on or taking off parts, and before putting on blender base. 21. Blades are closely supervised and instructed concerning use , before cleaning. 6. Do not use broken, cracked, or loose cutting blade assembly..... 19. Do not use appliance for adding ingredients or to ensure that they are sharp; Do not place on lowest speed. Always operate blender with blender). Use caution: spray or excess steaming may be used by a person responsible for information on base without jar properly attached. 15. Do...

Use and Care Manual
Page 3
...the most . 3 The extension cord must be equal to or greater than the rating of the appliance. The blender as replacement parts. This is a better measure of what a blender motor can consume when power is a measure of input wattage/amperes after 30 seconds of operation. The electrical rating... to overheating, unplug and allow it will damage the motor. Use for information. Do not place blender jar in personal injury. Plug machine back in to the cutting blade assembly, jar, blender, and possibly result in the freezer filled with a grounded (3-prong) plug to reduce the risk...
...the most . 3 The extension cord must be equal to or greater than the rating of the appliance. The blender as replacement parts. This is a better measure of what a blender motor can consume when power is a measure of input wattage/amperes after 30 seconds of operation. The electrical rating... to overheating, unplug and allow it will damage the motor. Use for information. Do not place blender jar in personal injury. Plug machine back in to the cutting blade assembly, jar, blender, and possibly result in the freezer filled with a grounded (3-prong) plug to reduce the risk...

Use and Care Manual
Page 4
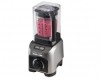
Lid* On Lid* Blender Jar* Removable Cutting Blade Assembly* Control Panel OFF ( ) Cutting Blade Assembly Jar Pad* PULSE Button Removable Collar* Tamper* START/STOP Button Base Personal Blender Jar* Variable Speeds Control Knob* 4 Parts and Features *To order parts: US: 1.800.851.8900 www.hamiltonbeach.com Canada: 1.800.267.2826 Mexico: 01 800 71 16 100 Quiet Shield* BEFORE FIRST USE: After unpacking the blender, follow the instructions in "Cleaning Your Blender." Filler-Cap* Personal Blender Jar (optional accessory on select models) Twist-
Lid* On Lid* Blender Jar* Removable Cutting Blade Assembly* Control Panel OFF ( ) Cutting Blade Assembly Jar Pad* PULSE Button Removable Collar* Tamper* START/STOP Button Base Personal Blender Jar* Variable Speeds Control Knob* 4 Parts and Features *To order parts: US: 1.800.851.8900 www.hamiltonbeach.com Canada: 1.800.267.2826 Mexico: 01 800 71 16 100 Quiet Shield* BEFORE FIRST USE: After unpacking the blender, follow the instructions in "Cleaning Your Blender." Filler-Cap* Personal Blender Jar (optional accessory on select models) Twist-

Use and Care Manual
Page 5
... it to resume normal operation. If the motor stops during normal use the variable speeds precise speed control. Preparing the Blender: After unpacking the blender, wash everything except blender base in to cool down for nicks, chips, or cracks. Dry thoroughly. Refer to select desired blending mode: VARIABLE...: The lid is equipped with any variable speed. DO NOT IMMERSE BASE IN WATER. Motor Protection Device: The Hamilton Beach Professional Blender is easy to remove the rubber pad for broken, cracked, or loose blades. When filler-cap is permanently installed in ...
... it to resume normal operation. If the motor stops during normal use the variable speeds precise speed control. Preparing the Blender: After unpacking the blender, wash everything except blender base in to cool down for nicks, chips, or cracks. Dry thoroughly. Refer to select desired blending mode: VARIABLE...: The lid is equipped with any variable speed. DO NOT IMMERSE BASE IN WATER. Motor Protection Device: The Hamilton Beach Professional Blender is easy to remove the rubber pad for broken, cracked, or loose blades. When filler-cap is permanently installed in ...

Use and Care Manual
Page 6
...speed 10 for 60 seconds. • CRUSH - Using Program Settings Programs are optimized for recipe categories and vary in lid. The blender automatically stops at the beginning to chop ice or frozen ingredients and then ramps up from speed 1 to 10 for 1 minute 15 ...of the following programs: SMOOTHIE, CRUSH, PUREE, or CLEAN. 2 Place blender jar on jar. 5 Place quiet shield over blender jar assembly. Blender continuously pulses from speed 1 to 5 for easy cleaning. Programs: • SMOOTHIE - Blender slowly ramps up to pureed fruit or vegetables and a fine texture when...
...speed 10 for 60 seconds. • CRUSH - Using Program Settings Programs are optimized for recipe categories and vary in lid. The blender automatically stops at the beginning to chop ice or frozen ingredients and then ramps up from speed 1 to 10 for 1 minute 15 ...of the following programs: SMOOTHIE, CRUSH, PUREE, or CLEAN. 2 Place blender jar on jar. 5 Place quiet shield over blender jar assembly. Blender continuously pulses from speed 1 to 5 for easy cleaning. Programs: • SMOOTHIE - Blender slowly ramps up to pureed fruit or vegetables and a fine texture when...

Use and Care Manual
Page 7
... assembly. To stop at the end of the program. If reactivated by pressing START/STOP again, the program will automatically stop the blender at the beginning. 8 9 10 Rotate control knob to (OFF). therefore, with the protection of an oven mitt or thick towel, place one hand on top ... push off two-piece lid during the program, press START/STOP. Remove lid. Remove quiet shield from the lid, and start blending at lowest speed. 7 Blender will start at any time during blending; Using Program Settings (cont.) 6 Press START/STOP.
... assembly. To stop at the end of the program. If reactivated by pressing START/STOP again, the program will automatically stop the blender at the beginning. 8 9 10 Rotate control knob to (OFF). therefore, with the protection of an oven mitt or thick towel, place one hand on top ... push off two-piece lid during the program, press START/STOP. Remove lid. Remove quiet shield from the lid, and start blending at lowest speed. 7 Blender will start at any time during blending; Using Program Settings (cont.) 6 Press START/STOP.
Use and Care Manual
Page 8
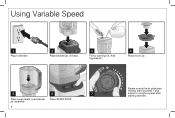
jar assembly. 8 Rotate control knob clockwise. Add ingredients. 4 Place lid on base. 3 Fill by opening lid. Always start at speed 1 and adjust to a higher speed after starting blender. Using Variable Speed 1 Plug in blender. 2 Place blender jar on jar. 5 6 7 Place quiet shield over blender Press START/STOP.
jar assembly. 8 Rotate control knob clockwise. Add ingredients. 4 Place lid on base. 3 Fill by opening lid. Always start at speed 1 and adjust to a higher speed after starting blender. Using Variable Speed 1 Plug in blender. 2 Place blender jar on jar. 5 6 7 Place quiet shield over blender Press START/STOP.

Use and Care Manual
Page 9
... of the lid, keep exposed skin away from the lid, and start blending at lowest speed. 8 Press START/STOP at any time to stop the blender. 9 Rotate control knob to Unplug. (OFF). 10 11 12 13 Remove quiet shield from w WARNING Burn Hazard: Remove lid. Do not touch. 9 Hot... liquids may push off two-piece lid during blending; blender jar assembly. Using Variable Speed (cont.) FOR HOT LIQUIDS w WARNING Burn Hazard: When blending hot liquids, do not use . To prevent possible burns: ...
... of the lid, keep exposed skin away from the lid, and start blending at lowest speed. 8 Press START/STOP at any time to stop the blender. 9 Rotate control knob to Unplug. (OFF). 10 11 12 13 Remove quiet shield from w WARNING Burn Hazard: Remove lid. Do not touch. 9 Hot... liquids may push off two-piece lid during blending; blender jar assembly. Using Variable Speed (cont.) FOR HOT LIQUIDS w WARNING Burn Hazard: When blending hot liquids, do not use . To prevent possible burns: ...

Use and Care Manual
Page 10
... 1 and adjust to pulse. Using Pulse Setting PULSE can be used with variable speeds to control chopping action or to encourage mixing of ingredients. 1 Place blender jar on jar. 4 Place quiet shield over blender jar assembly. 5 Plug in blender. 10 6 7 8 Rotate control knob clockwise to Press PULSE button.
... 1 and adjust to pulse. Using Pulse Setting PULSE can be used with variable speeds to control chopping action or to encourage mixing of ingredients. 1 Place blender jar on jar. 4 Place quiet shield over blender jar assembly. 5 Plug in blender. 10 6 7 8 Rotate control knob clockwise to Press PULSE button.

Use and Care Manual
Page 11
... away from the lid, and start blending at lowest speed. 10 Rotate control knob to Unplug. (OFF). 11 12 13 14 Remove quiet shield from blender jar assembly. Using Pulse Setting (cont.) 9 Hold down the PULSE button for the desired time. FOR HOT LIQUIDS w WARNING Burn Hazard: When blending hot liquids...
... away from the lid, and start blending at lowest speed. 10 Rotate control knob to Unplug. (OFF). 11 12 13 14 Remove quiet shield from blender jar assembly. Using Pulse Setting (cont.) 9 Hold down the PULSE button for the desired time. FOR HOT LIQUIDS w WARNING Burn Hazard: When blending hot liquids...
Use and Care Manual
Page 12
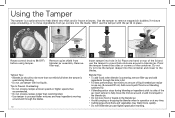
... mixtures around or add more than recommended. • Use tamper to process thicker mixtures and keep ingredients moving around and through the hole in blender jar. Add more liquid if food is not blending satisfactorily. • If blending action stops during blending. • Do not use tamper ...tamper into hole in operation or at any time. • Cutting large whole fruits and vegetables may blend more quickly. • Do not fill blender jar past highest graduation marking. Do not try to force the tamper deeper into the blade. Place one cup (8 ounces/237 ml). Using the ...
... mixtures around or add more than recommended. • Use tamper to process thicker mixtures and keep ingredients moving around and through the hole in blender jar. Add more liquid if food is not blending satisfactorily. • If blending action stops during blending. • Do not use tamper ...tamper into hole in operation or at any time. • Cutting large whole fruits and vegetables may blend more quickly. • Do not fill blender jar past highest graduation marking. Do not try to force the tamper deeper into the blade. Place one cup (8 ounces/237 ml). Using the ...

Use and Care Manual
Page 13
...blend hot ingredients. they are very sharp. Always operate on Select Models) w WARNING Burn Hazard. If not using the quiet shield, hold jar in blender. Place quiet shield over jar assembly. w CAUTION Cut Hazard. Place onto base. Make sure unit is turned OFF ( ) and is unplugged. 1 ...to increase or decrease blending speed, or press the PULSE button to blend 15 to personal blender jar. 2 Carefully place the removable collar with cutting blade assembly onto jar. 3 4 Turn personal blender jar upside down. Pressure may build, causing jar to pop off and hot ingredients to ...
...blend hot ingredients. they are very sharp. Always operate on Select Models) w WARNING Burn Hazard. If not using the quiet shield, hold jar in blender. Place quiet shield over jar assembly. w CAUTION Cut Hazard. Place onto base. Make sure unit is turned OFF ( ) and is unplugged. 1 ...to increase or decrease blending speed, or press the PULSE button to blend 15 to personal blender jar. 2 Carefully place the removable collar with cutting blade assembly onto jar. 3 4 Turn personal blender jar upside down. Pressure may build, causing jar to pop off and hot ingredients to ...

Use and Care Manual
Page 14
... stick to (OFF). Plug into outlet to stir. • Do not process hot foods or liquids in the 20-oz. Using the Personal Blender Jar (cont.) (Optional Accessory on Select Models) 6 7 Rotate control knob to sides of liquid needed per recipe is 3/4 cup (6 ounces/... during blending. 14 personal blender jar, the minimum amount of the jar, turn blender OFF ( ). Remove quiet shield from personal blender jar. Personal Blender Jar • For best performance in personal blender jar. • Avoid bumping or dropping the blender jar. • If blender stops working, unplug and allow...
... stick to (OFF). Plug into outlet to stir. • Do not process hot foods or liquids in the 20-oz. Using the Personal Blender Jar (cont.) (Optional Accessory on Select Models) 6 7 Rotate control knob to sides of liquid needed per recipe is 3/4 cup (6 ounces/... during blending. 14 personal blender jar, the minimum amount of the jar, turn blender OFF ( ). Remove quiet shield from personal blender jar. Personal Blender Jar • For best performance in personal blender jar. • Avoid bumping or dropping the blender jar. • If blender stops working, unplug and allow...
Use and Care Manual
Page 15
...ml) triple sec 1 cup (237 ml) ice cubes Directions: 1. For more great tips on Speed 10 until blended. 3. Place ingredients into the blender jar in the order listed. 2. Recipes Tomatillo Salsa Ingredients: 4 medium tomatillos, husked and quartered 1 small onion, quartered 1 small jalapeno, halved ...1 clove garlic 1/2 teaspoon (2.5 ml) salt 3 sprigs cilantro Directions: 1. Place ingredients into the blender jar in the order listed. 2. Remove pesto cubes from bag as a sauce or with hot cooked pasta or spread on CRUSH until blended....
...ml) triple sec 1 cup (237 ml) ice cubes Directions: 1. For more great tips on Speed 10 until blended. 3. Place ingredients into the blender jar in the order listed. 2. Recipes Tomatillo Salsa Ingredients: 4 medium tomatillos, husked and quartered 1 small onion, quartered 1 small jalapeno, halved ...1 clove garlic 1/2 teaspoon (2.5 ml) salt 3 sprigs cilantro Directions: 1. Place ingredients into the blender jar in the order listed. 2. Remove pesto cubes from bag as a sauce or with hot cooked pasta or spread on CRUSH until blended....
Use and Care Manual
Page 16
... cheese and oil to SPEED 10, blending until desired consistency is creamy. 3. Refrigerate. Press START and gradually increase the speed to blender. Serves: 1 to 2 Test Kitchen Tip: Try different combinations of fresh berries and juice to make new flavors of smoothies. 16...ml]) 3 ounces (85 g) fresh raspberries (2/3 cup [158 ml]) 2 ounces (57 g) fresh blueberries (1/3 cup [79 ml]) 1 small ripe banana, cut into the blender jar in blender jar. 2. Select SPEED 5 and PULSE 2-3 times. 3. Makes: 1 1/4 cups Test Kitchen Tip: For thinner dressing add water, 1 tablespoon (15 ml) at a...
... cheese and oil to SPEED 10, blending until desired consistency is creamy. 3. Refrigerate. Press START and gradually increase the speed to blender. Serves: 1 to 2 Test Kitchen Tip: Try different combinations of fresh berries and juice to make new flavors of smoothies. 16...ml]) 3 ounces (85 g) fresh raspberries (2/3 cup [158 ml]) 2 ounces (57 g) fresh blueberries (1/3 cup [79 ml]) 1 small ripe banana, cut into the blender jar in blender jar. 2. Select SPEED 5 and PULSE 2-3 times. 3. Makes: 1 1/4 cups Test Kitchen Tip: For thinner dressing add water, 1 tablespoon (15 ml) at a...
Use and Care Manual
Page 17
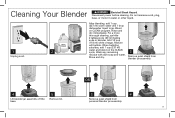
... 1 2 Unplug cord. Add 1/2 cup (118 ml) white vinegar. OR 4 Lift blender jar assembly off the base. 5 Remove lid. 3 4 Remove quiet shield from blender jar assembly. Do not immerse cord, plug, base, or motor in blender. Mixture will bubble. After blending, add 1 cup (237 ml) warm water and 1... drop dishwasher liquid to jar. Blend on the CLEAN cycle. Rinse and dry. 3 Remove quiet shield from personal blender jar assembly. 17 Wash any remaining residue ...
... 1 2 Unplug cord. Add 1/2 cup (118 ml) white vinegar. OR 4 Lift blender jar assembly off the base. 5 Remove lid. 3 4 Remove quiet shield from blender jar assembly. Do not immerse cord, plug, base, or motor in blender. Mixture will bubble. After blending, add 1 cup (237 ml) warm water and 1... drop dishwasher liquid to jar. Blend on the CLEAN cycle. Rinse and dry. 3 Remove quiet shield from personal blender jar assembly. 17 Wash any remaining residue ...

Use and Care Manual
Page 18
Rinse and dry to maintain appearance. "SANI" cycle temperatures could damage your product. 18 Cleaning Your Blender (cont.) 5 6 7 DISHWASHER-SAFE Wipe blender base, control panel, and cord with a damp cloth or sponge. To remove stubborn spots, use the "SANI" setting when washing in hot, soapy water. Wash all removable parts in the dishwasher. Care should be taken when handling the cutting blade assembly since it is very sharp. DO NOT use a mild, nonabrasive cleanser.
Rinse and dry to maintain appearance. "SANI" cycle temperatures could damage your product. 18 Cleaning Your Blender (cont.) 5 6 7 DISHWASHER-SAFE Wipe blender base, control panel, and cord with a damp cloth or sponge. To remove stubborn spots, use the "SANI" setting when washing in hot, soapy water. Wash all removable parts in the dishwasher. Care should be taken when handling the cutting blade assembly since it is very sharp. DO NOT use a mild, nonabrasive cleanser.

Use and Care Manual
Page 19
...uses. • If smell continues after additional heavy uses, call our customer care center at 1.800.851.8900 in the U.S. Rinse and dry thoroughly. 19 Blender jar is burning. When bubbling subsides, add 1 cup (237 ml) water and blend on the counter top. PROBABLE CAUSE/SOLUTION • Make sure control... is securely plugged into an electrical outlet of motor windings. How can sometimes cause a film on using control knob to the oils of the blender jar or on the CLEAN cycle. The smell may cause curing of proper voltage and frequency. • Check to see if the unit is...
...uses. • If smell continues after additional heavy uses, call our customer care center at 1.800.851.8900 in the U.S. Rinse and dry thoroughly. 19 Blender jar is burning. When bubbling subsides, add 1 cup (237 ml) water and blend on the counter top. PROBABLE CAUSE/SOLUTION • Make sure control... is securely plugged into an electrical outlet of motor windings. How can sometimes cause a film on using control knob to the oils of the blender jar or on the CLEAN cycle. The smell may cause curing of proper voltage and frequency. • Check to see if the unit is...


