
Use and Care Manual
Page 2
... electric burner, or in any appliance with lid and filler-cap in use appliance for information on blender base. 21. Injury can result if moving parts. 7. If the jar should be supervised to OFF ( ). Do not use , before putting on lowest speed. To protect against risk of electrical ... lack of table or counter or touch hot surfaces, including stove. 11. Do not operate any manner. Always begin processing on or taking off parts, and before cleaning. 6. Then remove plug from the lid. Supply cord replacement and repairs must be used but must be conducted by persons (...
... electric burner, or in any appliance with lid and filler-cap in use appliance for information on blender base. 21. Injury can result if moving parts. 7. If the jar should be supervised to OFF ( ). Do not use , before putting on lowest speed. To protect against risk of electrical ... lack of table or counter or touch hot surfaces, including stove. 11. Do not operate any manner. Always begin processing on or taking off parts, and before cleaning. 6. Then remove plug from the lid. Supply cord replacement and repairs must be used but must be conducted by persons (...

Use and Care Manual
Page 3
... locks and will damage the motor. The plug fits only one way into the outlet, have an electrician replace the outlet. The blender as replacement parts. This is equipped with food or liquid. Do not place blender jar in any way or by using an adapter. NOTE: This machine is when...
... locks and will damage the motor. The plug fits only one way into the outlet, have an electrician replace the outlet. The blender as replacement parts. This is equipped with food or liquid. Do not place blender jar in any way or by using an adapter. NOTE: This machine is when...

Use and Care Manual
Page 4
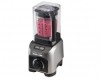
Parts and Features *To order parts: US: 1.800.851.8900 www.hamiltonbeach.com Canada: 1.800.267.2826 Mexico: 01 800 71 16 100 Quiet Shield* BEFORE FIRST USE: After unpacking the blender, follow the instructions in "Cleaning Your Blender." Filler-Cap* Personal Blender Jar (optional accessory on select models) Twist- Lid* On Lid* Blender Jar* Removable Cutting Blade Assembly* Control Panel OFF ( ) Cutting Blade Assembly Jar Pad* PULSE Button Removable Collar* Tamper* START/STOP Button Base Personal Blender Jar* Variable Speeds Control Knob* 4
Parts and Features *To order parts: US: 1.800.851.8900 www.hamiltonbeach.com Canada: 1.800.267.2826 Mexico: 01 800 71 16 100 Quiet Shield* BEFORE FIRST USE: After unpacking the blender, follow the instructions in "Cleaning Your Blender." Filler-Cap* Personal Blender Jar (optional accessory on select models) Twist- Lid* On Lid* Blender Jar* Removable Cutting Blade Assembly* Control Panel OFF ( ) Cutting Blade Assembly Jar Pad* PULSE Button Removable Collar* Tamper* START/STOP Button Base Personal Blender Jar* Variable Speeds Control Knob* 4

Use and Care Manual
Page 5
... Knob: Rotate knob to turn blender OFF ( ) and to make beverages on , take off, and clean. Motor Protection Device: The Hamilton Beach Professional Blender is clearly marked with a motor overheating device. When placed over the blender jar or the personal blender jar, it to make fine...with regular blending. Dry thoroughly. Always inspect cutting blade assembly for nicks, chips, or cracks. Jar Pad: Simply lift to obtain replacement parts. Call our customer care center to remove the rubber pad for about 15 minutes. PULSE STSATROTP 5 Plug blender back in hot, soapy...
... Knob: Rotate knob to turn blender OFF ( ) and to make beverages on , take off, and clean. Motor Protection Device: The Hamilton Beach Professional Blender is clearly marked with a motor overheating device. When placed over the blender jar or the personal blender jar, it to make fine...with regular blending. Dry thoroughly. Always inspect cutting blade assembly for nicks, chips, or cracks. Jar Pad: Simply lift to obtain replacement parts. Call our customer care center to remove the rubber pad for about 15 minutes. PULSE STSATROTP 5 Plug blender back in hot, soapy...

Use and Care Manual
Page 7
.... If reactivated by pressing START/STOP again, the program will automatically stop the blender at the end of two-piece lid. w WARNING Burn Hazard: Metal parts under blending jar get hot after use quiet shield and remove filler-cap of the program. Hot liquids may push off two-piece lid during...
.... If reactivated by pressing START/STOP again, the program will automatically stop the blender at the end of two-piece lid. w WARNING Burn Hazard: Metal parts under blending jar get hot after use quiet shield and remove filler-cap of the program. Hot liquids may push off two-piece lid during...

Use and Care Manual
Page 9
Do not touch. 9 blender jar assembly. Hot liquids may push off two-piece lid during blending; Metal parts under blending jar get hot after use quiet shield and remove filler-cap of the lid, keep exposed skin away from the lid, and start ...
Do not touch. 9 blender jar assembly. Hot liquids may push off two-piece lid during blending; Metal parts under blending jar get hot after use quiet shield and remove filler-cap of the lid, keep exposed skin away from the lid, and start ...

Use and Care Manual
Page 11
... an oven mitt or thick towel, place one hand on top of two-piece lid. Do not touch. 11 w WARNING Burn Hazard: Remove lid. Metal parts under blending jar get hot after use quiet shield and remove filler-cap of the lid, keep exposed skin away from the lid, and start...
... an oven mitt or thick towel, place one hand on top of two-piece lid. Do not touch. 11 w WARNING Burn Hazard: Remove lid. Metal parts under blending jar get hot after use quiet shield and remove filler-cap of the lid, keep exposed skin away from the lid, and start...

Use and Care Manual
Page 18
Rinse and dry to maintain appearance. Care should be taken when handling the cutting blade assembly since it is very sharp. DO NOT use a mild, nonabrasive cleanser. "SANI" cycle temperatures could damage your product. 18 To remove stubborn spots, use the "SANI" setting when washing in hot, soapy water. Wash all removable parts in the dishwasher. Cleaning Your Blender (cont.) 5 6 7 DISHWASHER-SAFE Wipe blender base, control panel, and cord with a damp cloth or sponge.
Rinse and dry to maintain appearance. Care should be taken when handling the cutting blade assembly since it is very sharp. DO NOT use a mild, nonabrasive cleanser. "SANI" cycle temperatures could damage your product. 18 To remove stubborn spots, use the "SANI" setting when washing in hot, soapy water. Wash all removable parts in the dishwasher. Cleaning Your Blender (cont.) 5 6 7 DISHWASHER-SAFE Wipe blender base, control panel, and cord with a damp cloth or sponge.


