
Use and Care Manual
Page 2
... accidentally become exposed. 19. A rubber spatula may not be supervised to avoid a hazard. Do not use a broken, chipped, or cracked blender jar. 15. Always begin processing on or taking off the appliance. To disconnect cord, turn off parts, and before putting on lowest speed.... repair, or adjustment. 8. Then remove plug from the lid. SAVE THESE INSTRUCTIONS! 2 Call the provided customer service number for information on blender base. 20. When blending hot liquids or ingredients, remove filler-cap from wall outlet. 22. Supply cord replacement and repairs must be used...
... accidentally become exposed. 19. A rubber spatula may not be supervised to avoid a hazard. Do not use a broken, chipped, or cracked blender jar. 15. Always begin processing on or taking off the appliance. To disconnect cord, turn off parts, and before putting on lowest speed.... repair, or adjustment. 8. Then remove plug from the lid. SAVE THESE INSTRUCTIONS! 2 Call the provided customer service number for information on blender base. 20. When blending hot liquids or ingredients, remove filler-cap from wall outlet. 22. Supply cord replacement and repairs must be used...

Use and Care Manual
Page 3
... reduce the hazards of the motor wattage during operation due to overheating, unplug and allow it to the cutting blade assembly, jar, blender, and possibly result in personal injury. Care must be pulled on available cutting blade assembly, jar combinations, and attachments that may not... arrange the extension cord so that it will not move, it can result in damage to cool down for information. This is when a blender requires the most . 3 w WARNING Electrical Shock Hazard: This appliance is provided with food or liquid. Other Consumer Safety Information This appliance ...
... reduce the hazards of the motor wattage during operation due to overheating, unplug and allow it to the cutting blade assembly, jar, blender, and possibly result in personal injury. Care must be pulled on available cutting blade assembly, jar combinations, and attachments that may not... arrange the extension cord so that it will not move, it can result in damage to cool down for information. This is when a blender requires the most . 3 w WARNING Electrical Shock Hazard: This appliance is provided with food or liquid. Other Consumer Safety Information This appliance ...

Use and Care Manual
Page 4
Filler-Cap* Lid* Control Panel OFF (O) Tamper* Blender Jar* Cutting Blade Assembly Jar Pad* PULSE Button 4 START/STOP Button Timer Display Base Variable Speeds Control Knob* Parts and Features *To order parts: US: 1.800.851.8900 www.hamiltonbeach.com Canada: 1.800.267.2826 Mexico: 01 800 71 16 100 BEFORE FIRST USE: After unpacking the blender, follow the instructions in "Cleaning Your Blender."
Filler-Cap* Lid* Control Panel OFF (O) Tamper* Blender Jar* Cutting Blade Assembly Jar Pad* PULSE Button 4 START/STOP Button Timer Display Base Variable Speeds Control Knob* Parts and Features *To order parts: US: 1.800.851.8900 www.hamiltonbeach.com Canada: 1.800.267.2826 Mexico: 01 800 71 16 100 BEFORE FIRST USE: After unpacking the blender, follow the instructions in "Cleaning Your Blender."

Use and Care Manual
Page 5
.... DO NOT IMMERSE BASE IN WATER. Motor Protection Device: The Hamilton Beach Professional Blender is equipped with ounces, cups, and milliliters. Preparing the Blender: After unpacking the blender, wash everything except blender base in the blender jar. Dry thoroughly. If jar or cutting blade assembly is clearly...Assembly: The cutting blade assembly is removed, ingredients can be taken when handling cutting blade assembly since it to 10. IMPORTANT: Blender jar and cutting blade assembly are located on page 16. Always inspect jar for broken, cracked, or loose blades. Use START...
.... DO NOT IMMERSE BASE IN WATER. Motor Protection Device: The Hamilton Beach Professional Blender is equipped with ounces, cups, and milliliters. Preparing the Blender: After unpacking the blender, wash everything except blender base in the blender jar. Dry thoroughly. If jar or cutting blade assembly is clearly...Assembly: The cutting blade assembly is removed, ingredients can be taken when handling cutting blade assembly since it to 10. IMPORTANT: Blender jar and cutting blade assembly are located on page 16. Always inspect jar for broken, cracked, or loose blades. Use START...

Use and Care Manual
Page 6
...O (OFF) to 5 for easy cleaning. Programs: • SMOOTHIE - Blender slowly ramps up to blender jar before starting the program for 1 minute. • PUREE - Blender pulses five times at the end of the program. 6 3 Place blender jar on base. 4 Fill by opening lid. Add 2 cups (473 ml... high speed 10 for 60 seconds. • CRUSH - Fillercap should be kept in blending speed and duration. Blends frozen or fresh smoothies. Blender runs for slushies or fine cocktails. Using Program Settings Programs are optimized for 1 minute 15 seconds. • CLEAN - Gives a smooth, ...
...O (OFF) to 5 for easy cleaning. Programs: • SMOOTHIE - Blender slowly ramps up to blender jar before starting the program for 1 minute. • PUREE - Blender pulses five times at the end of the program. 6 3 Place blender jar on base. 4 Fill by opening lid. Add 2 cups (473 ml... high speed 10 for 60 seconds. • CRUSH - Fillercap should be kept in blending speed and duration. Blends frozen or fresh smoothies. Blender runs for slushies or fine cocktails. Using Program Settings Programs are optimized for 1 minute 15 seconds. • CLEAN - Gives a smooth, ...

Use and Care Manual
Page 7
... filler-cap of the lid, keep exposed skin away from the lid, and start at any time during blending; Rotate control knob to count down. Blender will automatically stop at the end of the program and display will begin to O (OFF). hot after use. Using Program Settings (cont.) 6 Press START/STOP... again, the program will Metal parts under blending jar get start blending at lowest speed. 7 Timer display will show END. 8 9 10 11 To stop the blender at the beginning. Do not touch. 7
... filler-cap of the lid, keep exposed skin away from the lid, and start at any time during blending; Rotate control knob to count down. Blender will automatically stop at the end of the program and display will begin to O (OFF). hot after use. Using Program Settings (cont.) 6 Press START/STOP... again, the program will Metal parts under blending jar get start blending at lowest speed. 7 Timer display will show END. 8 9 10 11 To stop the blender at the beginning. Do not touch. 7
Use and Care Manual
Page 8
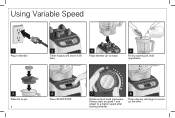
Always start at speed 1 and adjust to count up the time. Add ingredients. 5 Place lid on base. 4 Fill by opening lid. Using Variable Speed 1 Plug in blender. 2 Timer display will begin to a higher speed after starting blender. 8 Timer display will show 0:00 time. 3 Place blender jar on jar. 8 6 Press START/STOP. 7 Rotate control knob clockwise.
Always start at speed 1 and adjust to count up the time. Add ingredients. 5 Place lid on base. 4 Fill by opening lid. Using Variable Speed 1 Plug in blender. 2 Timer display will begin to a higher speed after starting blender. 8 Timer display will show 0:00 time. 3 Place blender jar on jar. 8 6 Press START/STOP. 7 Rotate control knob clockwise.

Use and Care Manual
Page 9
... of the lid, keep exposed skin away from the lid, and start blending at lowest speed. 9 Press START/STOP at any time to stop the blender. 10 Rotate control knob to O (OFF). 11 12 13 14 Unplug. therefore, with the protection of an oven mitt or thick towel, place one hand...
... of the lid, keep exposed skin away from the lid, and start blending at lowest speed. 9 Press START/STOP at any time to stop the blender. 10 Rotate control knob to O (OFF). 11 12 13 14 Unplug. therefore, with the protection of an oven mitt or thick towel, place one hand...

Use and Care Manual
Page 10
Using Pulse Setting PULSE can be used with variable speeds to control chopping action or to encourage mixing of ingredients. 1 Timer display will begin to a higher speed after starting blender. 8 Timer display will show 0:00 time. 2 Place blender jar on jar. 5 Plug in blender. 10 6 Press PULSE button. 7 Rotate control knob clockwise. Always start at speed 1 and adjust to count up the time. Add ingredients. 4 Place lid on base. 3 Fill by opening lid.
Using Pulse Setting PULSE can be used with variable speeds to control chopping action or to encourage mixing of ingredients. 1 Timer display will begin to a higher speed after starting blender. 8 Timer display will show 0:00 time. 2 Place blender jar on jar. 5 Plug in blender. 10 6 Press PULSE button. 7 Rotate control knob clockwise. Always start at speed 1 and adjust to count up the time. Add ingredients. 4 Place lid on base. 3 Fill by opening lid.

Use and Care Manual
Page 12
...not use tamper with the jar lid in place. 1 Rotate control knob to help blend very thick and/or frozen mixtures. Tamper Tips: • Blender jar should not be more liquid if food is used during blending or ingredients stick to sides of the lid and use the tamper with...Overheating: • Do not process recipes at any time. • Cutting large whole fruits and vegetables may blend more quickly. • Do not fill blender jar past highest graduation marking. ONLY use the tamper to move ingredients from jar corners into the container and closer to move thick mixtures around...
...not use tamper with the jar lid in place. 1 Rotate control knob to help blend very thick and/or frozen mixtures. Tamper Tips: • Blender jar should not be more liquid if food is used during blending or ingredients stick to sides of the lid and use the tamper with...Overheating: • Do not process recipes at any time. • Cutting large whole fruits and vegetables may blend more quickly. • Do not fill blender jar past highest graduation marking. ONLY use the tamper to move ingredients from jar corners into the container and closer to move thick mixtures around...

Use and Care Manual
Page 13
..., Food Focus: Basil. 13 Toss with hot cooked pasta or spread on grilled chicken, or use as a sandwich spread. Place ingredients in order listed in blender. 2. Makes: 2 1/2 cups Test Kitchen Tip: Divide Traditional Basil Pesto sauce between two ice cube trays; Add oil, Parmesan cheese and salt. Garnish with additional cilantro...
..., Food Focus: Basil. 13 Toss with hot cooked pasta or spread on grilled chicken, or use as a sandwich spread. Place ingredients in order listed in blender. 2. Makes: 2 1/2 cups Test Kitchen Tip: Divide Traditional Basil Pesto sauce between two ice cube trays; Add oil, Parmesan cheese and salt. Garnish with additional cilantro...

Use and Care Manual
Page 14
... large chunks 1 cup (237 ml) vanilla yogurt 12 ice cubes Directions: 1. Serves: 3 to 4 Test Kitchen Tip: Try different combinations of fresh berries and juice to blender. Makes: 1 1/4 cups Test Kitchen Tip: For thinner dressing, add water, 1 tablespoon (15 ml) at a time, until desired consistency is creamy. 3. Cover and blend on HIGH... sauce 1/2 teaspoon (2.5 ml) cracked black pepper 1/2 cup (118 ml) mayonnaise 1/2 cup (118 ml) grated Parmesan cheese 1/3 cup (79 ml) olive oil Directions: 1. Place ingredients in blender jar in...
... large chunks 1 cup (237 ml) vanilla yogurt 12 ice cubes Directions: 1. Serves: 3 to 4 Test Kitchen Tip: Try different combinations of fresh berries and juice to blender. Makes: 1 1/4 cups Test Kitchen Tip: For thinner dressing, add water, 1 tablespoon (15 ml) at a time, until desired consistency is creamy. 3. Cover and blend on HIGH... sauce 1/2 teaspoon (2.5 ml) cracked black pepper 1/2 cup (118 ml) mayonnaise 1/2 cup (118 ml) grated Parmesan cheese 1/3 cup (79 ml) olive oil Directions: 1. Place ingredients in blender jar in...

Use and Care Manual
Page 15
Pour in the order listed. 2. Place the ingredients in the blender jar in margarita. Dip in a dish of lime. Rub the rims of glasses with a wedge of kosher salt or sugar. Recipes (cont.) Strawberry Margarita Ingredients: 1 1/2 cups (355 ml) chopped strawberries 2 tablespoons (30 ml) sugar 1/4 cup (59 ml) lime juice 5 ounces (149 ml) tequila 2 ounces (59 ml) triple sec 2 cups (473 ml) ice cubes Directions: 1. Serves: 4 to 5 15 Blend on CRUSH until blended. 3.
Pour in the order listed. 2. Place the ingredients in the blender jar in margarita. Dip in a dish of lime. Rub the rims of glasses with a wedge of kosher salt or sugar. Recipes (cont.) Strawberry Margarita Ingredients: 1 1/2 cups (355 ml) chopped strawberries 2 tablespoons (30 ml) sugar 1/4 cup (59 ml) lime juice 5 ounces (149 ml) tequila 2 ounces (59 ml) triple sec 2 cups (473 ml) ice cubes Directions: 1. Serves: 4 to 5 15 Blend on CRUSH until blended. 3.

Use and Care Manual
Page 16
...immediately. To remove stubborn spots, use the "SANI" setting when washing in hot, soapy water. Do not immerse cord, plug, base, or motor in blender. For a more thorough cleaning, sprinkle 1/4 cup (59 ml) baking soda in water or other liquid. 1 2 Unplug cord. Wash any remaining residue ...with a damp cloth or sponge. Rinse and dry. 3 Lift blender jar assembly off the base. 4 Remove lid. 16 5 Wipe blender base, control panel, and cord with dish soap and water. "SANI" cycle temperatures could damage your product. Care should...
...immediately. To remove stubborn spots, use the "SANI" setting when washing in hot, soapy water. Do not immerse cord, plug, base, or motor in blender. For a more thorough cleaning, sprinkle 1/4 cup (59 ml) baking soda in water or other liquid. 1 2 Unplug cord. Wash any remaining residue ...with a damp cloth or sponge. Rinse and dry. 3 Lift blender jar assembly off the base. 4 Remove lid. 16 5 Wipe blender base, control panel, and cord with dish soap and water. "SANI" cycle temperatures could damage your product. Care should...

Use and Care Manual
Page 17
...or 1.800.267.2826 in addition to 45 minutes. • If unit will bubble. How can sometimes cause a film on the CLEAN cycle. Blender smells like it ? Blender jar is burning. PROBABLE CAUSE/SOLUTION • Turn unit to OFF (O) before unplugging. • Unplug and allow to see if fuse for ...continues after use may indicate an issue with dish soap and water. Unit does not respond to start. or 1.800.267.2826 in the U.S. Blender fails to button commands. The smell may be natural after additional heavy uses, call our customer care center at 1.800.851.8900 in Canada....
...or 1.800.267.2826 in addition to 45 minutes. • If unit will bubble. How can sometimes cause a film on the CLEAN cycle. Blender smells like it ? Blender jar is burning. PROBABLE CAUSE/SOLUTION • Turn unit to OFF (O) before unplugging. • Unplug and allow to see if fuse for ...continues after use may indicate an issue with dish soap and water. Unit does not respond to start. or 1.800.267.2826 in the U.S. Blender fails to button commands. The smell may be natural after additional heavy uses, call our customer care center at 1.800.851.8900 in Canada....


