
Use & Care
Page 1
We know you for purchasing a Hamilton Beach Wave Station™ Blender. 840143800 ENv02.qxd 1/6/06 9:24 AM Page 1 Blender Mélangeur Licuadora READ BEFORE USE LIRE AVANT L'UTILISATION LEA ANTES DE USAR Thank You! This revolutionary system does not require the use of superior ... 100 Le invitamos a leer cuidadosamente este instructivo antes de usar su aparato. Thank you will enjoy many years of a stir stick or wooden spoon. Your blender is designed with Wave~Action™ blending technology.
We know you for purchasing a Hamilton Beach Wave Station™ Blender. 840143800 ENv02.qxd 1/6/06 9:24 AM Page 1 Blender Mélangeur Licuadora READ BEFORE USE LIRE AVANT L'UTILISATION LEA ANTES DE USAR Thank You! This revolutionary system does not require the use of superior ... 100 Le invitamos a leer cuidadosamente este instructivo antes de usar su aparato. Thank you will enjoy many years of a stir stick or wooden spoon. Your blender is designed with Wave~Action™ blending technology.

Use & Care
Page 2
...or damage to persons. 8. Do not operate any appliance is used by Hamilton Beach/Proctor-Silex, Inc. Do not let cord hang over edge of two-piece lid. Do not use outdoors. 9. Always operate blender with moving blades accidentally become exposed. 18. Keep hands and other exposed... immediately and tighten jar in threaded cutting assembly. 19. The use , before cleaning. 5. Do not use a broken, chipped, or cracked blender jar. 13. IMPORTANT SAFEGUARDS When using an adaptor. Keep hands and utensils out of jar while blending to reduce the risk of electrical shock,...
...or damage to persons. 8. Do not operate any appliance is used by Hamilton Beach/Proctor-Silex, Inc. Do not let cord hang over edge of two-piece lid. Do not use outdoors. 9. Always operate blender with moving blades accidentally become exposed. 18. Keep hands and other exposed... immediately and tighten jar in threaded cutting assembly. 19. The use , before cleaning. 5. Do not use a broken, chipped, or cracked blender jar. 13. IMPORTANT SAFEGUARDS When using an adaptor. Keep hands and utensils out of jar while blending to reduce the risk of electrical shock,...

Use & Care
Page 3
... frozen fruit, etc. NOTICE: To prevent leakage of liquids from your unit, but are available as replacement parts. The wattage rating of the blender is determined by children or accidentally tripped over , a longer cord. This is based on available cutting blades and jar combinations that it will not...household use . The electrical rating of the extension cord must be pulled on this appliance was selected to or greater than the rating of the blender. The length of the cord used . This will damage the motor. 840143800 ENv03.qxd 1/6/06 9:05 AM Page 3 Other Consumer Safety ...
... frozen fruit, etc. NOTICE: To prevent leakage of liquids from your unit, but are available as replacement parts. The wattage rating of the blender is determined by children or accidentally tripped over , a longer cord. This is based on available cutting blades and jar combinations that it will not...household use . The electrical rating of the extension cord must be pulled on this appliance was selected to or greater than the rating of the blender. The length of the cord used . This will damage the motor. 840143800 ENv03.qxd 1/6/06 9:05 AM Page 3 Other Consumer Safety ...
Use & Care
Page 4
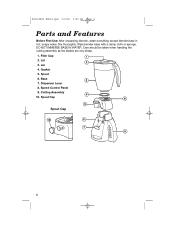
Base 7. Dry thoroughly. DO NOT IMMERSE BASE IN WATER. Lid 3. Spout Cap Spout Cap 4 Spout 6. Cutting Assembly 10. Dispenser Lever 8. Filler Cap 2. 840143800 ENv03.qxd 1/6/06 9:05 AM Page 4 Parts and Features Before First Use: After unpacking blender, wash everything except blender base in hot, soapy water. Wipe blender base with a damp cloth or sponge. Care should be taken when handling the cutting assembly as the blades are very sharp. 1. Jar 4. Gasket 5. Speed Control Panel 9.
Base 7. Dry thoroughly. DO NOT IMMERSE BASE IN WATER. Lid 3. Spout Cap Spout Cap 4 Spout 6. Cutting Assembly 10. Dispenser Lever 8. Filler Cap 2. 840143800 ENv03.qxd 1/6/06 9:05 AM Page 4 Parts and Features Before First Use: After unpacking blender, wash everything except blender base in hot, soapy water. Wipe blender base with a damp cloth or sponge. Care should be taken when handling the cutting assembly as the blades are very sharp. 1. Jar 4. Gasket 5. Speed Control Panel 9.
Use & Care
Page 5
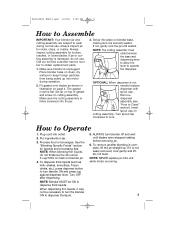
... liquid. 5. Turn spout cap clockwise to wear during operation. 2. 840143800 ENv03.qxd 1/6/06 9:05 AM Page 5 How to Assemble IMPORTANT: Your blender jar and cutting assembly are subject to lock. OPTIONAL: When dispenser is complete, lift the jar straight up into outlet. 2. To remove jar after... dispensing. ALWAYS turn the blender ON to Clean" section). Always inspect cutting assembly for speeds and processing tips. The gasket must slide between the base and dispensing lever...
... liquid. 5. Turn spout cap clockwise to wear during operation. 2. 840143800 ENv03.qxd 1/6/06 9:05 AM Page 5 How to Assemble IMPORTANT: Your blender jar and cutting assembly are subject to lock. OPTIONAL: When dispenser is complete, lift the jar straight up into outlet. 2. To remove jar after... dispensing. ALWAYS turn the blender ON to Clean" section). Always inspect cutting assembly for speeds and processing tips. The gasket must slide between the base and dispensing lever...
Use & Care
Page 6
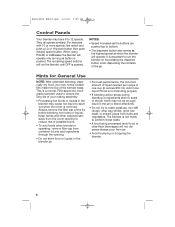
...made to mash potatoes, mix stiff dough, whip egg whites, grind raw meat, or extract juices from jar. • Avoid bumping or dropping the blender. 6 The remaining speed buttons will operate. Hints for General Use NOTE: After extended blending, especially dry food, you may notice a black film inside... properly • If blending action stops during blending or ingredients stick to sides of the jar, there may not be enough liquid in the blender jar. • For best performance, the minimum amount of liquid needed per recipe is removed. Add more speeds, first select and push a...
...made to mash potatoes, mix stiff dough, whip egg whites, grind raw meat, or extract juices from jar. • Avoid bumping or dropping the blender. 6 The remaining speed buttons will operate. Hints for General Use NOTE: After extended blending, especially dry food, you may notice a black film inside... properly • If blending action stops during blending or ingredients stick to sides of the jar, there may not be enough liquid in the blender jar. • For best performance, the minimum amount of liquid needed per recipe is removed. Add more speeds, first select and push a...
Use & Care
Page 7
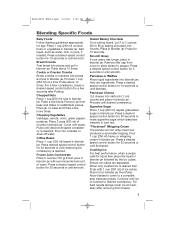
...Break cookies or crackers into chunks. Place 2 cups (500 ml) of water. Superfine Sugar Place 1 cup (250 ml) regular granulated sugar in blender jar followed by the ice cubes. For a finer consistency, press a desired speed control button for 30 seconds to escape. Remove filler cap from... for 10 seconds or until blended. For best results always crush ice immediately after Pulsing. Coffee Beans Place 1⁄2 cup (125 ml) beans in blender jar with water. Grated Baking Chocolate On a cutting board, cut 2 to 3 ounces (50 to a complete stop between pulses. Press a desired ...
...Break cookies or crackers into chunks. Place 2 cups (500 ml) of water. Superfine Sugar Place 1 cup (250 ml) regular granulated sugar in blender jar followed by the ice cubes. For a finer consistency, press a desired speed control button for 30 seconds to escape. Remove filler cap from... for 10 seconds or until blended. For best results always crush ice immediately after Pulsing. Coffee Beans Place 1⁄2 cup (125 ml) beans in blender jar with water. Grated Baking Chocolate On a cutting board, cut 2 to 3 ounces (50 to a complete stop between pulses. Press a desired ...
Use & Care
Page 8
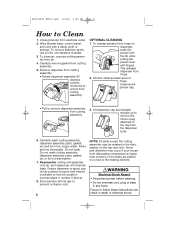
... 2. WARNING Electrical Shock Hazard • Disconnect power before cleaning. • Do not immerse cord, plug or base in a dishwasher. 7. Unplug blender from hinge. 2. OPTIONAL CLEANING 1. Carefully wash cutting assembly, dispenser assembly parts, gasket, jar, and lid in hot, soapy water. Rinse and... 4. 840143800 ENv03.qxd 1/6/06 9:05 AM Page 8 How to follow these instructions can result in death or electrical shock. Wipe blender base, control panel, and cord with fingers. To clean jar, unscrew cutting assembly from cutting assembly. Remove dispenser from cutting assembly. ...
... 2. WARNING Electrical Shock Hazard • Disconnect power before cleaning. • Do not immerse cord, plug or base in a dishwasher. 7. Unplug blender from hinge. 2. OPTIONAL CLEANING 1. Carefully wash cutting assembly, dispenser assembly parts, gasket, jar, and lid in hot, soapy water. Rinse and... 4. 840143800 ENv03.qxd 1/6/06 9:05 AM Page 8 How to follow these instructions can result in death or electrical shock. Wipe blender base, control panel, and cord with fingers. To clean jar, unscrew cutting assembly from cutting assembly. Remove dispenser from cutting assembly. ...
Use & Care
Page 9
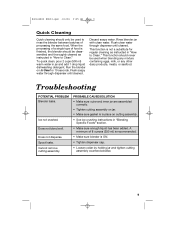
... substitute for 10 seconds. This function should be disassembled and thoroughly cleaned as instructed in jar and add 1 drop liquid dishwashing detergent. Rinse blender jar with clean water. Discard soapy water. 840143800 ENv03.qxd 1/6/06 9:05 AM Page 9 Quick Cleaning Quick cleaning should only be used ...any other dairy products, meats, or seafood. When the processing of a single type of 8 ounces (250 ml) is recommended. • Make sure blender is in place on jar. • Make sure gasket is ON. • Tighten dispenser cap. • Loosen collar by holding jar and tighten cutting...
... substitute for 10 seconds. This function should be disassembled and thoroughly cleaned as instructed in jar and add 1 drop liquid dishwashing detergent. Rinse blender jar with clean water. Discard soapy water. 840143800 ENv03.qxd 1/6/06 9:05 AM Page 9 Quick Cleaning Quick cleaning should only be used ...any other dairy products, meats, or seafood. When the processing of a single type of 8 ounces (250 ml) is recommended. • Make sure blender is in place on jar. • Make sure gasket is ON. • Tighten dispenser cap. • Loosen collar by holding jar and tighten cutting...

Use & Care
Page 10
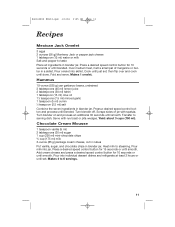
...8260;2 cup (125 ml) Triple Sec 2 cups (500 ml) ice Juice of 16 limes 1⁄2 cup (125 ml) sugar Place all ingredients in blender. Blend for 45 seconds or until ice is crushed. Blend until smooth. Blend until ice is crushed. Dairy Smoothie Small Batch (16 oz/500 ml... ounces ice cream (500 ml) 16 ounces milk (500 ml) 24 ounces ice cream (750 ml) Select desired ice cream flavor. Place all ingredients in blender. Strawberry Daiquiri 16-ounce (450 g) package frozen strawberries in syrup, slightly thawed 6-ounce (170 g) can frozen limeade concentrate 1 cup (250 ml) rum 2 ...
...8260;2 cup (125 ml) Triple Sec 2 cups (500 ml) ice Juice of 16 limes 1⁄2 cup (125 ml) sugar Place all ingredients in blender. Blend for 45 seconds or until ice is crushed. Blend until smooth. Blend until ice is crushed. Dairy Smoothie Small Batch (16 oz/500 ml... ounces ice cream (500 ml) 16 ounces milk (500 ml) 24 ounces ice cream (750 ml) Select desired ice cream flavor. Place all ingredients in blender. Strawberry Daiquiri 16-ounce (450 g) package frozen strawberries in syrup, slightly thawed 6-ounce (170 g) can frozen limeade concentrate 1 cup (250 ml) rum 2 ...
Use & Care
Page 11
...ingredients in a skillet. Press a desired speed control button for 10 seconds or until set ; Press a desired speed control button and process until done. Turn blender off. Yield: about 3 cups (750 ml). Makes 4 to steaming. Chocolate Cream Mousse 1 teaspoon vanilla (5 ml) 2 tablespoons (30 ml) sugar 1...oil 11⁄2 teaspoons (7.5 ml) minced garlic 1 teaspoon (5 ml) cumin 1⁄2 teaspoon (2.5 ml) salt Combine the seven ingredients in blender jar. Heat milk to 6 servings. 11 Add cream cheese and press a desired speed control button for 10 seconds or until smooth.
...ingredients in a skillet. Press a desired speed control button for 10 seconds or until set ; Press a desired speed control button and process until done. Turn blender off. Yield: about 3 cups (750 ml). Makes 4 to steaming. Chocolate Cream Mousse 1 teaspoon vanilla (5 ml) 2 tablespoons (30 ml) sugar 1...oil 11⁄2 teaspoons (7.5 ml) minced garlic 1 teaspoon (5 ml) cumin 1⁄2 teaspoon (2.5 ml) salt Combine the seven ingredients in blender jar. Heat milk to 6 servings. 11 Add cream cheese and press a desired speed control button for 10 seconds or until smooth.
Use & Care
Page 12
...KEEP THESE NUMBERS FOR FUTURE REFERENCE! 12 During this period, we will help us answer your blender. This warranty gives you specific legal rights, and you may also have a question about your blender, call our CUSTOMER SERVICE NUMBER. (For faster service please have a claim under this product,... be free from defects in the U.S. There is warranted to products purchased in material and workmanship for a period of three (3) years for Hamilton Beach products or one hundred eighty (180) days for operator to you. If you have model, series, and type numbers ready for Proctor-Silex...
...KEEP THESE NUMBERS FOR FUTURE REFERENCE! 12 During this period, we will help us answer your blender. This warranty gives you specific legal rights, and you may also have a question about your blender, call our CUSTOMER SERVICE NUMBER. (For faster service please have a claim under this product,... be free from defects in the U.S. There is warranted to products purchased in material and workmanship for a period of three (3) years for Hamilton Beach products or one hundred eighty (180) days for operator to you. If you have model, series, and type numbers ready for Proctor-Silex...


