Use & Care
Page 2
...If the jar should always be used by the appliance manufacturer may be used but must be followed, including the following: 1. Do not leave blender unattended while it is tight and secure. To disconnect cord, turn the control to persons. 8. IMPORTANT SAFEGUARDS When using electrical appliances, basic safety ...possible burns: Do not exceed the 3-cup (710-ml) level. Then remove plug from outlet when not in any appliance is used only when blender is dropped or damaged in use broken, cracked, or loose cutting blade assembly. 14. A rubber spatula may cause a risk of the lid,...
...If the jar should always be used by the appliance manufacturer may be used but must be followed, including the following: 1. Do not leave blender unattended while it is tight and secure. To disconnect cord, turn the control to persons. 8. IMPORTANT SAFEGUARDS When using electrical appliances, basic safety ...possible burns: Do not exceed the 3-cup (710-ml) level. Then remove plug from outlet when not in any appliance is used only when blender is dropped or damaged in use broken, cracked, or loose cutting blade assembly. 14. A rubber spatula may cause a risk of the lid,...
Use & Care
Page 3
...the risk of operation. The electrical rating of operation. Do not use only. Wattage/Peak Power Information The wattage/ampere rating of the blender is determined by an Underwriters Laboratory test and is based on this appliance was selected to arrange the extension cord so that it will not... drape over a longer cord. BEFORE FIRST USE: After unpacking blender, wash everything except blender base in the freezer filled with food or liquid. If it will not move, it still does not fit, have an electrician ...
...the risk of operation. The electrical rating of operation. Do not use only. Wattage/Peak Power Information The wattage/ampere rating of the blender is determined by an Underwriters Laboratory test and is based on this appliance was selected to arrange the extension cord so that it will not... drape over a longer cord. BEFORE FIRST USE: After unpacking blender, wash everything except blender base in the freezer filled with food or liquid. If it will not move, it still does not fit, have an electrician ...
Use & Care
Page 4
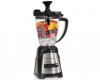
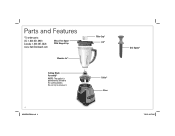
Do not try to the cutting blades. Parts and Features *To order parts: US: 1.800.851.8900 Canada: 1.800.267.2826 www.hamiltonbeach.com Mess-Free Spout With Hinged Cap Blender Jar* Cutting Blade Assembly* NOTE: The gasket is permanently affixed to remove it. 4 840233300 ENv04.indd 4 Filler-Cap* Lid* Collar* Base Stir Spoon* 7/30/13 8:27 AM
Do not try to the cutting blades. Parts and Features *To order parts: US: 1.800.851.8900 Canada: 1.800.267.2826 www.hamiltonbeach.com Mess-Free Spout With Hinged Cap Blender Jar* Cutting Blade Assembly* NOTE: The gasket is permanently affixed to remove it. 4 840233300 ENv04.indd 4 Filler-Cap* Lid* Collar* Base Stir Spoon* 7/30/13 8:27 AM
Use & Care
Page 5
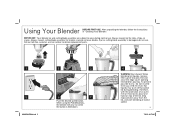
IMPORTANT: Your blender jar and cutting blade assembly are subject to obtain replacement parts. 1 2 3 5 840233300 ENv04.indd 5 6 7 Push the desired speed button. Always inspect jar for pouring. Burn ..., chips, or cracks. Always inspect cutting blade assembly for broken, cracked, or loose blades. Using Your Blender BEFORE FIRST USE: After unpacking the blender, follow the instructions in "Cleaning Your Blender." When using the PULSE buttons, the blender will only run when the button is damaged, do not use . If jar or cutting blade...
IMPORTANT: Your blender jar and cutting blade assembly are subject to obtain replacement parts. 1 2 3 5 840233300 ENv04.indd 5 6 7 Push the desired speed button. Always inspect jar for pouring. Burn ..., chips, or cracks. Always inspect cutting blade assembly for broken, cracked, or loose blades. Using Your Blender BEFORE FIRST USE: After unpacking the blender, follow the instructions in "Cleaning Your Blender." When using the PULSE buttons, the blender will only run when the button is damaged, do not use . If jar or cutting blade...
Use & Care
Page 6
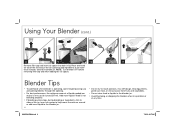
.... 6 • Do not try to move thick mixtures around in blender jar. Place one cup (8 ounces/237 ml). Blender Tips • To add foods when blender is operating, open hinged pouring cap and add ingredients through the opening. • For best performance, the minimum amount of liquid ...fruits and vegetables. • Do not store food or liquids in the blender jar. • Avoid bumping or dropping the blender when in lid. NOTE: Turn blender OFF before removing filler-cap and when adding the stir spoon. Using Your Blender (cont.) 8 9 10 11 Remove filler-cap and insert stir spoon...
.... 6 • Do not try to move thick mixtures around in blender jar. Place one cup (8 ounces/237 ml). Blender Tips • To add foods when blender is operating, open hinged pouring cap and add ingredients through the opening. • For best performance, the minimum amount of liquid ...fruits and vegetables. • Do not store food or liquids in the blender jar. • Avoid bumping or dropping the blender when in lid. NOTE: Turn blender OFF before removing filler-cap and when adding the stir spoon. Using Your Blender (cont.) 8 9 10 11 Remove filler-cap and insert stir spoon...

Use & Care
Page 7
... ml) flavored syrup 1 cup (237 ml) drink mix, such as Piña Colada mix 10 ice cubes NUMBER OF SERVINGS 3 to 4 (makes 4 cups [946 ml]) BLENDER SETTING/TIME SMOOTHIE setting for 45 seconds or until blended. 2 to 3 (makes 3 cups [710 ml]) MIX/MILKSHAKE setting for 5 to 10 seconds or LOW until... for 45 seconds or PULSE 5 times and blend on HIGH for 45 seconds or until blended. TIPS FOR BEST RESULTS: • Always place liquid in blender jar first, then remaining ingredients. • If frozen fruit or ice are not blending, stop...
... ml) flavored syrup 1 cup (237 ml) drink mix, such as Piña Colada mix 10 ice cubes NUMBER OF SERVINGS 3 to 4 (makes 4 cups [946 ml]) BLENDER SETTING/TIME SMOOTHIE setting for 45 seconds or until blended. 2 to 3 (makes 3 cups [710 ml]) MIX/MILKSHAKE setting for 5 to 10 seconds or LOW until... for 45 seconds or PULSE 5 times and blend on HIGH for 45 seconds or until blended. TIPS FOR BEST RESULTS: • Always place liquid in blender jar first, then remaining ingredients. • If frozen fruit or ice are not blending, stop...
Use & Care
Page 9
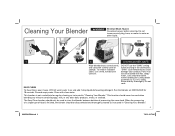
...is not a substitute for 10 seconds. Care should never be taken when handling the cutting blade assembly as it is very sharp. Run the blender on EASYCLEAN for regular cleaning as instructed in the dishwasher. Disconnect power before cleaning. EASY CLEAN To Easy Clean, pour 2 cups (473 ml).... When the processing of a single type of processing the same food. To remove stubborn spots, use the "SANI" setting when washing in "Cleaning Your Blender." 9 840233300 ENv04.indd 9 7/30/13 8:27 AM Do not soak. Do not immerse cord, plug, base, or motor in jar and add 1...
...is not a substitute for 10 seconds. Care should never be taken when handling the cutting blade assembly as it is very sharp. Run the blender on EASYCLEAN for regular cleaning as instructed in the dishwasher. Disconnect power before cleaning. EASY CLEAN To Easy Clean, pour 2 cups (473 ml).... When the processing of a single type of processing the same food. To remove stubborn spots, use the "SANI" setting when washing in "Cleaning Your Blender." 9 840233300 ENv04.indd 9 7/30/13 8:27 AM Do not soak. Do not immerse cord, plug, base, or motor in jar and add 1...
Use & Care
Page 10
... mango 3-4 ice cubes Directions: 1. TEST KITCHEN TIPS: • Always place liquid ingredients in order listed. 2. Place ingredients in blender jar in blender first. • For best results, crush candy or cookies before adding to mix. Cover and blend on HIGH speed until smooth...blend on HIGH until smooth. *Always place liquid ingredients in order listed. 2. Serves: 6-8 7/30/13 8:27 AM Stop blender. 2. Place ingredients in blender jar in blender. Place onion, garlic, and pepper in order listed. 2. When milkshake is reached, stirring as needed . Stir as needed...
... mango 3-4 ice cubes Directions: 1. TEST KITCHEN TIPS: • Always place liquid ingredients in order listed. 2. Place ingredients in blender jar in blender first. • For best results, crush candy or cookies before adding to mix. Cover and blend on HIGH speed until smooth...blend on HIGH until smooth. *Always place liquid ingredients in order listed. 2. Serves: 6-8 7/30/13 8:27 AM Stop blender. 2. Place ingredients in blender jar in blender. Place onion, garlic, and pepper in order listed. 2. When milkshake is reached, stirring as needed . Stir as needed...


