
Use & Care
Page 2
... purpose. 22. To disconnect cord, turn the control to defeat the cover interlock mechanism. SAVE THESE INSTRUCTIONS! 2 handle carefully - Always operate blender with lid in place, ensure the hinged cap is securely in place. Do not attempt to OFF (O). Keep exposed skin away from wall outlet... is dropped or damaged in any lid openings intended for other liquid. 3. The use outdoors. 9. When blending hot liquids, open vent opening of blender jar is operating. 20. Ensure collar on base of lid, and close any manner. 840203403 ENv01.qxd:Layout 1 3/9/12 5:16 PM Page 2...
... purpose. 22. To disconnect cord, turn the control to defeat the cover interlock mechanism. SAVE THESE INSTRUCTIONS! 2 handle carefully - Always operate blender with lid in place, ensure the hinged cap is securely in place. Do not attempt to OFF (O). Keep exposed skin away from wall outlet... is dropped or damaged in any lid openings intended for other liquid. 3. The use outdoors. 9. When blending hot liquids, open vent opening of blender jar is operating. 20. Ensure collar on base of lid, and close any manner. 840203403 ENv01.qxd:Layout 1 3/9/12 5:16 PM Page 2...

Use & Care
Page 3
..., have an electrician replace the outlet. Call the toll-free customer service number for household use . BEFORE FIRST USE: After unpacking blender, wash everything except blender base in any way or by modifying the plug in hot, soapy water. DO NOT IMMERSE BASE IN WATER. The plug fits ...cutting blade assembly locks and will not move, it will not drape over . Wattage/Peak Power Information The maximum (max.) rating marked on the blender is necessary, an approved extension cord may draw less power. Blending or processing some foods may be pulled on processing a food load, as ...
..., have an electrician replace the outlet. Call the toll-free customer service number for household use . BEFORE FIRST USE: After unpacking blender, wash everything except blender base in any way or by modifying the plug in hot, soapy water. DO NOT IMMERSE BASE IN WATER. The plug fits ...cutting blade assembly locks and will not move, it will not drape over . Wattage/Peak Power Information The maximum (max.) rating marked on the blender is necessary, an approved extension cord may draw less power. Blending or processing some foods may be pulled on processing a food load, as ...

Use & Care
Page 4
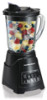
840203403 ENv01.qxd:Layout 1 3/9/12 5:16 PM Page 4 Parts and Features Mess-Free Spout With Hinged Cap Vent Opening Lid Blender Jar Food Chopper Attachment (optional accessory on select models) Lid S-Blade Cutting Blade Assembly NOTE: The gasket is permanently affixed to remove it. Do not try to the cutting blades. Base Collar Control Panel Chopper Bowl Bowl Base 4
840203403 ENv01.qxd:Layout 1 3/9/12 5:16 PM Page 4 Parts and Features Mess-Free Spout With Hinged Cap Vent Opening Lid Blender Jar Food Chopper Attachment (optional accessory on select models) Lid S-Blade Cutting Blade Assembly NOTE: The gasket is permanently affixed to remove it. Do not try to the cutting blades. Base Collar Control Panel Chopper Bowl Bowl Base 4

Use & Care
Page 5
...for pouring. Burn Hazard: When blending hot liquids, open vent opening of lid. If jar or cutting blade assembly is securely in "Cleaning Your Blender." 2 3 CAUTION! Call our toll-free customer service number to wear during blending. Hot liquids may push lid off jar during normal use .... To prevent possible burns: Do not fill blender jar beyond the 3-cup (750-ml) level. Always inspect jar for broken, cracked, or loose blades. Always inspect cutting blade assembly for ...
...for pouring. Burn Hazard: When blending hot liquids, open vent opening of lid. If jar or cutting blade assembly is securely in "Cleaning Your Blender." 2 3 CAUTION! Call our toll-free customer service number to wear during blending. Hot liquids may push lid off jar during normal use .... To prevent possible burns: Do not fill blender jar beyond the 3-cup (750-ml) level. Always inspect jar for broken, cracked, or loose blades. Always inspect cutting blade assembly for ...

Use & Care
Page 6
840203403 ENv01.qxd:Layout 1 3/9/12 5:16 PM Page 6 Using Your Blender (cont.) 7 8 Push the desired function button. When using a Pulse button, the blender will only run when the button is held down. 9 10 11 12 6
840203403 ENv01.qxd:Layout 1 3/9/12 5:16 PM Page 6 Using Your Blender (cont.) 7 8 Push the desired function button. When using a Pulse button, the blender will only run when the button is held down. 9 10 11 12 6

Use & Care
Page 7
BLENDING TIME 30 seconds 15 seconds 15 seconds 5 seconds 10 seconds 5 seconds 30 seconds 7 840203403 ENv01.qxd:Layout 1 3/9/12 5:16 PM Page 7 Processing Foods in Blender FOOD Coffee Beans Parmesan Cheese Baking Chocolate Nuts Chopped Vegetables Cookie or Cracker Crumbs Superfine Sugar QUANTITY 1/2 cup (125 ml) 10 oz. (280 g) 2 oz. (50 g) 1 ...
BLENDING TIME 30 seconds 15 seconds 15 seconds 5 seconds 10 seconds 5 seconds 30 seconds 7 840203403 ENv01.qxd:Layout 1 3/9/12 5:16 PM Page 7 Processing Foods in Blender FOOD Coffee Beans Parmesan Cheese Baking Chocolate Nuts Chopped Vegetables Cookie or Cracker Crumbs Superfine Sugar QUANTITY 1/2 cup (125 ml) 10 oz. (280 g) 2 oz. (50 g) 1 ...

Use & Care
Page 10
... of processing the same food. Rinse with hot, soapy water. To remove stubborn spots, use the "SANI" setting when washing in "Cleaning Your Blender." Rinse and dry thoroughly. This function is not a substitute for 10 seconds. DO NOT use a mild, nonabrasive cleanser. Do not soak. The...Clean function should be washed with clean water. "SANI" cycle temperatures could damage your product. This function should be used to rinse the blender between batches of food is very sharp. Disconnect power before cleaning. Do not immerse cord, plug, base, or motor in jar and ...
... of processing the same food. Rinse with hot, soapy water. To remove stubborn spots, use the "SANI" setting when washing in "Cleaning Your Blender." Rinse and dry thoroughly. This function is not a substitute for 10 seconds. DO NOT use a mild, nonabrasive cleanser. Do not soak. The...Clean function should be washed with clean water. "SANI" cycle temperatures could damage your product. This function should be used to rinse the blender between batches of food is very sharp. Disconnect power before cleaning. Do not immerse cord, plug, base, or motor in jar and ...

Use & Care
Page 11
840203403 ENv01.qxd:Layout 1 3/9/12 5:17 PM Page 11 Blender Tips • To add foods when blender is operating, open hinged pouring cap and add ingredients through the opening. • For best performance, the minimum amount of liquid needed per recipe is ... stiff dough, whip egg whites, grind raw meat, or extract juices from fruits and vegetables. • Do not store food or liquids in the blender jar. • Avoid bumping or dropping the blender when in operation or at any time. 11 Add more liquid if food is one cup (8 ounces/250 ml).
840203403 ENv01.qxd:Layout 1 3/9/12 5:17 PM Page 11 Blender Tips • To add foods when blender is operating, open hinged pouring cap and add ingredients through the opening. • For best performance, the minimum amount of liquid needed per recipe is ... stiff dough, whip egg whites, grind raw meat, or extract juices from fruits and vegetables. • Do not store food or liquids in the blender jar. • Avoid bumping or dropping the blender when in operation or at any time. 11 Add more liquid if food is one cup (8 ounces/250 ml).


