Use & Care
Page 2
...during blending; Keep hands and utensils out of jar while blending to persons. 8. handle carefully-especially when assembling, disassembling, or cleaning inside blender jar. 12. Close supervision is necessary when any appliance with a damaged cord or plug, or after the appliance malfunctions, or is ...off parts, and before putting on examination, repair, or electrical or mechanical adjustment. 7. Do not use appliance for pouring. Always operate blender with the protection of an oven mitt or thick towel, place one hand on base of injury, never place cutting blade assembly on...
...during blending; Keep hands and utensils out of jar while blending to persons. 8. handle carefully-especially when assembling, disassembling, or cleaning inside blender jar. 12. Close supervision is necessary when any appliance with a damaged cord or plug, or after the appliance malfunctions, or is ...off parts, and before putting on examination, repair, or electrical or mechanical adjustment. 7. Do not use appliance for pouring. Always operate blender with the protection of an oven mitt or thick towel, place one hand on base of injury, never place cutting blade assembly on...
Use & Care
Page 3
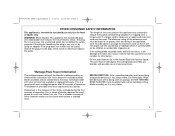
... cord used . Care must be used on this appliance was selected to reduce the hazards of becoming tangled in personal injury. The blender as provided may not be taken when handling cutting blade assembly as replacement parts. Care should be provided with a damp cloth or ...sponge. Wattage/Peak Power Information The wattage/ampere rating of the blender is determined by an Underwriters Laboratory test and is very sharp. 3 Dry thoroughly. Use for information. The electrical rating of the extension...
... cord used . Care must be used on this appliance was selected to reduce the hazards of becoming tangled in personal injury. The blender as provided may not be taken when handling cutting blade assembly as replacement parts. Care should be provided with a damp cloth or ...sponge. Wattage/Peak Power Information The wattage/ampere rating of the blender is determined by an Underwriters Laboratory test and is very sharp. 3 Dry thoroughly. Use for information. The electrical rating of the extension...
Use & Care
Page 4
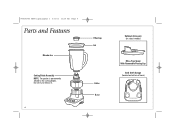
840193703 ENv01.qxd:Layout 1 5/2/11 11:19 AM Page 4 Parts and Features Blender Jar Filler-Cap Lid Cutting Blade Assembly NOTE: The gasket is permanently affixed to remove it. 4 Collar Base Optional Accessory (on select models) Mess-Free Spout With Removable Pouring Cap Cord Stuff Storage (located on bottom of base) Do not try to the cutting blades.
840193703 ENv01.qxd:Layout 1 5/2/11 11:19 AM Page 4 Parts and Features Blender Jar Filler-Cap Lid Cutting Blade Assembly NOTE: The gasket is permanently affixed to remove it. 4 Collar Base Optional Accessory (on select models) Mess-Free Spout With Removable Pouring Cap Cord Stuff Storage (located on bottom of base) Do not try to the cutting blades.
Use & Care
Page 5
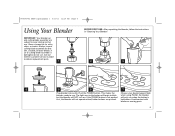
...other buttons are subject to wear during normal use . This makes the blender ready to obtain replacement parts. 1 BEFORE FIRST USE: After unpacking the blender, follow the instructions in "Cleaning Your Blender." 2 3 4 5 6 7 Plug blender into outlet. Push the POWER button. Choose your desired speed. Avoid contact.... 840193703 ENv01.qxd:Layout 1 5/2/11 11:19 AM Page 5 Using Your Blender IMPORTANT: Your blender jar and cutting blade assembly are pushed. If the POWER button is not pushed first, the blender will NOT turn on. Call our toll-free customer service number to use ....
...other buttons are subject to wear during normal use . This makes the blender ready to obtain replacement parts. 1 BEFORE FIRST USE: After unpacking the blender, follow the instructions in "Cleaning Your Blender." 2 3 4 5 6 7 Plug blender into outlet. Push the POWER button. Choose your desired speed. Avoid contact.... 840193703 ENv01.qxd:Layout 1 5/2/11 11:19 AM Page 5 Using Your Blender IMPORTANT: Your blender jar and cutting blade assembly are pushed. If the POWER button is not pushed first, the blender will NOT turn on. Call our toll-free customer service number to use ....
Use & Care
Page 6
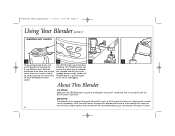
...off until POWER button is pushed again or the unit is pushed. Push STOP button when finished blending. About This Blender ICE CRUSH When the ICE CRUSH button is pushed, the blender will move to a low speed, then ramp up over time to mix ingredients. Start blending at lowest speed. ...At the end of lid. Keep exposed skin away from lid. After the initial bursts of speed, the blender will cycle 1 second on a high speed, in the standby (power ready) mode until the STOP button is unplugged. 840193703 ENv01.qxd:Layout 1 5/2/11...
...off until POWER button is pushed again or the unit is pushed. Push STOP button when finished blending. About This Blender ICE CRUSH When the ICE CRUSH button is pushed, the blender will move to a low speed, then ramp up over time to mix ingredients. Start blending at lowest speed. ...At the end of lid. Keep exposed skin away from lid. After the initial bursts of speed, the blender will cycle 1 second on a high speed, in the standby (power ready) mode until the STOP button is unplugged. 840193703 ENv01.qxd:Layout 1 5/2/11...
Use & Care
Page 7
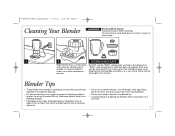
... not soak. DO NOT use a mild, nonabrasive cleanser. Parts may not be enough liquid in water or other liquid. 1 2 DISHWASHER-SAFE Wipe blender base, control panel, and cord with hot, soapy water. Care should be washed with a damp cloth or sponge. Add more liquid if food is...extract juices from fruits and vegetables. • Do not store food or liquids in the blender jar. • Avoid bumping or dropping the blender when in the dishwasher. Blender Tips • To add foods when blender is operating, remove filler-cap and add ingredients through the opening. • For best ...
... not soak. DO NOT use a mild, nonabrasive cleanser. Parts may not be enough liquid in water or other liquid. 1 2 DISHWASHER-SAFE Wipe blender base, control panel, and cord with hot, soapy water. Care should be washed with a damp cloth or sponge. Add more liquid if food is...extract juices from fruits and vegetables. • Do not store food or liquids in the blender jar. • Avoid bumping or dropping the blender when in the dishwasher. Blender Tips • To add foods when blender is operating, remove filler-cap and add ingredients through the opening. • For best ...


