Use & Care
Page 2
... operate. Keep hands and utensils out of jar while blending to reduce the risk of an oven mitt or thick towel, place one hand on blender base. 19. A rubber spatula may be used but must be followed, including the following: 1. therefore, with a damaged cord or plug, or...immediately and tighten jar in any manner. To protect against risk of injury to OFF. handle carefully-especially when assembling, disassembling, or cleaning inside blender jar. 12. To prevent possible burns: Do not exceed the 3-cup (750 ml) level. Close supervision is necessary when any appliance is ...
... operate. Keep hands and utensils out of jar while blending to reduce the risk of an oven mitt or thick towel, place one hand on blender base. 19. A rubber spatula may be used but must be followed, including the following: 1. therefore, with a damaged cord or plug, or...immediately and tighten jar in any manner. To protect against risk of injury to OFF. handle carefully-especially when assembling, disassembling, or cleaning inside blender jar. 12. To prevent possible burns: Do not exceed the 3-cup (750 ml) level. Close supervision is necessary when any appliance is ...
Use & Care
Page 3
...not fit, have an electrician replace the outlet. DO NOT IMMERSE BASE IN WATER. Wattage/Peak Power Information The wattage/ampere rating of the blender is determined by an Underwriters Laboratory test and is the measure of the motor wattage during the first seconds of the appliance. This is ...needed most power to the cutting blade assembly, jar, blender, and possibly result in hot, soapy water. If the cutting blade assembly locks and will not drape over the countertop or tabletop where it...
...not fit, have an electrician replace the outlet. DO NOT IMMERSE BASE IN WATER. Wattage/Peak Power Information The wattage/ampere rating of the blender is determined by an Underwriters Laboratory test and is the measure of the motor wattage during the first seconds of the appliance. This is ...needed most power to the cutting blade assembly, jar, blender, and possibly result in hot, soapy water. If the cutting blade assembly locks and will not drape over the countertop or tabletop where it...
Use & Care
Page 4
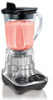
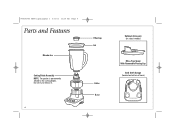
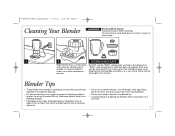
Do not try to the cutting blades. 840193703 ENv01.qxd:Layout 1 5/2/11 11:19 AM Page 4 Parts and Features Blender Jar Filler-Cap Lid Cutting Blade Assembly NOTE: The gasket is permanently affixed to remove it. 4 Collar Base Optional Accessory (on select models) Mess-Free Spout With Removable Pouring Cap Cord Stuff Storage (located on bottom of base)
Do not try to the cutting blades. 840193703 ENv01.qxd:Layout 1 5/2/11 11:19 AM Page 4 Parts and Features Blender Jar Filler-Cap Lid Cutting Blade Assembly NOTE: The gasket is permanently affixed to remove it. 4 Collar Base Optional Accessory (on select models) Mess-Free Spout With Removable Pouring Cap Cord Stuff Storage (located on bottom of base)
Use & Care
Page 5
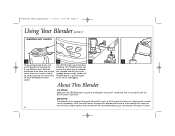
... blade assembly is held down. Note when using PULSE, the blender will NOT turn on. Always inspect cutting blade assembly for nicks, chips, or cracks. This makes the blender ready to blink but the blender will only run when the button is damaged, do not use...not operate when/if other buttons are subject to obtain replacement parts. 1 BEFORE FIRST USE: After unpacking the blender, follow the instructions in "Cleaning Your Blender." 2 3 4 5 6 7 Plug blender into outlet. Call our toll-free customer service number to wear during normal use . Avoid contact with blades...
... blade assembly is held down. Note when using PULSE, the blender will NOT turn on. Always inspect cutting blade assembly for nicks, chips, or cracks. This makes the blender ready to blink but the blender will only run when the button is damaged, do not use...not operate when/if other buttons are subject to obtain replacement parts. 1 BEFORE FIRST USE: After unpacking the blender, follow the instructions in "Cleaning Your Blender." 2 3 4 5 6 7 Plug blender into outlet. Call our toll-free customer service number to wear during normal use . Avoid contact with blades...
Use & Care
Page 6
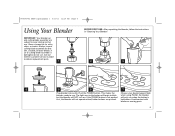
... CRUSH When the ICE CRUSH button is pushed, the blender will cycle 1 second on its own. 6 SMOOTHIE This blender has a unique 45-second "Smoothie" cycle. Start blending at lowest speed. The POWER button will continue to blink after the blender has stopped and will stop on and 1 second off until POWER ...button is pushed again or the unit is pushed. After the initial bursts of speed, the blender will first pulse 5 times on top of lid. With the protection of the 45-second Smoothie cycle, the blender will stay in order to a higher speed. Keep exposed skin away from lid. Push STOP...
... CRUSH When the ICE CRUSH button is pushed, the blender will cycle 1 second on its own. 6 SMOOTHIE This blender has a unique 45-second "Smoothie" cycle. Start blending at lowest speed. The POWER button will continue to blink after the blender has stopped and will stop on and 1 second off until POWER ...button is pushed again or the unit is pushed. After the initial bursts of speed, the blender will first pulse 5 times on top of lid. With the protection of the 45-second Smoothie cycle, the blender will stay in order to a higher speed. Keep exposed skin away from lid. Push STOP...
Use & Care
Page 7
... extract juices from fruits and vegetables. • Do not store food or liquids in the blender jar. • Avoid bumping or dropping the blender when in water or other liquid. 1 2 DISHWASHER-SAFE Wipe blender base, control panel, and cord with hot, soapy water. Rinse and dry thoroughly. Add more... liquid if food is one cup (8 ounces/250 ml). Blender Tips • To add foods when blender is operating, remove filler-cap and add ingredients through the opening. • For best performance, the minimum amount of liquid ...
... extract juices from fruits and vegetables. • Do not store food or liquids in the blender jar. • Avoid bumping or dropping the blender when in water or other liquid. 1 2 DISHWASHER-SAFE Wipe blender base, control panel, and cord with hot, soapy water. Rinse and dry thoroughly. Add more... liquid if food is one cup (8 ounces/250 ml). Blender Tips • To add foods when blender is operating, remove filler-cap and add ingredients through the opening. • For best performance, the minimum amount of liquid ...


