
Use & Care
Page 2
... all instructions. 2. Blades are sharp; Then remove plug from lid. Do not attempt to OFF. Do not use appliance for information on blender base. 19. 840212600 ENv03.qxd:Layout 1 1/31/12 3:39 PM Page 2 IMPORTANT SAFEGUARDS When using electrical appliances, basic safety precautions should... ON, switch OFF immediately and tighten jar in collar or on examination, repair, or electrical or mechanical adjustment. 7. Always operate blender with moving blades accidentally become exposed. 18. To protect against risk of table or counter or touch hot surfaces, including stove. 10...
... all instructions. 2. Blades are sharp; Then remove plug from lid. Do not attempt to OFF. Do not use appliance for information on blender base. 19. 840212600 ENv03.qxd:Layout 1 1/31/12 3:39 PM Page 2 IMPORTANT SAFEGUARDS When using electrical appliances, basic safety precautions should... ON, switch OFF immediately and tighten jar in collar or on examination, repair, or electrical or mechanical adjustment. 7. Always operate blender with moving blades accidentally become exposed. 18. To protect against risk of table or counter or touch hot surfaces, including stove. 10...

Use & Care
Page 3
... can consume when power is necessary, an approved extension cord may draw significantly less power. The blender as provided may be taken when handling cutting blade assembly as replacement parts. Wipe blender base with food or liquid. If a longer cord is needed most power to arrange the extension... possibly result in any way or by children or accidentally tripped over a longer cord. BEFORE FIRST USE: After unpacking blender, wash everything except blender base in the freezer filled with a damp cloth or sponge. If it will damage the motor. The plug fits only one...
... can consume when power is necessary, an approved extension cord may draw significantly less power. The blender as provided may be taken when handling cutting blade assembly as replacement parts. Wipe blender base with food or liquid. If a longer cord is needed most power to arrange the extension... possibly result in any way or by children or accidentally tripped over a longer cord. BEFORE FIRST USE: After unpacking blender, wash everything except blender base in the freezer filled with a damp cloth or sponge. If it will damage the motor. The plug fits only one...
Use & Care
Page 4
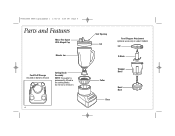
840212600 ENv03.qxd:Layout 1 1/31/12 3:39 PM Page 4 Parts and Features Mess-Free Spout With Hinged Cap Blender Jar Cord Stuff Storage (located on bottom of base) Cutting Blade Assembly NOTE: The gasket is permanently affixed to remove it. 4 Vent Opening Lid Food Chopper Attachment (optional accessory on select models) Lid S-Blade Collar Chopper Bowl Bowl Base Base Do not try to the cutting blades.
840212600 ENv03.qxd:Layout 1 1/31/12 3:39 PM Page 4 Parts and Features Mess-Free Spout With Hinged Cap Blender Jar Cord Stuff Storage (located on bottom of base) Cutting Blade Assembly NOTE: The gasket is permanently affixed to remove it. 4 Vent Opening Lid Food Chopper Attachment (optional accessory on select models) Lid S-Blade Collar Chopper Bowl Bowl Base Base Do not try to the cutting blades.

Use & Care
Page 5
...7 Push the desired speed button. 840212600 ENv03.qxd:Layout 1 1/31/12 3:39 PM Page 5 Using Your Blender BEFORE FIRST USE: After unpacking the blender, follow the instructions in "Cleaning Your Blender." If jar or cutting blade assembly is held down. 5 With the protection of an oven mitt or thick ...blending. Hot liquids may push lid off jar during normal use . When using a Pulse button, the blender will only run when the button is damaged, do not use . Do not fill blender jar beyond the 3-cup (750-ml) level. When blending hot liquids, open vent opening of lid....
...7 Push the desired speed button. 840212600 ENv03.qxd:Layout 1 1/31/12 3:39 PM Page 5 Using Your Blender BEFORE FIRST USE: After unpacking the blender, follow the instructions in "Cleaning Your Blender." If jar or cutting blade assembly is held down. 5 With the protection of an oven mitt or thick ...blending. Hot liquids may push lid off jar during normal use . When using a Pulse button, the blender will only run when the button is damaged, do not use . Do not fill blender jar beyond the 3-cup (750-ml) level. When blending hot liquids, open vent opening of lid....

Use & Care
Page 6
..., mix stiff dough, whip egg whites, grind raw meat, or extract juices from fruits and vegetables. • Do not store food or liquids in the blender jar. • Avoid bumping or dropping the blender when in operation or at any time. 6 840212600 ENv03.qxd:Layout 1 1/31/12 3:39 PM Page 6 Using Your...
..., mix stiff dough, whip egg whites, grind raw meat, or extract juices from fruits and vegetables. • Do not store food or liquids in the blender jar. • Avoid bumping or dropping the blender when in operation or at any time. 6 840212600 ENv03.qxd:Layout 1 1/31/12 3:39 PM Page 6 Using Your...

Use & Care
Page 8
... TIME 30 seconds 15 seconds 15 seconds 5 seconds 10 seconds 5 seconds 30 seconds 8 840212600 ENv03.qxd:Layout 1 1/31/12 3:39 PM Page 8 Processing Foods in Blender (For Models Without Food Chopper Attachment) FOOD Coffee Beans Parmesan Cheese Baking Chocolate Nuts Chopped Vegetables Cookie or Cracker Crumbs Superfine Sugar QUANTITY 1/2 cup (125...
... TIME 30 seconds 15 seconds 15 seconds 5 seconds 10 seconds 5 seconds 30 seconds 8 840212600 ENv03.qxd:Layout 1 1/31/12 3:39 PM Page 8 Processing Foods in Blender (For Models Without Food Chopper Attachment) FOOD Coffee Beans Parmesan Cheese Baking Chocolate Nuts Chopped Vegetables Cookie or Cracker Crumbs Superfine Sugar QUANTITY 1/2 cup (125...

Use & Care
Page 9
... first, then remaining ingredients. • If ice or frozen fruit pieces are not blending, stop blender and PULSE a few times. 9 840212600 ENv03.qxd:Layout 1 1/31/12 3:39 PM Page 9 Blending Drinks TYPE OF DRINK Fruit Smoothie Milkshake Frozen Drink INGREDIENTS 1 cup (... to 45 ml) flavored syrup 1 cup (250 ml) drink mix, such as Piña Colada mix 10 ice cubes NUMBER OF SERVINGS 3 to 4 (makes 4 cups [1 L]) BLENDER SETTING/TIME SMOOTHIE setting for 45-second program or until blended. 2 to 3 (makes 3 cups [750 ml]) MIX/MILKSHAKE setting for 5 to 10 seconds or LOW...
... first, then remaining ingredients. • If ice or frozen fruit pieces are not blending, stop blender and PULSE a few times. 9 840212600 ENv03.qxd:Layout 1 1/31/12 3:39 PM Page 9 Blending Drinks TYPE OF DRINK Fruit Smoothie Milkshake Frozen Drink INGREDIENTS 1 cup (... to 45 ml) flavored syrup 1 cup (250 ml) drink mix, such as Piña Colada mix 10 ice cubes NUMBER OF SERVINGS 3 to 4 (makes 4 cups [1 L]) BLENDER SETTING/TIME SMOOTHIE setting for 45-second program or until blended. 2 to 3 (makes 3 cups [750 ml]) MIX/MILKSHAKE setting for 5 to 10 seconds or LOW...

Use & Care
Page 11
..., milk, or any other liquid. 1 2 DISHWASHER-SAFE Wipe blender base, control panel, and cord with a damp cloth or sponge. Run the blender on EASY CLEAN for regular cleaning as instructed in "Cleaning Your Blender." This function should only be disassembled and thoroughly cleaned as instructed in... soapy water. 840212600 ENv03.qxd:Layout 1 1/31/12 3:39 PM Page 11 Cleaning Your Blender w WARNING Electrical Shock Hazard. Disconnect power before cleaning. Parts may also be used to rinse the blender between batches of food is very sharp. EASY CLEAN To Easy Clean, pour 2 cups ...
..., milk, or any other liquid. 1 2 DISHWASHER-SAFE Wipe blender base, control panel, and cord with a damp cloth or sponge. Run the blender on EASY CLEAN for regular cleaning as instructed in "Cleaning Your Blender." This function should only be disassembled and thoroughly cleaned as instructed in... soapy water. 840212600 ENv03.qxd:Layout 1 1/31/12 3:39 PM Page 11 Cleaning Your Blender w WARNING Electrical Shock Hazard. Disconnect power before cleaning. Parts may also be used to rinse the blender between batches of food is very sharp. EASY CLEAN To Easy Clean, pour 2 cups ...


