
Operation Manual
Page 2
... recommended by or near children. 13. Hot liquids may cause injuries. 14. SAVE THESE INSTRUCTIONS - 2 When using blender. Plug into blender container while operating blender. 15. Do not remove ground prong. 4. Inspect container and cutter assembly daily. Not intended for short periods of ... electrical appliances, basic safety precautions should be reviewed with all equipment operators as part of personal injury and to prevent damage to blender or container and cutter assembly, DO NOT insert utensils into a grounded 3-prong outlet. 3. This appliance is intended for use...
... recommended by or near children. 13. Hot liquids may cause injuries. 14. SAVE THESE INSTRUCTIONS - 2 When using blender. Plug into blender container while operating blender. 15. Do not remove ground prong. 4. Inspect container and cutter assembly daily. Not intended for short periods of ... electrical appliances, basic safety precautions should be reviewed with all equipment operators as part of personal injury and to prevent damage to blender or container and cutter assembly, DO NOT insert utensils into a grounded 3-prong outlet. 3. This appliance is intended for use...

Operation Manual
Page 3
... For assistance or replacement parts, call our Technical Service number: 866-285-1087 or 910-693-4277 8 a.m. - 5:00 p.m. Electrical Shock Hazard Disconnect power before cleaning blender base. Part Description 44 oz. Do not use , rinse with sanitizing solution. 3. polycarbonate container 32 oz. Electrical Shock Hazard Plug into a grounded outlet. Wipe exterior...
... For assistance or replacement parts, call our Technical Service number: 866-285-1087 or 910-693-4277 8 a.m. - 5:00 p.m. Electrical Shock Hazard Disconnect power before cleaning blender base. Part Description 44 oz. Do not use , rinse with sanitizing solution. 3. polycarbonate container 32 oz. Electrical Shock Hazard Plug into a grounded outlet. Wipe exterior...
Operation Manual
Page 4
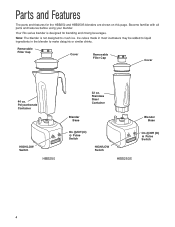
Ice cubes made in most icemakers may be added to liquid ingredients in the blender to crush ice. Polycarbonate Container HIGH/LOW Switch HBB250 32 oz. Removable Filler Cap Cover Removable Filler Cap Cover 44 oz. Parts and Features The ...parts and features for blending and mixing beverages. Become familiar with all parts and features before using your blender. Stainless Steel Container Blender Base Blender Base On (I)/Off (O) Pulse Switch HIGH/LOW Switch HBB250S On (I)/Off (O) Pulse Switch 4 Note: The...
Ice cubes made in most icemakers may be added to liquid ingredients in the blender to crush ice. Polycarbonate Container HIGH/LOW Switch HBB250 32 oz. Removable Filler Cap Cover Removable Filler Cap Cover 44 oz. Parts and Features The ...parts and features for blending and mixing beverages. Become familiar with all parts and features before using your blender. Stainless Steel Container Blender Base Blender Base On (I)/Off (O) Pulse Switch HIGH/LOW Switch HBB250S On (I)/Off (O) Pulse Switch 4 Note: The...
Operation Manual
Page 5
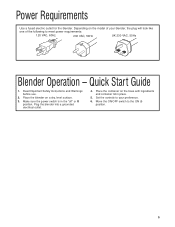
... lid in the "off" or O position. Plug the blender into a grounded electrical outlet. 4. Make sure the power switch is in place. 5. Power Requirements Use a fused electric outlet for the blender. Move the ON/OFF switch to your blender, the plug will look like one of the following to ...meet power requirements: 120 VAC, 60Hz 230 VAC, 50Hz UK 230 VAC, 50Hz Blender Operation - Set the controls to the ON (I) position. ...
... lid in the "off" or O position. Plug the blender into a grounded electrical outlet. 4. Make sure the power switch is in place. 5. Power Requirements Use a fused electric outlet for the blender. Move the ON/OFF switch to your blender, the plug will look like one of the following to ...meet power requirements: 120 VAC, 60Hz 230 VAC, 50Hz UK 230 VAC, 50Hz Blender Operation - Set the controls to the ON (I) position. ...
Operation Manual
Page 10
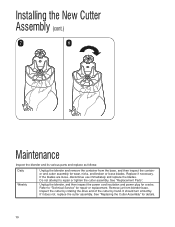
..., nicks, and broken or loose blades. Installing the New Cutter Assembly (cont.) 7 8 Maintenance Inspect the blender and its various parts and replace as follows: Daily Weekly Unplug the blender and remove the container from blender base. Unplug the blender, and then inspect the power cord insulation and power plug for details. 10 It should...
..., nicks, and broken or loose blades. Installing the New Cutter Assembly (cont.) 7 8 Maintenance Inspect the blender and its various parts and replace as follows: Daily Weekly Unplug the blender and remove the container from blender base. Unplug the blender, and then inspect the power cord insulation and power plug for details. 10 It should...
Operation Manual
Page 11
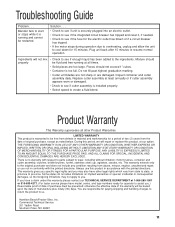
...from defects in accordance with the printed directions. Product Warranty This Warranty supercedes all times. • Solid pieces are too large. Blender fails to us. Do not fill past highest graduation marking. • Cutter unit blades are not sharp or are responsible for a... of purchase must be fluid and free-running and cannot be free from state to state, or province to create a fluid blend. Hamilton Beach/Proctor-Silex, Inc. Troubleshooting Guide Problem . . . Inspect container and cutter assembly daily. During this product, at least annually or if cutter ...
...from defects in accordance with the printed directions. Product Warranty This Warranty supercedes all times. • Solid pieces are too large. Blender fails to us. Do not fill past highest graduation marking. • Cutter unit blades are not sharp or are responsible for a... of purchase must be fluid and free-running and cannot be free from state to state, or province to create a fluid blend. Hamilton Beach/Proctor-Silex, Inc. Troubleshooting Guide Problem . . . Inspect container and cutter assembly daily. During this product, at least annually or if cutter ...


