

Use & Care
Page 3
... most . This is a better measure of operation. Care must be taken to arrange the extension cord so that may not be provided with your blender jar, the round rubber gasket must be used on this appliance was selected to or greater than the rating of the cord used . Do not place... blender jar in the diagram below. 3 840143800 ENv03.qxd 1/6/06 9:05 AM Page 3 Other Consumer Safety Information This appliance is intended for information. This is...
... most . This is a better measure of operation. Care must be taken to arrange the extension cord so that may not be provided with your blender jar, the round rubber gasket must be used on this appliance was selected to or greater than the rating of the cord used . Do not place... blender jar in the diagram below. 3 840143800 ENv03.qxd 1/6/06 9:05 AM Page 3 Other Consumer Safety Information This appliance is intended for information. This is...
Use & Care
Page 4
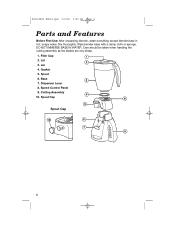
Care should be taken when handling the cutting assembly as the blades are very sharp. 1. Lid 3. Jar 4. Spout 6. Spout Cap Spout Cap 4 840143800 ENv03.qxd 1/6/06 9:05 AM Page 4 Parts and Features Before First Use: After unpacking blender, wash everything except blender base in hot, soapy water. Dry thoroughly. Filler Cap 2. Gasket 5. Speed Control Panel 9. Base 7. Cutting Assembly 10. Dispenser Lever 8. Wipe blender base with a damp cloth or sponge. DO NOT IMMERSE BASE IN WATER.
Care should be taken when handling the cutting assembly as the blades are very sharp. 1. Lid 3. Jar 4. Spout 6. Spout Cap Spout Cap 4 840143800 ENv03.qxd 1/6/06 9:05 AM Page 4 Parts and Features Before First Use: After unpacking blender, wash everything except blender base in hot, soapy water. Dry thoroughly. Filler Cap 2. Gasket 5. Speed Control Panel 9. Base 7. Cutting Assembly 10. Dispenser Lever 8. Wipe blender base with a damp cloth or sponge. DO NOT IMMERSE BASE IN WATER.
Use & Care
Page 5
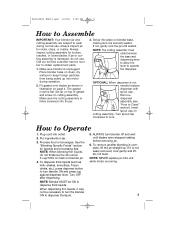
... jar or cutting assembly is not easily removed, rock gently and lift. The gasket must slide between the base and dispensing lever to allow the lever to dispense thick liquids. Set jar into place on blender base, making sure it is damaged, do not fill above the 40-ounce/... the jar. 3. 840143800 ENv03.qxd 1/6/06 9:05 AM Page 5 How to Assemble IMPORTANT: Your blender jar and cutting assembly are subject to Clean" section). Fit gasket over blades as milk- Remove dispenser assembly (see "How to wear during operation. 2. Plug cord into motor during normal use . NOTE...
... jar or cutting assembly is not easily removed, rock gently and lift. The gasket must slide between the base and dispensing lever to allow the lever to dispense thick liquids. Set jar into place on blender base, making sure it is damaged, do not fill above the 40-ounce/... the jar. 3. 840143800 ENv03.qxd 1/6/06 9:05 AM Page 5 How to Assemble IMPORTANT: Your blender jar and cutting assembly are subject to Clean" section). Fit gasket over blades as milk- Remove dispenser assembly (see "How to wear during operation. 2. Plug cord into motor during normal use . NOTE...
Use & Care
Page 8
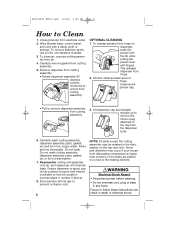
...assembly onto jar, and replace jar onto blender base. Do not wash cutting assembly, dispenser assembly parts, gasket, jar, or lid in hot, soapy water. Carefully wash cutting assembly, dispenser assembly parts, gasket, jar, and lid in a dishwasher. 7. Unplug blender from hinge on spout and rotated clockwise ...to Clean 1. Ensure dispenser or spout cap is higher than normal or if the parts are ...
...assembly onto jar, and replace jar onto blender base. Do not wash cutting assembly, dispenser assembly parts, gasket, jar, or lid in hot, soapy water. Carefully wash cutting assembly, dispenser assembly parts, gasket, jar, and lid in a dishwasher. 7. Unplug blender from hinge on spout and rotated clockwise ...to Clean 1. Ensure dispenser or spout cap is higher than normal or if the parts are ...
Use & Care
Page 9
...regular cleaning as instructed in "How to Clean." Rinse blender jar with clean water. Ice not crushed. Cannot remove cutting assembly. Run the blender on jar. • Make sure gasket is ON. • Tighten dispenser cap. • Loosen collar by holding jar and tighten... cutting assembly counterclockwise. 9 Discard soapy water. Flush clean water through dispenser until cleaned. 840143800 ENv03.qxd 1/6/06...
...regular cleaning as instructed in "How to Clean." Rinse blender jar with clean water. Ice not crushed. Cannot remove cutting assembly. Run the blender on jar. • Make sure gasket is ON. • Tighten dispenser cap. • Loosen collar by holding jar and tighten... cutting assembly counterclockwise. 9 Discard soapy water. Flush clean water through dispenser until cleaned. 840143800 ENv03.qxd 1/6/06...
Use & Care
Page 12
... series numbers and fill in material and workmanship for a period of three (3) years for Hamilton Beach products or one hundred eighty (180) days for Proctor-Silex and Traditions products from state to... and you may not apply to the following, which vary from the date of your blender, call our toll-free customer service number. 840143800 ENv03.qxd 1/6/06 9:05 AM Page...with this product, including without limitation: glass parts, glass containers, cutter/strainers, blades, seals, gaskets, clutches, motor brushes, and/or agitators, etc. LIMITED WARRANTY This product is no cost. ANY...
... series numbers and fill in material and workmanship for a period of three (3) years for Hamilton Beach products or one hundred eighty (180) days for Proctor-Silex and Traditions products from state to... and you may not apply to the following, which vary from the date of your blender, call our toll-free customer service number. 840143800 ENv03.qxd 1/6/06 9:05 AM Page...with this product, including without limitation: glass parts, glass containers, cutter/strainers, blades, seals, gaskets, clutches, motor brushes, and/or agitators, etc. LIMITED WARRANTY This product is no cost. ANY...


