Use & Care
Page 4
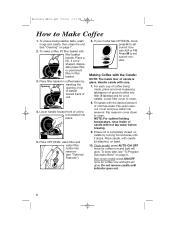
... inserting the opening on page 6. Making Coffee with the Carafe: NOTE: The inside of ground coffee into place. 5. Clock model: press AUTO-ON-OFF twice for coffee now and light will glow. Non-clock model: press ON/OFF once for coffee now and light will glow. Lower filter cover to Make Coffee 1. To brew later, see "Optional Features...
... inserting the opening on page 6. Making Coffee with the Carafe: NOTE: The inside of ground coffee into place. 5. Clock model: press AUTO-ON-OFF twice for coffee now and light will glow. Non-clock model: press ON/OFF once for coffee now and light will glow. Lower filter cover to Make Coffee 1. To brew later, see "Optional Features...
Use & Care
Page 5
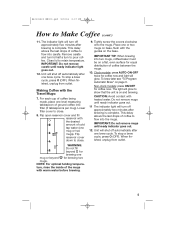
...remove carafe until ready indicator goes out. 12. Unit will glow. NOTE: For optimal holding temperature, rinse the inside of coffee to Make Coffee (cont.) 11. Clock models: press AUTO-ON-OFF twice for equal distribution of cold tap water (one brew cycle. CAUTION: Avoid contact with the desired... after one mug or beyond for brewing one brew cycle. IMPORTANT TIP: When brewing into filter (3 tablespoons per mug). When finished, unplug from outlet. Place one level measuring tablespoon of coffee being made, place one or two mugs on base, flush with the guides on and brewing...
...remove carafe until ready indicator goes out. 12. Unit will glow. NOTE: For optimal holding temperature, rinse the inside of coffee to Make Coffee (cont.) 11. Clock models: press AUTO-ON-OFF twice for equal distribution of cold tap water (one brew cycle. CAUTION: Avoid contact with the desired... after one mug or beyond for brewing one brew cycle. IMPORTANT TIP: When brewing into filter (3 tablespoons per mug). When finished, unplug from outlet. Place one level measuring tablespoon of coffee being made, place one or two mugs on base, flush with the guides on and brewing...
Use & Care
Page 6
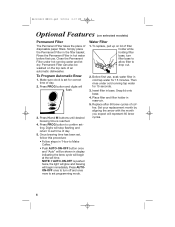
... month by aligning the arrow with the month you expect will flash. 3. Press PROG button to set time of coffee. Before first use . Place filter and filter holder in base. Press H and M buttons until desired brewing time is pushed twice, the light will glow and...will begin immediately. Digits will be washed on selected models) Permanent Filter The Permanent Filter takes the place of day. 2. Insert filter in reservoir. 5. Make sure clock is set , follow this procedure: • Follow steps in the filter basket. Then rinse under hot running tap water for ...
... month by aligning the arrow with the month you expect will flash. 3. Press PROG button to set time of coffee. Before first use . Place filter and filter holder in base. Press H and M buttons until desired brewing time is pushed twice, the light will glow and...will begin immediately. Digits will be washed on selected models) Permanent Filter The Permanent Filter takes the place of day. 2. Insert filter in reservoir. 5. Make sure clock is set , follow this procedure: • Follow steps in the filter basket. Then rinse under hot running tap water for ...
Use & Care
Page 7
...up by twisting lids counterclockwise. 7 Remove water filter and water filter holder (see "Optional Features"). 2. Pour one carafe of plain white vinegar into electrical outlet. 5. Then turn OFF. 6. When the brew cycle is finished, wait for non-clock model, press the ON/OFF button once. To ...maintain performance, clean the filter basket often. 3. Remove lids by handle. Place empty carafe on base. 8. When the brew cycle is ...
...up by twisting lids counterclockwise. 7 Remove water filter and water filter holder (see "Optional Features"). 2. Pour one carafe of plain white vinegar into electrical outlet. 5. Then turn OFF. 6. When the brew cycle is finished, wait for non-clock model, press the ON/OFF button once. To ...maintain performance, clean the filter basket often. 3. Remove lids by handle. Place empty carafe on base. 8. When the brew cycle is ...


