
Use & Care
Page 2
... service number for other liquid. 4. Do not use refrigerated oil. 22. Do not place on or near children. 5. Never move deep fryer containing hot oil. 13. Always dry deep fryer components thoroughly after the appliance malfunctions or has been damaged in any appliance with lid in water or other than intended purpose...
... service number for other liquid. 4. Do not use refrigerated oil. 22. Do not place on or near children. 5. Never move deep fryer containing hot oil. 13. Always dry deep fryer components thoroughly after the appliance malfunctions or has been damaged in any appliance with lid in water or other than intended purpose...
Use & Care
Page 3
If the plug does not fit fully into the hot liquid. Do not allow the cord to hang over the deep fryer when the lid is only intended for household use with any way or by children or become entangled with an extension cord. • Hot liquid ... with the user. WARNING! The plug fits only one wide blade) that reduces the risk of electric shock. If it may result from a deep-fat fryer being pulled off . 840217100 ENv05.indd 3 3 4/30/12 11:42 AM Do not defeat the safety purpose of the plug by modifying the plug in...
If the plug does not fit fully into the hot liquid. Do not allow the cord to hang over the deep fryer when the lid is only intended for household use with any way or by children or become entangled with an extension cord. • Hot liquid ... with the user. WARNING! The plug fits only one wide blade) that reduces the risk of electric shock. If it may result from a deep-fat fryer being pulled off . 840217100 ENv05.indd 3 3 4/30/12 11:42 AM Do not defeat the safety purpose of the plug by modifying the plug in...

Use & Care
Page 5
... unless correctly installed on a stable, flat surface. basket. 5 For storage: Push handle into metal bracket. making sure it is in place. How to Assemble the Fryer 1 Place base on base. 3 4 To assemble handle, squeeze tines Release tines to allow them to of to lock into basket and squeeze tines together to...
... unless correctly installed on a stable, flat surface. basket. 5 For storage: Push handle into metal bracket. making sure it is in place. How to Assemble the Fryer 1 Place base on base. 3 4 To assemble handle, squeeze tines Release tines to allow them to of to lock into basket and squeeze tines together to...

Use & Care
Page 6
...See "How to disturb magnetic connection when plugging cord into electrical outlet. Close lid. Press OPEN button to open lid. 6 2 Fill fryer with at least 6 but no more information on (6 to MAX indicator mark on when oil has reached preset temperature. 840217100 ENv05.indd ...NOTE: Magnetic force is turned to follow these instructions may spill from being inadvertently pulled, thereby preventing deep fryer from fryer. 1 Place assembled fryer on page 11.) 3 4 Make sure fryer is relatively low to ensure that the cord will require resetting. (See "How to desired setting. Frying...
...See "How to disturb magnetic connection when plugging cord into electrical outlet. Close lid. Press OPEN button to open lid. 6 2 Fill fryer with at least 6 but no more information on (6 to MAX indicator mark on when oil has reached preset temperature. 840217100 ENv05.indd ...NOTE: Magnetic force is turned to follow these instructions may spill from being inadvertently pulled, thereby preventing deep fryer from fryer. 1 Place assembled fryer on page 11.) 3 4 Make sure fryer is relatively low to ensure that the cord will require resetting. (See "How to desired setting. Frying...

Use & Care
Page 9
... cloth dampened with hot, soapy water. gently press lid down into place. 840217100 ENv05.indd 9 9 4/30/12 11:42 AM Wipe all fryer components thoroughly before using. 1 Make sure fryer is turned to release and open lid. use care when cleaning heating element assembly. Unplug from... opening on base. Do not immerse unit in water. Do not immerse heating element assembly in water. 5 Press OPEN button to MIN. Cleaning Your Fryer w WARNING Burn Hazard. Slightly tilt lid towards the control panel and pull lid up. 6 TO REINSERT LID: Place lid on the lid hinge, ...
... cloth dampened with hot, soapy water. gently press lid down into place. 840217100 ENv05.indd 9 9 4/30/12 11:42 AM Wipe all fryer components thoroughly before using. 1 Make sure fryer is turned to release and open lid. use care when cleaning heating element assembly. Unplug from... opening on base. Do not immerse unit in water. Do not immerse heating element assembly in water. 5 Press OPEN button to MIN. Cleaning Your Fryer w WARNING Burn Hazard. Slightly tilt lid towards the control panel and pull lid up. 6 TO REINSERT LID: Place lid on the lid hinge, ...
Use & Care
Page 11
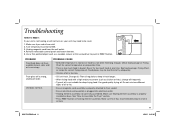
... fat. • Ensure magnetic cord assembly is properly attached to fryer socket. • Ensure electrical cord assembly is not crispy. Make sure fryer has recommended amount of oil in RESET button. Turn temperature control to Assemble the Fryer" section. • Press RESET button on heating element assembly.... Food pieces may need to be reset. Change oil. Use good quality frying oil. Make sure fryer and oil are cold. 2. Use a thin pointed object such as chicken or fries), change oil frequently. • Type of oil is ...
... fat. • Ensure magnetic cord assembly is properly attached to fryer socket. • Ensure electrical cord assembly is not crispy. Make sure fryer has recommended amount of oil in RESET button. Turn temperature control to Assemble the Fryer" section. • Press RESET button on heating element assembly.... Food pieces may need to be reset. Change oil. Use good quality frying oil. Make sure fryer and oil are cold. 2. Use a thin pointed object such as chicken or fries), change oil frequently. • Type of oil is ...

Use & Care
Page 12
... good quality frying oil. Use room-temperature oil. • Oil tank has not been cleaned properly. PROBABLE CAUSE • There is too much oil in fryer. Make sure that oil does not exceed maximum level mark. • Basket/food immersed too quickly. Do not mix two different types of oil is... food at one time than quantities indicated on window. Carefully raise basket out of oil. • Food contains too much food in the "Cleaning Your Fryer" section. • Water vapor from oil tank, use of the...
... good quality frying oil. Use room-temperature oil. • Oil tank has not been cleaned properly. PROBABLE CAUSE • There is too much oil in fryer. Make sure that oil does not exceed maximum level mark. • Basket/food immersed too quickly. Do not mix two different types of oil is... food at one time than quantities indicated on window. Carefully raise basket out of oil. • Food contains too much food in the "Cleaning Your Fryer" section. • Water vapor from oil tank, use of the...


