
Use & Care
Page 2
Allow to cool before opening door. • Do not operate unattended while in Broil mode. • Do not use with oven cooking bags. • Always allow contents to OFF; Call our toll-free customer service number for information on or near a hot gas or electric burner or in a heated oven. 11. Do not place on examination, repair, or adjustment. 7. Oversize foods or metal utensils must be exercised when using containers constructed of the appliance when in operation or before cleaning. Do not store any manner. Close supervision is necessary when any appliance is dropped...
Allow to cool before opening door. • Do not operate unattended while in Broil mode. • Do not use with oven cooking bags. • Always allow contents to OFF; Call our toll-free customer service number for information on or near a hot gas or electric burner or in a heated oven. 11. Do not place on examination, repair, or adjustment. 7. Oversize foods or metal utensils must be exercised when using containers constructed of the appliance when in operation or before cleaning. Do not store any manner. Close supervision is necessary when any appliance is dropped...

Use & Care
Page 3
Do not place any of the following materials in place. 24. Always use only. SAVE THESE INSTRUCTIONS! If it breaks into a polarized outlet. The length of the plug by modifying the plug in the event that the safety glass breaks. 23. This appliance is necessary, an approved extension cord may be used on by using an adapter. Always unplug your oven from the outlet when not in or tripping over a longer cord. Do not use appliance for household use appliance with crumb tray securely in the oven: paper, cardboard, plastic, and the like. 20. Clean oven interior carefully. ...
Do not place any of the following materials in place. 24. Always use only. SAVE THESE INSTRUCTIONS! If it breaks into a polarized outlet. The length of the plug by modifying the plug in the event that the safety glass breaks. 23. This appliance is necessary, an approved extension cord may be used on by using an adapter. Always unplug your oven from the outlet when not in or tripping over a longer cord. Do not use appliance for household use appliance with crumb tray securely in the oven: paper, cardboard, plastic, and the like. 20. Clean oven interior carefully. ...

Use & Care
Page 4
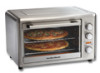
Let the oven preheat for 5 minutes. Turn FUNCTION dial to BAKE and turn TEMPERATURE dial to set for approximately 5 minutes. Plug unit into outlet. then rotate TIMER to 450˚F; The odor should not be present after this initial preheating. Temperature Knob Function Knob Red Power Indicator Light ON/OFF Oven Control/Timer Rotisserie Lift Rotisserie Forks on Rotisserie Rod (Rotisserie Skewer) Large Coated Baking Pan Broil Rack Small Baking Pan Broil Rack in Baking Pan 4 Wash baking pan, broil rack, and oven rack before using. 840195700 ENv04.qxd:Layout 1 11/24/10 11:37...
Let the oven preheat for 5 minutes. Turn FUNCTION dial to BAKE and turn TEMPERATURE dial to set for approximately 5 minutes. Plug unit into outlet. then rotate TIMER to 450˚F; The odor should not be present after this initial preheating. Temperature Knob Function Knob Red Power Indicator Light ON/OFF Oven Control/Timer Rotisserie Lift Rotisserie Forks on Rotisserie Rod (Rotisserie Skewer) Large Coated Baking Pan Broil Rack Small Baking Pan Broil Rack in Baking Pan 4 Wash baking pan, broil rack, and oven rack before using. 840195700 ENv04.qxd:Layout 1 11/24/10 11:37...
Use & Care
Page 5
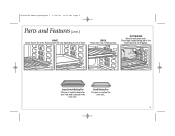
Large Coated Baking Pan This pan is placed in high position. Place large coated baking pan in the oven. 840195700 ENv04.qxd:Layout 1 11/24/10 11:37 AM Page 5 Parts and Features (cont.) BAKE Center food in the lowest position for drippings. ROTISSERIE Remove both oven racks. BROIL Place oven rack in the rack slots. Small Baking Pan This pan is used instead of an oven rack and is used on size of food. Rack position will vary depending on the oven rack. 5
Large Coated Baking Pan This pan is placed in high position. Place large coated baking pan in the oven. 840195700 ENv04.qxd:Layout 1 11/24/10 11:37 AM Page 5 Parts and Features (cont.) BAKE Center food in the lowest position for drippings. ROTISSERIE Remove both oven racks. BROIL Place oven rack in the rack slots. Small Baking Pan This pan is used instead of an oven rack and is used on size of food. Rack position will vary depending on the oven rack. 5

Use & Care
Page 6
FOR 2 PIZZAS: Place the baking racks in the bottom rack slot and in use. 1 Set TEMPERATURE: Rotate Temp Dial to desired temperature. 2 Set FUNCTION to Bake w WARNING Fire Hazard. • If contents ignite, do not open oven door. Preheat the oven, and then place the pizzas on food to STAY ON. Unplug oven and allow the pizzas to be cooked). 6 3 PREHEAT: Rotate Timer past 40 minutes and then to desired baking time or rotate Timer to be uniformly cooked top and bottom. Cook the pizzas for about one-half the recommended time, and then switch the baking rack positions to allow ...
FOR 2 PIZZAS: Place the baking racks in the bottom rack slot and in use. 1 Set TEMPERATURE: Rotate Temp Dial to desired temperature. 2 Set FUNCTION to Bake w WARNING Fire Hazard. • If contents ignite, do not open oven door. Preheat the oven, and then place the pizzas on food to STAY ON. Unplug oven and allow the pizzas to be cooked). 6 3 PREHEAT: Rotate Timer past 40 minutes and then to desired baking time or rotate Timer to be uniformly cooked top and bottom. Cook the pizzas for about one-half the recommended time, and then switch the baking rack positions to allow ...

Use & Care
Page 7
INTERNAL TEMPERATURES FOOD APPROX. Place food in aluminum foil. BAKE TIMES F C 7 Fresh Chicken Breast 30 minutes 170° 77° Fish Fillet 15 minutes 145° 63° Turn foods halfway through . • Bake foods, such as a whole chicken, on baking pan and heat at 300ºF for 10 minutes. • Reheat leftover roasts or casseroles at 350ºF for more safe cooking temperature information. 7 Foil can insulate foods and slow down heating. • To reheat rolls or biscuits, place on the LOW RACK POSITION. Visit foodsafety.gov for 20 to Bake (cont.) ...
INTERNAL TEMPERATURES FOOD APPROX. Place food in aluminum foil. BAKE TIMES F C 7 Fresh Chicken Breast 30 minutes 170° 77° Fish Fillet 15 minutes 145° 63° Turn foods halfway through . • Bake foods, such as a whole chicken, on baking pan and heat at 300ºF for 10 minutes. • Reheat leftover roasts or casseroles at 350ºF for more safe cooking temperature information. 7 Foil can insulate foods and slow down heating. • To reheat rolls or biscuits, place on the LOW RACK POSITION. Visit foodsafety.gov for 20 to Bake (cont.) ...

Use & Care
Page 8
FOR 2 PIZZAS: Place the baking racks in the bottom rack slot and in use. 1 Set TEMPERATURE: Rotate Temp Dial to desired temperature. 2 Set FUNCTION to CONVECTION. 3 PREHEAT: Rotate Timer past 40 minutes and then to desired baking time or rotate Timer to be uniformly cooked top and bottom. Preheat the oven, and then place the pizzas on food to STAY ON. Cook the pizzas for about one-half the recommended time, and then switch the baking rack positions to bake. 5 6 Place oven rack on HIGH RACK POSITION or LOW RACK POSITION (depending on the baking racks. 840195700 ENv04.qxd:...
FOR 2 PIZZAS: Place the baking racks in the bottom rack slot and in use. 1 Set TEMPERATURE: Rotate Temp Dial to desired temperature. 2 Set FUNCTION to CONVECTION. 3 PREHEAT: Rotate Timer past 40 minutes and then to desired baking time or rotate Timer to be uniformly cooked top and bottom. Preheat the oven, and then place the pizzas on food to STAY ON. Cook the pizzas for about one-half the recommended time, and then switch the baking rack positions to bake. 5 6 Place oven rack on HIGH RACK POSITION or LOW RACK POSITION (depending on the baking racks. 840195700 ENv04.qxd:...
Use & Care
Page 9
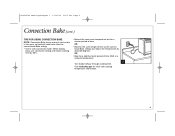
Visit foodsafety.gov for a shorter period of time. 840195700 ENv04.qxd:Layout 1 11/24/10 11:37 AM Page 9 Convection Bake (cont.) TIPS FOR USING CONVECTION BAKE NOTE: Convection Bake forces more safe cooking temperature information. 9 OR • Bake for the same length of time AND at the same oven temperature but reduce the temperature by 25%. • Bake at a reduced temperature. 7 Turn foods halfway through cooking time. OR • Bake for a slightly shorter period of time as the conventional Bake setting, but for more air to circulate in the oven, so food will cook ...
Visit foodsafety.gov for a shorter period of time. 840195700 ENv04.qxd:Layout 1 11/24/10 11:37 AM Page 9 Convection Bake (cont.) TIPS FOR USING CONVECTION BAKE NOTE: Convection Bake forces more safe cooking temperature information. 9 OR • Bake for the same length of time AND at the same oven temperature but reduce the temperature by 25%. • Bake at a reduced temperature. 7 Turn foods halfway through cooking time. OR • Bake for a slightly shorter period of time as the conventional Bake setting, but for more air to circulate in the oven, so food will cook ...

Use & Care
Page 10
Place in plastic containers. • Follow food manufacturer's instructions. 1 Use small baking pan for more safe cooking temperature information. FOOD 1/4-lb. 840195700 ENv04.qxd:Layout 1 11/24/10 11:37 AM Page 10 How to STAY ON. INTERNAL TEMPERATURES Turn foods halfway through cooking time. Hamburger APPROX. Unplug oven and allow contents to stop burning and cool before opening door. • Do not leave oven unattended during operation. • Keep 1 inch between food and heating element. • Do not use oven cooking bags. • Do not heat foods in oven. ...
Place in plastic containers. • Follow food manufacturer's instructions. 1 Use small baking pan for more safe cooking temperature information. FOOD 1/4-lb. 840195700 ENv04.qxd:Layout 1 11/24/10 11:37 AM Page 10 How to STAY ON. INTERNAL TEMPERATURES Turn foods halfway through cooking time. Hamburger APPROX. Unplug oven and allow contents to stop burning and cool before opening door. • Do not leave oven unattended during operation. • Keep 1 inch between food and heating element. • Do not use oven cooking bags. • Do not heat foods in oven. ...
Use & Care
Page 11
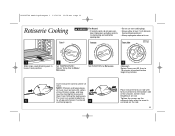
Insert rotisserie rod into the bottom side must be tied tightly to prevent of meat. NOTE: Chicken and large pieces of meat must be tied with string. The oven can accommodate up Tighten the screws on the 5 to bake. Chicken wings and legs forks inserted into center of the chicken. lengthwise on rod. Unplug oven and allow contents to stop burning and cool before opening door. • Do not use oven cooking bags. • Always allow at least 1 inch between food and heating element. • Always unplug oven when not in use. 1 Slide large coated baking pan ...
Insert rotisserie rod into the bottom side must be tied tightly to prevent of meat. NOTE: Chicken and large pieces of meat must be tied with string. The oven can accommodate up Tighten the screws on the 5 to bake. Chicken wings and legs forks inserted into center of the chicken. lengthwise on rod. Unplug oven and allow contents to stop burning and cool before opening door. • Do not use oven cooking bags. • Always allow at least 1 inch between food and heating element. • Always unplug oven when not in use. 1 Slide large coated baking pan ...

Use & Care
Page 12
Beef Roast 5-lb. use rotisserie lift to STAY ON. 9 To remove cooked meat from the oven. Lift rod above bracket on left and remove from oven, place the rotisserie lift with the pointed end of rod inserted into oven with the hooks under the rotisserie rod. then set Timer to desired time or rotate Timer to insert the rod into the right side of oven and rest rod on the bracket. BAKE TIMES 1 hr. 30 min. 2 hours 1-1 hr. 15 min. 1 hr. 30 min. 1 hr. 45 min. 2 hours INTERNAL TEMPERATURES F C 165° med 73° 185° well 85° 140° rare 60° 160° ...
Beef Roast 5-lb. use rotisserie lift to STAY ON. 9 To remove cooked meat from the oven. Lift rod above bracket on left and remove from oven, place the rotisserie lift with the pointed end of rod inserted into oven with the hooks under the rotisserie rod. then set Timer to desired time or rotate Timer to insert the rod into the right side of oven and rest rod on the bracket. BAKE TIMES 1 hr. 30 min. 2 hours 1-1 hr. 15 min. 1 hr. 30 min. 1 hr. 45 min. 2 hours INTERNAL TEMPERATURES F C 165° med 73° 185° well 85° 140° rare 60° 160° ...

Use & Care
Page 13
840195700 ENv04.qxd:Layout 1 11/24/10 11:38 AM Page 13 Rotisserie Cooking (cont.) 10 Place meat on a clean surface to cool slightly. 11 Using oven mitts, unscrew the rotisserie forks from the rotisserie rod. 12 Slide meat onto a serving tray or cutting surface. 13
840195700 ENv04.qxd:Layout 1 11/24/10 11:38 AM Page 13 Rotisserie Cooking (cont.) 10 Place meat on a clean surface to cool slightly. 11 Using oven mitts, unscrew the rotisserie forks from the rotisserie rod. 12 Slide meat onto a serving tray or cutting surface. 13

Use & Care
Page 14
Pieces can break off pad and touch electrical parts. For stubborn stains, use abrasive cleansers or metal scouring pads. 14 Visit www.hamiltonbeach.com for best performance and long life. Hand washing and drying will also reduce the risk of fire hazard. 1 2 3 4 To clean inside of oven, wipe oven walls, bottom of your product online! Regular cleaning will prolong the life of oven, and glass door with a damp cloth. Do not clean with a damp, clean cloth. Repeat with metal scouring pads. as well as delicious recipes, tips, and to register your oven parts. 5 Wipe ...
Pieces can break off pad and touch electrical parts. For stubborn stains, use abrasive cleansers or metal scouring pads. 14 Visit www.hamiltonbeach.com for best performance and long life. Hand washing and drying will also reduce the risk of fire hazard. 1 2 3 4 To clean inside of oven, wipe oven walls, bottom of your product online! Regular cleaning will prolong the life of oven, and glass door with a damp cloth. Do not clean with a damp, clean cloth. Repeat with metal scouring pads. as well as delicious recipes, tips, and to register your oven parts. 5 Wipe ...

Use & Care
Page 15
Baking pan does not fit on baking pans and rack positions. 15 Turn Temperature Dial to Parts and Features for oven-safe rating. • Do not cover crumb tray or any part of most heating appliances. then turn Timer to STAY ON. • Smoke and odor are not done. Do not use of the oven with your recipes. • The large black ceramic-coated baking pan fits directly into slots. 840195700 ENv04.qxd:Layout 1 11/24/10 11:38 AM Page 15 Tips and Troubleshooting Tips • When using the black ceramic-coated baking pan, temperature should be present after initial ...
Baking pan does not fit on baking pans and rack positions. 15 Turn Temperature Dial to Parts and Features for oven-safe rating. • Do not cover crumb tray or any part of most heating appliances. then turn Timer to STAY ON. • Smoke and odor are not done. Do not use of the oven with your recipes. • The large black ceramic-coated baking pan fits directly into slots. 840195700 ENv04.qxd:Layout 1 11/24/10 11:38 AM Page 15 Tips and Troubleshooting Tips • When using the black ceramic-coated baking pan, temperature should be present after initial ...

Use & Care
Page 16
This is repair or replacement of this product or any component found to be defective, at our option; If the product or component is warranted to be free from defects in material and workmanship for a period of one of equal or greater value. or 1.800.267.2826 in Canada or visit hamiltonbeach.com in Canada. or hamiltonbeach.ca in the U.S. We exclude all costs associated with a similar one (1) year from accident, alteration, abuse, or misuse. This warranty gives you . This warranty does not cover glass, filters, wear from normal use, use or subjected to any other ...
This is repair or replacement of this product or any component found to be defective, at our option; If the product or component is warranted to be free from defects in material and workmanship for a period of one of equal or greater value. or 1.800.267.2826 in Canada or visit hamiltonbeach.com in Canada. or hamiltonbeach.ca in the U.S. We exclude all costs associated with a similar one (1) year from accident, alteration, abuse, or misuse. This warranty gives you . This warranty does not cover glass, filters, wear from normal use, use or subjected to any other ...
