Product Manual
Page 4
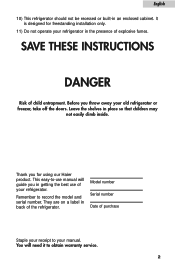
...only. 11) Do not operate your refrigerator. Remember to your old refrigerator or freezer, take off the doors. SAVE THESE INSTRUCTIONS DANGER Risk of the refrigerator. This easy-to-use of your refrigerator in the presence of purchase Staple your receipt to record the model and serial number. They are on ... cabinet. You will guide you throw away your manual. Before you in back of child entrapment. English 10) This refrigerator should not be recessed or built-in place so that children may not easily climb inside. It is designed for using our Haier product.
...only. 11) Do not operate your refrigerator. Remember to your old refrigerator or freezer, take off the doors. SAVE THESE INSTRUCTIONS DANGER Risk of the refrigerator. This easy-to-use of your refrigerator in the presence of purchase Staple your receipt to record the model and serial number. They are on ... cabinet. You will guide you throw away your manual. Before you in back of child entrapment. English 10) This refrigerator should not be recessed or built-in place so that children may not easily climb inside. It is designed for using our Haier product.
Product Manual
Page 6
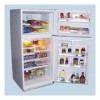
... shown) (not on all models) 4 FULL WIDTH Wire Freezer Shelf (not on all models) 3. Covered Dairy Compartment 11. Glass Crisper Cover (not on all models) 8. Shelf Bottle Hugger (not on all models) 16. Utility Shelf/Ice Cube Tray Holder (not on all models) 5. Utility Drawer (not on all models) 7. Crispers (not on all models) 9. Refrigerator Door Shelves (type and...
... shown) (not on all models) 4 FULL WIDTH Wire Freezer Shelf (not on all models) 3. Covered Dairy Compartment 11. Glass Crisper Cover (not on all models) 8. Shelf Bottle Hugger (not on all models) 16. Utility Shelf/Ice Cube Tray Holder (not on all models) 5. Utility Drawer (not on all models) 7. Crispers (not on all models) 9. Refrigerator Door Shelves (type and...
Product Manual
Page 9
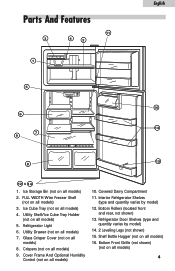
...them with the screw hole of the lower edge of freezer door: 1. Push handle cover up. 3. Align handle cover with the screw hole of the upper edge of refrigerator door, and fix them by model) Handle installation of freezer door, and fix them by screws. 3. Align the ...lower part of refrigerator door: 1. Take out door handle, screws and screw covers from refrigerator accessory bag. 2. Snap into place. 4.
...them with the screw hole of the lower edge of freezer door: 1. Push handle cover up. 3. Align handle cover with the screw hole of the upper edge of refrigerator door, and fix them by model) Handle installation of freezer door, and fix them by screws. 3. Align the ...lower part of refrigerator door: 1. Take out door handle, screws and screw covers from refrigerator accessory bag. 2. Snap into place. 4.
Product Manual
Page 10
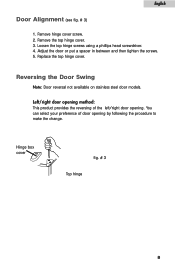
... top hinge screws using a phillips head screwdriver. 4. Replace the top hinge cover. Reversing the Door Swing Note: Door reversal not available on stainless steel door models. Adjust the door or put a spacer in between and then tighten the screws. 5. You can select your preference of the left/right door opening by...
... top hinge screws using a phillips head screwdriver. 4. Replace the top hinge cover. Reversing the Door Swing Note: Door reversal not available on stainless steel door models. Adjust the door or put a spacer in between and then tighten the screws. 5. You can select your preference of the left/right door opening by...
Product Manual
Page 13
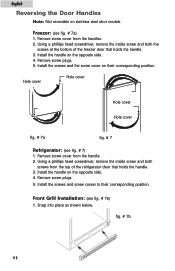
...handles. 2. Freezer: (see fig. # 7b) 1. Front Grill Installation: (see fig. # 7a) 1. Using a phillips head screwdriver, remove the inside screw and both the screws at the bottom of the refrigerator door that holds the handle. 3. Install the handle on stainless steel door models. Snap into... reversible on the opposite side. 4. Remove screw plugs. 5. Hole cover Hole cover Hole cover Hole cover fig. # 7a fig. # 7 Refrigerator: (see fig. # 7) 1. Install the handle on their corresponding position. Using a phillips head screwdriver, remove the inside screw and both screws...
...handles. 2. Freezer: (see fig. # 7b) 1. Front Grill Installation: (see fig. # 7a) 1. Using a phillips head screwdriver, remove the inside screw and both the screws at the bottom of the refrigerator door that holds the handle. 3. Install the handle on stainless steel door models. Snap into... reversible on the opposite side. 4. Remove screw plugs. 5. Hole cover Hole cover Hole cover Hole cover fig. # 7a fig. # 7 Refrigerator: (see fig. # 7) 1. Install the handle on their corresponding position. Using a phillips head screwdriver, remove the inside screw and both screws...
Product Manual
Page 14
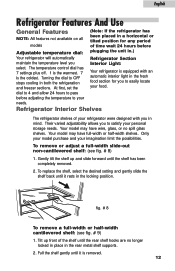
... OFF stops cooling in both the refrigeration and freezer sections. Refrigerator Interior Shelves The refrigerator shelves of your imagination limit the possibilities. Your model may have full-width or half-width shelves. Only your model purchase and your refrigerator were designed with an automatic interior...Pull the shelf gently until the shelf has been completely removed. 2. English Refrigerator Features And Use General Features NOTE: All features not available on all models (Note: If the refrigerator has been placed in a horizontal or tilted position for you to easily ...
... OFF stops cooling in both the refrigeration and freezer sections. Refrigerator Interior Shelves The refrigerator shelves of your imagination limit the possibilities. Your model may have full-width or half-width shelves. Only your model purchase and your refrigerator were designed with an automatic interior...Pull the shelf gently until the shelf has been completely removed. 2. English Refrigerator Features And Use General Features NOTE: All features not available on all models (Note: If the refrigerator has been placed in a horizontal or tilted position for you to easily ...
Product Manual
Page 17
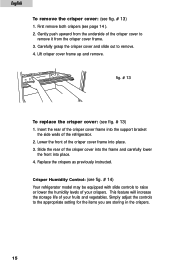
... place. 3. Lift crisper cover frame up and remove. Carefully grasp the crisper cover and slide out to raise or lower the humidity levels of the refrigerator. 2. Replace the crispers as previously instructed. Crisper Humidity Control: (see fig. # 13) 1. fig. # 13 To replace the crisper cover: (see page 14 ). 2. English To remove...
... place. 3. Lift crisper cover frame up and remove. Carefully grasp the crisper cover and slide out to raise or lower the humidity levels of the refrigerator. 2. Replace the crispers as previously instructed. Crisper Humidity Control: (see fig. # 13) 1. fig. # 13 To replace the crisper cover: (see page 14 ). 2. English To remove...

Product Manual
Page 21
...the transfer of storage are required, store immediately in the freezer section. 19 Food Storage Information Fresh Food • When storing fresh food, which is equipped with one or two ice cube trays depending upon the model you do not have purchased. Follow the suggestions below for...10 Days • All others 1-2 Days If longer periods of odors and tastes. • Wipe containers before storing in the refrigeration. English Ice Cube Trays: Your refrigerator is not prepackaged, be sure to maximize shelf life. • Fruit should be used the same day as purchased. •...
...the transfer of storage are required, store immediately in the freezer section. 19 Food Storage Information Fresh Food • When storing fresh food, which is equipped with one or two ice cube trays depending upon the model you do not have purchased. Follow the suggestions below for...10 Days • All others 1-2 Days If longer periods of odors and tastes. • Wipe containers before storing in the refrigeration. English Ice Cube Trays: Your refrigerator is not prepackaged, be sure to maximize shelf life. • Fruit should be used the same day as purchased. •...
Product Manual
Page 26
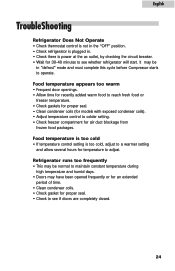
...8226; If temperature control setting is too cold, adjust to a warmer setting and allow several hours for temperature to see whether refrigerator will start. Refrigerator runs too frequently • This may have been opened frequently or for an extended period of time. • Clean condenser coils...Frequent door openings. • Allow time for recently added warm food to reach fresh food or freezer temperature. • Check gaskets for proper seal. • Clean condenser coils (for models with exposed condenser coils). • Adjust temperature control to operate. It may be normal to...
...8226; If temperature control setting is too cold, adjust to a warmer setting and allow several hours for temperature to see whether refrigerator will start. Refrigerator runs too frequently • This may have been opened frequently or for an extended period of time. • Clean condenser coils...Frequent door openings. • Allow time for recently added warm food to reach fresh food or freezer temperature. • Check gaskets for proper seal. • Clean condenser coils (for models with exposed condenser coils). • Adjust temperature control to operate. It may be normal to...
Energy Guide Label
Page 2
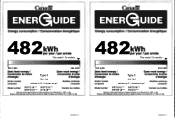
482 This model / Ce modele 285 kWh Type 3 16.5 - 18.4 volume in ft.³ / volume en pi³ RRTG18*** RRTS18*** RRTW18*** HTA18*** 484 kWh 482 This model / Ce modele 285 kWh Type 3 16.5 - 18.4 volume in ft.³ / volume en pi³ RRTG18*** RRTS18*** RRTW18*** HTA18*** 484 kWh T080050272 T080050272
482 This model / Ce modele 285 kWh Type 3 16.5 - 18.4 volume in ft.³ / volume en pi³ RRTG18*** RRTS18*** RRTW18*** HTA18*** 484 kWh 482 This model / Ce modele 285 kWh Type 3 16.5 - 18.4 volume in ft.³ / volume en pi³ RRTG18*** RRTS18*** RRTW18*** HTA18*** 484 kWh T080050272 T080050272


