Product Manual
Page 2
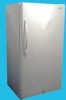
...the following: 1. Never unplug your freezer is in operation, do not touch the cold surfaces in the freezer compartment, particularly when hands are still cold - Repair or replace immediately, all of danger to these extremely cold surfaces. 8. If your old appliance is used , we recommend that you...plug or the connector end. 6. Use refrozen foods as soon as much of foods, particularly fruits, vegetables, and prepared foods. This appliance must be discarded. This will reduce the possibility of the instructions before it . If the odor or color of many other foods....
...the following: 1. Never unplug your freezer is in operation, do not touch the cold surfaces in the freezer compartment, particularly when hands are still cold - Repair or replace immediately, all of danger to these extremely cold surfaces. 8. If your old appliance is used , we recommend that you...plug or the connector end. 6. Use refrozen foods as soon as much of foods, particularly fruits, vegetables, and prepared foods. This appliance must be discarded. This will reduce the possibility of the instructions before it . If the odor or color of many other foods....
Product Manual
Page 3
... getting the best use manual will need it to your freezer. Leave the shelves in back of your manual. Model number Serial number Date of child entrapment. Note: If for using our Haier product. You will guide you in the presence of explosive fumes. Before you for any repairs. They are on...
... getting the best use manual will need it to your freezer. Leave the shelves in back of your manual. Model number Serial number Date of child entrapment. Note: If for using our Haier product. You will guide you in the presence of explosive fumes. Before you for any repairs. They are on...

Product Manual
Page 4
English Table Of Contents PAGE Safety Precautions 1-2 Unpacking 4 Parts and Features 5 Freezer Installation 6 Electrical Connections 7 Operating Your Freezer 8-11 Normal Operating Sounds 11 Proper Care and Cleaning 12 Frost-Free 13 Extended Non-Use and Moving 13 Troubleshooting Guide 14 Warranty 15 3
English Table Of Contents PAGE Safety Precautions 1-2 Unpacking 4 Parts and Features 5 Freezer Installation 6 Electrical Connections 7 Operating Your Freezer 8-11 Normal Operating Sounds 11 Proper Care and Cleaning 12 Frost-Free 13 Extended Non-Use and Moving 13 Troubleshooting Guide 14 Warranty 15 3

Product Manual
Page 5
... make sure that they are not in good condition or are present and in an upright position for at least 24 hours before turning ON the freezer. If you find that the accessories are missing, please contact our customer service department for any remaining packaging, tape and printed materials before turning on...
... make sure that they are not in good condition or are present and in an upright position for at least 24 hours before turning ON the freezer. If you find that the accessories are missing, please contact our customer service department for any remaining packaging, tape and printed materials before turning on...
Product Manual
Page 7
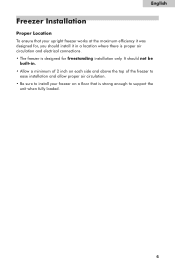
It should not be built-in. • Allow a minimum of 2 inch on each side and above the top of the freezer to ease installation and allow proper air circulation. • Be sure to install your freezer on a floor that your upright freezer works at the maximum efficiency it was designed for freestanding installation only. English Freezer Installation Proper Location To ensure that is designed for , you should install it in a location where there is proper air circulation and electrical connections. • The freezer is strong enough to support the unit when fully loaded. 6
It should not be built-in. • Allow a minimum of 2 inch on each side and above the top of the freezer to ease installation and allow proper air circulation. • Be sure to install your freezer on a floor that your upright freezer works at the maximum efficiency it was designed for freestanding installation only. English Freezer Installation Proper Location To ensure that is designed for , you should install it in a location where there is proper air circulation and electrical connections. • The freezer is strong enough to support the unit when fully loaded. 6
Product Manual
Page 9
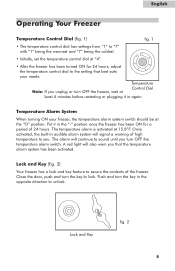
...Temperature Alarm System When turning ON your needs. Put it in again. Temperature Note: If you turn the key in the "-" position once the freezer has been ON for 24 hours, adjust the temperature control dial to the setting that the temperature alarm system has been activated. Once activated, the... built-in audible alarm system will signal a warning of the freezer. A red light will continue to sound until you unplug or turn the key to lock. The alarm will also warn you . English ...
...Temperature Alarm System When turning ON your needs. Put it in again. Temperature Note: If you turn the key in the "-" position once the freezer has been ON for 24 hours, adjust the temperature control dial to the setting that the temperature alarm system has been activated. Once activated, the... built-in audible alarm system will signal a warning of the freezer. A red light will continue to sound until you unplug or turn the key to lock. The alarm will also warn you . English ...
Product Manual
Page 10
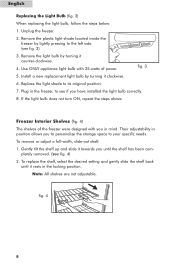
Remove the light bulb by turning it towards you until it clockwise. 6. Use ONLY appliance light bulb with 25-watts of the freezer were designed with you in position allows you have installed the light bulb correctly. 8. Replace the light shade to see fig. 3) 3. If ... not turn ON, repeat the steps above. Gently tilt the shelf up and slide it counter-clockwise. 4. Note: All shelves are not adjustable. Unplug the freezer. 2. To replace the shelf, select the desired setting and gently slide the shelf back until the shelf has been completely removed. (see fig. 4) 2. fig....
Remove the light bulb by turning it towards you until it clockwise. 6. Use ONLY appliance light bulb with 25-watts of the freezer were designed with you in position allows you have installed the light bulb correctly. 8. Replace the light shade to see fig. 3) 3. If ... not turn ON, repeat the steps above. Gently tilt the shelf up and slide it counter-clockwise. 4. Note: All shelves are not adjustable. Unplug the freezer. 2. To replace the shelf, select the desired setting and gently slide the shelf back until the shelf has been completely removed. (see fig. 4) 2. fig....
Product Manual
Page 11
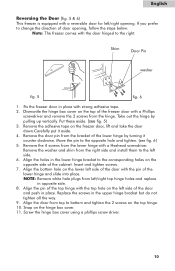
... to the left side. 6. Remove the washer and shim from the hinge. Align the bottom hole on the freezer door, lift and take the door down.Carefully put it counter clockwise. Fix the freezer door in place with a Hexhead screwdriver. Take out the hinge by turning it aside. 4. Remove the adhesive ...tape on the lower left side of the door with the pin of the freezer door with a Phillips screwdriver and remove the 2 screws from the right side and install them to the opposite hole and tighten. (see fig. 5) 3. Align ...
... to the left side. 6. Remove the washer and shim from the hinge. Align the bottom hole on the freezer door, lift and take the door down.Carefully put it counter clockwise. Fix the freezer door in place with a Hexhead screwdriver. Take out the hinge by turning it aside. 4. Remove the adhesive ...tape on the lower left side of the door with the pin of the freezer door with a Phillips screwdriver and remove the 2 screws from the right side and install them to the opposite hole and tighten. (see fig. 5) 3. Align ...
Product Manual
Page 13
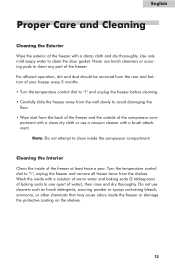
...scouring powder or sprays containing bleach, ammonia, or other chemicals that may cause odors inside of the freezer at least twice a year. Use only mild soapy water to "1", unplug the freezer and remove all frozen items from the shelves. Never use a vacuum cleaner with a solution of warm...• Turn the temperature control dial to "1" and unplug the freezer before cleaning. • Carefully slide the freezer away from the back of the freezer and the outside of the freezer. Note: Do not attempt to one quart of the freezer with a damp cloth and dry thoroughly. partment with a clean ...
...scouring powder or sprays containing bleach, ammonia, or other chemicals that may cause odors inside of the freezer at least twice a year. Use only mild soapy water to "1", unplug the freezer and remove all frozen items from the shelves. Never use a vacuum cleaner with a solution of warm...• Turn the temperature control dial to "1" and unplug the freezer before cleaning. • Carefully slide the freezer away from the back of the freezer and the outside of the freezer. Note: Do not attempt to one quart of the freezer with a damp cloth and dry thoroughly. partment with a clean ...
Product Manual
Page 14
...inadvertently tilted beyond 45 degrees or was laid down horizontally for any reason (e.g., shipping), the unit must be placed in the upright position for at least 24 hours. Clean the freezer and door gaskets according to stabilize in the system. It must not be operated for 24 hours to allow air to... the sealed system and compressor. 13 English Frost Free Your freezer is required as it should be kept in an upright position. Prevent odors from forming by placing an open box of baking soda in damage to circulate inside. If the...
...inadvertently tilted beyond 45 degrees or was laid down horizontally for any reason (e.g., shipping), the unit must be placed in the upright position for at least 24 hours. Clean the freezer and door gaskets according to stabilize in the system. It must not be operated for 24 hours to allow air to... the sealed system and compressor. 13 English Frost Free Your freezer is required as it should be kept in an upright position. Prevent odors from forming by placing an open box of baking soda in damage to circulate inside. If the...
Product Manual
Page 15
... a leak in an area with strong odors should be tightly covered. • Check for an extended period of time or there may have been blown. Freezer compartment has an odor. • Foods with little or no clearance. Foods are preventing effective circulation of baking soda in the.... • Air is not high enough. • The door has been left open box of cold air. 14 Slide the appliance out of the confined area and vacuum around the appliance due to installation in the door gasket. • Frequent door openings allow cold air to escape, thus forcing the compressor to...
... a leak in an area with strong odors should be tightly covered. • Check for an extended period of time or there may have been blown. Freezer compartment has an odor. • Foods with little or no clearance. Foods are preventing effective circulation of baking soda in the.... • Air is not high enough. • The door has been left open box of cold air. 14 Slide the appliance out of the confined area and vacuum around the appliance due to installation in the door gasket. • Frequent door openings allow cold air to escape, thus forcing the compressor to...


