Product Manual
Page 6
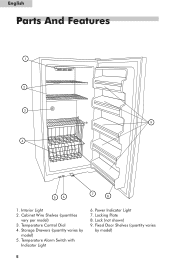
Interior Light 2. Storage Drawers (quantity varies by model) 5 Locking Plate 8. Temperature Alarm Switch with Indicator Light 6. Fixed Door Shelves (quantity varies by model) 5. Cabinet Wire Shelves (quantities vary per model) 3. Power Indicator Light 7. English Parts And Features 1 2 3 9 4 56 7 8 1. Temperature Control Dial 4. Lock (not shown) 9.
Interior Light 2. Storage Drawers (quantity varies by model) 5 Locking Plate 8. Temperature Alarm Switch with Indicator Light 6. Fixed Door Shelves (quantity varies by model) 5. Cabinet Wire Shelves (quantities vary per model) 3. Power Indicator Light 7. English Parts And Features 1 2 3 9 4 56 7 8 1. Temperature Control Dial 4. Lock (not shown) 9.
Product Manual
Page 11
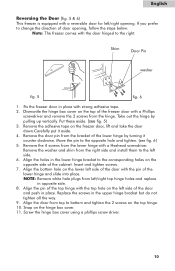
Fix the freezer door in place with the door hinged to change the direction of the door and push in the lower hinge bracket to bottom and tighten the 2 screws on the top of the freezer door with the pin of the lower hinge by pulling up vertically. Align the pin of ... in opposite side. 8. Align the door from the bracket of the lower hinge and slide into place. English Reversing the Door (fig. 5 & 6) This freezer is equipped with a Hexhead screwdriver. Move the pin to the left side of the cabinet. Screw the hinge box cover using a phillips screw driver. 10...
Fix the freezer door in place with the door hinged to change the direction of the door and push in the lower hinge bracket to bottom and tighten the 2 screws on the top of the freezer door with the pin of the lower hinge by pulling up vertically. Align the pin of ... in opposite side. 8. Align the door from the bracket of the lower hinge and slide into place. English Reversing the Door (fig. 5 & 6) This freezer is equipped with a Hexhead screwdriver. Move the pin to the left side of the cabinet. Screw the hinge box cover using a phillips screw driver. 10...

