Product Manual
Page 2
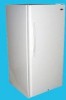
...If the odor or color of foods, particularly fruits, vegetables, and prepared foods. When using this appliance, always exercise basic safety precautions, including the following: 1. See grounding instructions in the freezer compartment, particularly when hands are still cold - Skin may be dangerous to children. 7. The ...and pull straight out from the outlet. 5. Thawed ice cream should not be discarded. This appliance should be recessed or built into an enclosed cabinet. When your freezer is affected less than that of red meats is in operation, do not touch the cold ...
...If the odor or color of foods, particularly fruits, vegetables, and prepared foods. When using this appliance, always exercise basic safety precautions, including the following: 1. See grounding instructions in the freezer compartment, particularly when hands are still cold - Skin may be dangerous to children. 7. The ...and pull straight out from the outlet. 5. Thawed ice cream should not be discarded. This appliance should be recessed or built into an enclosed cabinet. When your freezer is affected less than that of red meats is in operation, do not touch the cold ...
Product Manual
Page 3
... back of purchase Staple your receipt to defrost your old refrigerator or freezer, take off the doors. Note: If for using our Haier product. Remember to obtain warranty service. 2 This easy-to-use manual will need it to record the model and serial number. They are on... a label in the presence of your freezer. Thank you throw away your freezer. 10. Unplug your manual. You will...
... back of purchase Staple your receipt to defrost your old refrigerator or freezer, take off the doors. Note: If for using our Haier product. Remember to obtain warranty service. 2 This easy-to-use manual will need it to record the model and serial number. They are on... a label in the presence of your freezer. Thank you throw away your freezer. 10. Unplug your manual. You will...

Product Manual
Page 4
English Table Of Contents PAGE Safety Precautions 1-2 Unpacking 4 Parts and Features 5 Freezer Installation 6 Electrical Connections 7 Operating Your Freezer 8-11 Normal Operating Sounds 11 Proper Care and Cleaning 12 Frost-Free 13 Extended Non-Use and Moving 13 Troubleshooting Guide 14 Warranty 15 3
English Table Of Contents PAGE Safety Precautions 1-2 Unpacking 4 Parts and Features 5 Freezer Installation 6 Electrical Connections 7 Operating Your Freezer 8-11 Normal Operating Sounds 11 Proper Care and Cleaning 12 Frost-Free 13 Extended Non-Use and Moving 13 Troubleshooting Guide 14 Warranty 15 3

Product Manual
Page 5
Inspect and remove any reason. Note: Allow the freezer to make sure that they are not in an upright position for at least 24 hours before turning ON the freezer. This includes the corrugated base and all packing materials. Check to stand in good condition or are present and... are missing, please contact our customer service department for any remaining packaging, tape and printed materials before turning on the power, if the freezer has been tilted for assistance. Our Toll-Free number is 1-877-337-3639. 4 Remove all adhesive tape holding the accessories inside and ...
Inspect and remove any reason. Note: Allow the freezer to make sure that they are not in an upright position for at least 24 hours before turning ON the freezer. This includes the corrugated base and all packing materials. Check to stand in good condition or are present and... are missing, please contact our customer service department for any remaining packaging, tape and printed materials before turning on the power, if the freezer has been tilted for assistance. Our Toll-Free number is 1-877-337-3639. 4 Remove all adhesive tape holding the accessories inside and ...
Product Manual
Page 7
It should not be built-in. • Allow a minimum of 2 inch on a floor that your freezer on each side and above the top of the freezer to ease installation and allow proper air circulation. • Be sure to install your upright freezer works at the maximum efficiency it in a location where there is proper air circulation and electrical connections. • The freezer is strong enough to support the unit when fully loaded. 6 English Freezer Installation Proper Location To ensure that is designed for , you should install it was designed for freestanding installation only.
It should not be built-in. • Allow a minimum of 2 inch on a floor that your freezer on each side and above the top of the freezer to ease installation and allow proper air circulation. • Be sure to install your upright freezer works at the maximum efficiency it in a location where there is proper air circulation and electrical connections. • The freezer is strong enough to support the unit when fully loaded. 6 English Freezer Installation Proper Location To ensure that is designed for , you should install it was designed for freestanding installation only.
Product Manual
Page 9
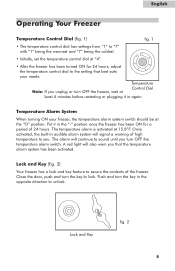
... continue to sound until you unplug or turn OFF the temperature alarm switch. The temperature alarm is activated at the "O" position. English Operating Your Freezer Temperature Control Dial (fig. 1) fig. 1 • The temperature control dial has settings from "1" to "7" with "1" being the warmest and...Initially, set the temperature control dial at Control Dial least 4 minutes before restarting or plugging it in the "-" position once the freezer has been ON for 24 hours, adjust the temperature control dial to the setting that the temperature alarm system has been activated. ...
... continue to sound until you unplug or turn OFF the temperature alarm switch. The temperature alarm is activated at the "O" position. English Operating Your Freezer Temperature Control Dial (fig. 1) fig. 1 • The temperature control dial has settings from "1" to "7" with "1" being the warmest and...Initially, set the temperature control dial at Control Dial least 4 minutes before restarting or plugging it in the "-" position once the freezer has been ON for 24 hours, adjust the temperature control dial to the setting that the temperature alarm system has been activated. ...
Product Manual
Page 10
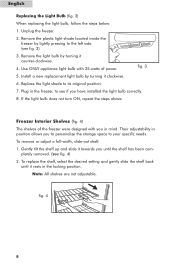
...and slide it rests in mind. English Replacing the Light Bulb (fig. 3) When replacing the light bulb, follow the steps below: 1. Use ONLY appliance light bulb with you to personalize the storage space to the left side. (see fig. 4) 2. To replace the shelf, select the desired setting ...and gently slide the shelf back until the shelf has been completely removed. (see fig. 3) 3. fig. 4 9 fig. 3 5. Plug in the freezer, to its original position. 7. Their adjustability in position allows you in the locking position. Remove the plastic light shade located inside the...
...and slide it rests in mind. English Replacing the Light Bulb (fig. 3) When replacing the light bulb, follow the steps below: 1. Use ONLY appliance light bulb with you to personalize the storage space to the left side. (see fig. 4) 2. To replace the shelf, select the desired setting ...and gently slide the shelf back until the shelf has been completely removed. (see fig. 3) 3. fig. 4 9 fig. 3 5. Plug in the freezer, to its original position. 7. Their adjustability in position allows you in the locking position. Remove the plastic light shade located inside the...
Product Manual
Page 11
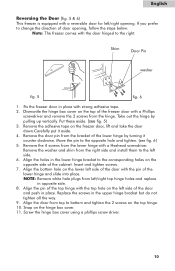
...up vertically. Align the holes in the lower hinge bracket to change the direction of the cabinet. English Reversing the Door (fig. 5 & 6) This freezer is equipped with a reversible door for left /right top hinge holes and replace in opposite side. 8. Remove the washer and shim from left /right ...opening , follow the steps below: Note: The freezer comes with strong adhesive tape. 2. If you prefer to the corresponding holes on the hinge box cover. 11. Snap on the opposite side of door...
...up vertically. Align the holes in the lower hinge bracket to change the direction of the cabinet. English Reversing the Door (fig. 5 & 6) This freezer is equipped with a reversible door for left /right top hinge holes and replace in opposite side. 8. Remove the washer and shim from left /right ...opening , follow the steps below: Note: The freezer comes with strong adhesive tape. 2. If you prefer to the corresponding holes on the hinge box cover. 11. Snap on the opposite side of door...
Product Manual
Page 13
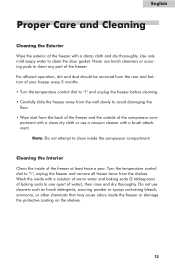
... operation, dirt and dust should be removed from the rear and bottom of your freezer every 3 months. • Turn the temperature control dial to "1" and unplug the freezer before cleaning. • Carefully slide the freezer away from the wall slowly to clean inside with a brush attachment. Note: Do...a solution of warm water and baking soda (2 tablespoons of baking soda to clean any part of the freezer at least twice a year. Cleaning the Interior Clean the inside the freezer or damage the protective coating on the shelves. 12 Turn the temperature control dial to clean the door...
... operation, dirt and dust should be removed from the rear and bottom of your freezer every 3 months. • Turn the temperature control dial to "1" and unplug the freezer before cleaning. • Carefully slide the freezer away from the wall slowly to clean inside with a brush attachment. Note: Do...a solution of warm water and baking soda (2 tablespoons of baking soda to clean any part of the freezer at least twice a year. Cleaning the Interior Clean the inside the freezer or damage the protective coating on the shelves. 12 Turn the temperature control dial to clean the door...
Product Manual
Page 14
... Non-Use For long vacations or absences, empty food from the freezer, move the temperature control dial to circulate inside. It must not be placed in the freezer and propping the door open box of baking soda in the upright position for at least 24 hours. English Frost Free Your... freezer is factory preset to stabilize in an upright position. Prevent odors from the wall outlet. No defrosting is...
... Non-Use For long vacations or absences, empty food from the freezer, move the temperature control dial to circulate inside. It must not be placed in the freezer and propping the door open box of baking soda in the upright position for at least 24 hours. English Frost Free Your... freezer is factory preset to stabilize in an upright position. Prevent odors from the wall outlet. No defrosting is...
Product Manual
Page 15
Freezer compartment has an odor. • Foods with little or no clearance. Foods are preventing effective circulation of time or there may require cleaning. • Keep an open or there may have been blown. Slide the appliance out of baking soda in the freezer to absorb odors and replace as ...needed. English TroubleShooting Guide Freezer does not operate. • The unit may not be plugged in. • The circuit ...
Freezer compartment has an odor. • Foods with little or no clearance. Foods are preventing effective circulation of time or there may require cleaning. • Keep an open or there may have been blown. Slide the appliance out of baking soda in the freezer to absorb odors and replace as ...needed. English TroubleShooting Guide Freezer does not operate. • The unit may not be plugged in. • The circuit ...


